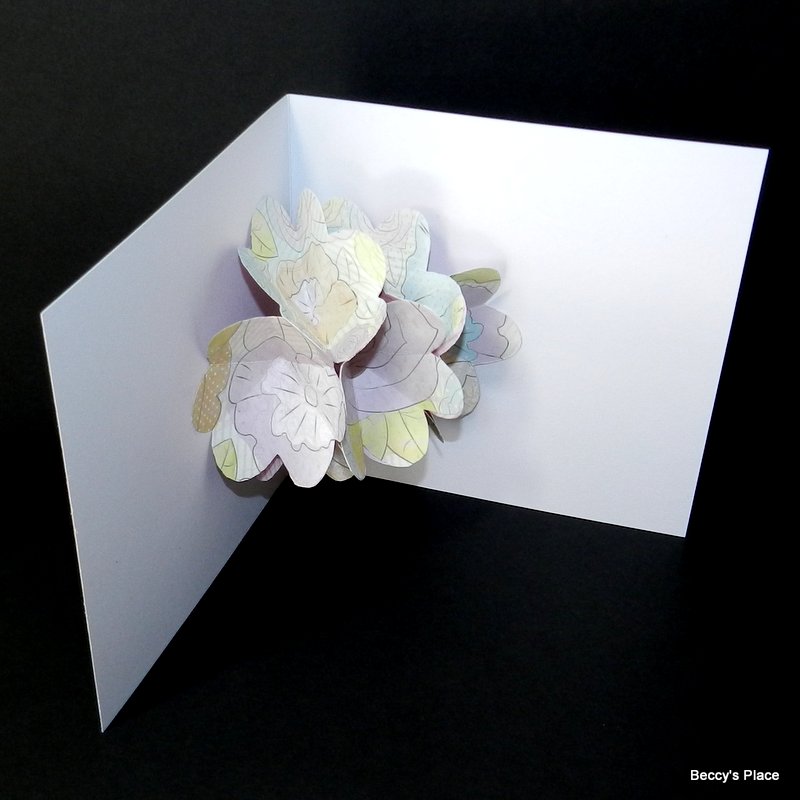
The "WOW!" factor in today's card is definitely the fabulous bouquet of flowers that spring up when the card is opened. They can be created from plain or coloured paper, embellished with fancy edges or coloured to have a darker centre. These wonderful pop-up cards would be perfect for birthdays, Mother's Day, Get Well cards or just to cheer up a friend.
1. Begin by making the bouquet centre. I used double sided patterned paper to cut seven squares measuring 3". I wouldn't advise going any smaller than this unless you're using very light weight paper as the folds can become a little bulky. Use the lightest weight paper you have in your stash as the bouquet is quite bulky when assembled.
2. Fold one of the squares in half, then fold again in quarters. As you work, make sure you press firmly on each fold so you get nice crisp lines and reduce some of the bulk.
3. Fold one side back on the diagonal, making sure the paper stays at a nice point at the bottom. Turn the paper over and fold the other side back in the same way.
4. Holding the paper by the end where all the folds meet, use a pair of sharp, sturdy scissors to round the top. You're aiming for a tear drop shape, which will form the individual petals on each flower.
6. Use the scissors again to cut along one of the score lines into the centre of the flower. Make sure your cut starts between two of the ovals and ends where the score lines intersect.
7. Cut along the score line immediately beside the first and remove one whole petal as shown in the photo below.
8. Apply some glue to one of the petals on either side of the cut. If you're using double sided paper, make sure the side you want visible is facing up.
9. Bring the petal on the other side of the cut over to the glue, line up the score lines and secure one petal over the top of the other. This will form a wide cone shape. Hold the paper in place until the glue dries, then press flat.
10. Repeat steps 2 - 9 for each of the squares of paper so that you end up with seven flowers.
11. Now, this is where things can get a little bit confusing, so please pay careful attention to the photos and written instructions. Lay your first flower flat on the desk with the point facing toward you and the three petals facing away. Apply a small amount of very strong glue along the top of the left-hand petal as shown in the photo below.
12. Take a second flower and lay the right hand petal over the glue. Hold in place for a few seconds so the glue can grip.
13. Apply glue to the right hand petal of the first flower in the same manner as before.
14. Lay the left hand petal of the third flower over the glue and hold in place. Now you have three flowers joined together with just the centre petal of the first flower showing.
15. Apply a small amount of glue to the three petals in the centre - there will be one petal from each of the three flowers.
16. Secure a fourth flower over the top of the glue lining up all three petals.
17. We're repeating the same pattern again by adding glue around the top of the left hand petal on the fourth flower and adding flower number five...
18. ...and glue around the top of the right hand petal on the fourth flower and adding flower number six.
19. The final flower is secured over the three centre petals in the same manner.
20. While the flowers dry thoroughly, you can work on your card base. I've created a square card measuring 51/4". You might need a larger or smaller card depending on how big your flowers are. They need to fit in the centre of the card with nothing protruding when the card is folded.
21. Lay the flowers in the centre of the card so that the ends are flush with the card fold.
22. Apply a small amount of glue around the top centre petal as shown in the photo below.
23. Carefully close the card taking care not to move the flowers as you do so. Hold in place for a minute so the glue has a change to work.
24. Open the card. The bouquet should be secured to the left hand side of the card.
25. Add some more glue to the centre petal of the bouquet in the same way as last time. Close the card and hold in place until the glue dries.
26. Don't be tempted to play with this card until the glue has a chance to dry completely. Because we've used so little adhesive there's a chance the bouquet will come apart if you don't allow it to dry thoroughly.
Have a go at using different types of papers for your flowers. Add some colour with pencils or makers, or maybe draw in some stamens with a black or brown pen. Just remember not to add any bulky embellishments otherwise the card won't fold flat. Enjoy!
Stamps: