Showing posts with label shaped card. Show all posts

Thursday, October 19

Shaped Card

I couldn't resist the pre-coloured image and paper from the Jingle Bells set, it looks so pretty when combined with silver cardstock that I just had to give it one more go. This time I used nesting dies to create a shaped card, which I decorated with a seam binding ribbon and some silver rhinestones.


Digital Stamps:

Saturday, May 13

Everything Papercraft - Shaped Cards


As the name suggests, shaped cards are simply cards that are cut to resemble something, such as a cake or a vase of flowers. Usually, the cards will have a section of the spine or fold in tact so that they open as normal, creating a kind of mirror effect. You can get as creative as you like with shaped cards cutting them with a small pair of scissors, cutting dies or electronic machines. You can even head to the internet to take advantage of the many free templates on offer.

Here are a couple of tutorials:

Friday, November 12

Tutorial - Shaped Image Cards


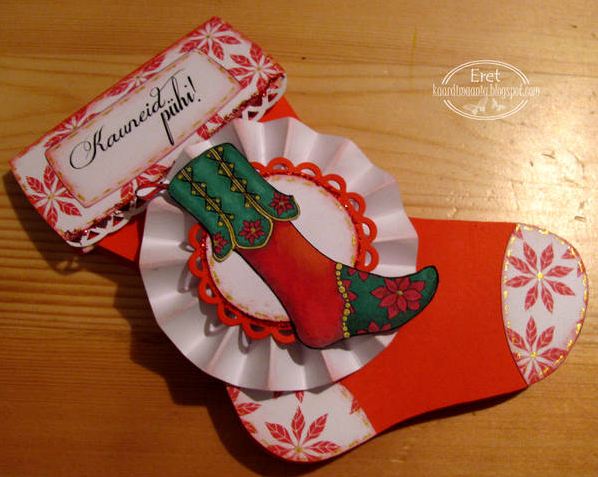
Digital stamps are particularly good for creating shaped cards since they can be enlarged, stretched and skewed, and if you're in a bit of a hurry, you can even print the coloured version to save some time. I printed one of the gingerbread men from the Sugar & Spice set at a little over 5" tall to create my Christmas card, and I've included some step-by-step photos at the bottom of the post.


Enlarge, print and colour the image.

Fussy cut right up to the printed line.

Place the image on a card blank with a portion overhanging the spine of the card. It can be top or side opening depending on the design. As you can see from the image below, it can be on an angle if you prefer.

Use a pencil to trace around the fussy cut image.

Cut the out the shape keeping the scissors just inside the traced line for a neater look. Make sure you don't cut through the spine of your card.

Glue the image to your card front and add additional decorations and mediums as desired.

Stamps:

Tuesday, July 9

Hot Tip Tuesday


Today's hot tip is all about shaped cards and how to avoid having a flat section along the fold.


I've used circle dies for today's hot tip, but you can use any shape you wish. Start by cutting your card base, which is a folded piece of card stock. When you line up the die, make sure some of the fold will remain in tact. This will give you a shaped card with a flat edge on one side, as in the photo below. Using the same die, cut a single shape of the same size.


Add the adhesive to the front of the card base, paying particular attention to the edges and along the fold.


Secure the die cut shape over the top, lining it up carefully with the card base. Now you'll have a perfectly shaped card, with no flat section, that's ready to decorate!


Tuesday, October 31

Shaped Card

Pink bling card stock and a fancy shaped die were the perfect accompaniments for a magnolia image coloured with watercolour pencils. A white, double-bow adds a nice finishing touch. 


Stamps: Magnolias

Saturday, November 7

Day 7 - Shaped Cards

Shaped cards are easy to create since the advent of die cutting.  Any large, solid shaped die will work provided you are able to leave an uncut section for the fold or spine of the card.
Click here for a tutorial on creating circle-shaped cards.
 
 
YOUR TURN:  Create a card that is any shape except a square or rectangle.
Upload your creation HERE.
 

Sunday, November 17

Day 17 - Shaped Cards

Creating shaped cards is a wonderful idea for Christmas because of all the different dies that are available on the market.  You can make sleigh shaped cards, tree cards, baubles, cards that look like puddings or gifts, holly cards, mitten cards or cards shaped like snowmen. 
 

YOUR TURN:  Create a shaped card.
Upload your creations here.

Here are a couple of tutorials to help you out.

Tuesday, December 11

Joy Card

I love to create white on white cards, it's one of my favourite styles.  I really like experimenting with dimension and interesting textures to differentiate between the various design elements.  The items I find most useful when creating one of these cards are my embossing folders, die cuts, foam tape and dimensional mediums such as texture paste and kindy glitz.


Monday, November 12

Elegant Stocking


Eret made this cute little pocket card, complete with chocolate!

Vivien made this clever card that has a detachable bookmark.

Wendy went with pretty greens and pinks for her card.

I layered the image three times to get lots of dimension.

Thursday, August 30

Heart with Blossoms

I have a lovely soft, feminine design for you again today.  I think this one would work beautifully for a birthday, wedding or anniversary card or even for Christmas cards if you coloured it with lovely traditional colours.

Vivien made this beautiful easel card following the shape of the heart.  She has left some room on the design to stamp a sentiment to customise it for the recipient.

Carla created a beautiful over the edge card by cutting out the image and adhering it over the top of the card front.  This is Carla's last card as guest designer for the month.  It's been a pleasure having you on board Carla!

Thursday, July 5

Petite Paris

I don't know what I was thinking when I started out on this little drawing adventure!  Oh my goodness it took a lot of patience to finish this one... and I don't even want to talk about the colouring!  But I am happy with the finished result and I really did enjoy making a card with it.  I was going to make a big frilly, fancy frame but once I had the image down on the base card I suddenly decided I shouldn't overcomplicate it any more than I'd already done.


Sue coloured the image with soft pinks and greys and then made this gorgeous step card.  She added some pretty blossoms and a beautiful piece of lace to finish her project.


Vivien very wisely opted to use the coloured version of the design to make her lovely card.  She teamed it with some wonderful French-themed stamps for a great look.


I printed the coloured image out three times and then layered it for a great 3D look.  I decided to keep the rest of the card clean and simple.

Thursday, June 28

Daffodils in a Teapot

The weather here has been very cold and rainy for the last few days so these daffodils are perfect for cheering things up!  This image reminds me of my dear old Nanna who passed away many years ago.  She really, really loved her pot of tea in the afternoon and would always make sure there were plenty of cakes, scones and bickies to go with it!


Vivien coloured her flowers and teapot in a lovely soft shade of pink, then cut it out with a die.  She matched it with some lovely patterened paper and a simple sentiment.


Eret used the image itself to make this absolutely stunning easel card!  The teapot is held open by the little blue and yellow roses added to the bottom part of the card.
Thanks for a wonderful month of inspiration Eret!


I cut out the image and mounted it on a circle of card.  I added some pretty patterned paper, which I shaped with a border punch, some ribbon and a few drops of Liquid Pearls.

Tuesday, June 26

Time for a Freebie!

Here's a simple little drawing that could be used for a variety of occasions.  I really like these sorts of images because you can colour them to the taste of the recipient or a particular theme.


Don't forget that our June challenge is ending in just a few days.  It's a nice simple one... just make a card using any one of the Beccy's Place images.  I will choose a guest designer for the month of July from amongst the entries and the challenge winner, chosen at random, will receive three free images from my online store.
Good luck!