Thursday, September 29


Selected, retired digital stamps at an incredibly low price for just 48 hours.
No rainchecks. No repeats.

Baby Robin
digital stamp

Tuesday, September 27

It's Cake Time!


This fabulous card was created using one of the images from the Cake Time set of digital stamps. Kathy framed the image, removing the bottom portion and giving herself some space at the top to add a speech bubble. She used coloured pencils for most of the colouring with a few additional white gel pen lines through the fur to really make the little guy pop!


Sunday, September 25

Love Cake

Yes, I must confess that I get pretty excited when there's cake on offer, especially if there's also a hot cup of coffee and a good friend to chat with. It's one of those sweet, simple pleasures in life that I appreciate more and more as the years go by.


Stamps:

Friday, September 23

Everything Papercraft - Liquid Pearlized Mediums


Liquid, pearlized mediums are versatile, waterproof pearlescent paints specifically designed for paper craft projects, although they can also be applied quite successfully to fabric. The medium is usually purchased in small squeeze bottles that have a built-in, easy flow tip that you apply directly to your project.

Many paper crafters use liquid pearlized mediums in place of self-adhesive pearls because they are better value for money, they can be applied in various sizes and in difficult to reach places. Simply squeeze out little drops of the liquid paint and allow to dry for a wonderful, shimmery card or page accent.

Wednesday, September 21

Warm Apple Cider


Beautiful papers decorate the backgrounds of both of Carla's cards and give them wonderful, warm autumn vibes. She has coloured the apple cider images from the Pumpkin and Spice digital stamp set with coloured pencil, adding shadows and highlights to help shape the images. 


Monday, September 19

Everything Nice

Many years ago, a dear friend of mine gave me a pad of patterned paper that included this adorable pumpkin pattern, which is a great match for my image. I used the paper to inspire my colour choices, including the dark brown background that I almost didn't add thinking it might be too much. Turns out it's a great contrast for the other colours and for the cream cardstock base.


Stamps:

Saturday, September 17

Let's Do Cake!


Karin has created a fabulous swing card decorated with two of the cake-loving raccoons from the new Cake Time set of digital stamps. The centre panel pivots as the card is opened and closed, giving you room for two images and sentiments. Karin has also tucked in a matching tag that can be used for a personalised message or even to hold a photo.


Thursday, September 15

Tutorial - Die Cut Edge Cards


As the name implies, Die Cut Edge cards are decorated with a stamped and die cut edge, although the technique can also be done with a pair of sharp scissors and a steady hand. These cards can be created in any size and shape you like, and the decorative edge can be at the top, bottom or side depending on the look you're going for.


1. Start with a card blank. It can be any size and any orientation. I'm using a piece of A5 sized cardstock with a top fold for one of the cards I'm creating, and an A5 with a side fold for the second card.


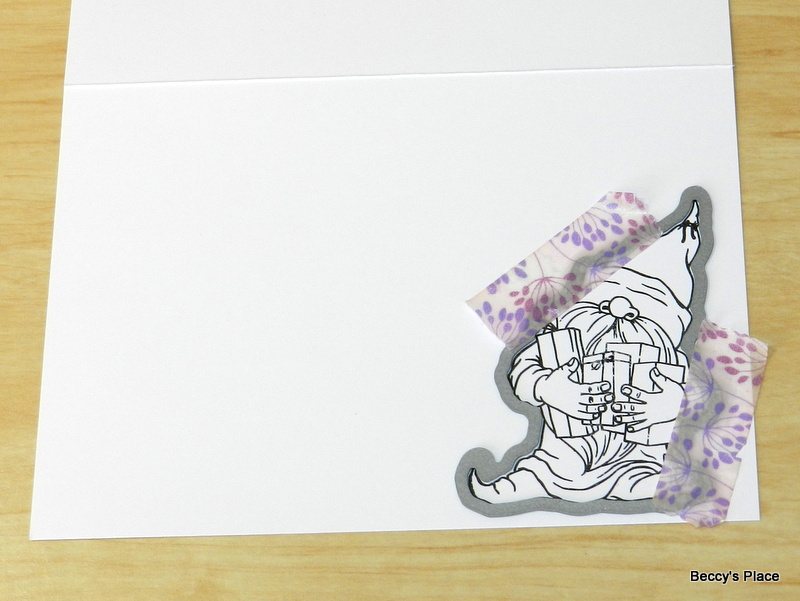
2. Stamp the image in whatever position you desire. For the card below, I'm going to cut away the bottom of the card so that the gnome's legs and feet protrude over the edge, which is why I've stamped him in the bottom corner. 


3. Position the die around the image and secure in place with some low-tack tape.


4. Place the card and cutting die on top of the cutting plate. Position the top plate so that the edge of the plate reaches the place you wish to cut to. The area under the plate will cut, but the area not covered by the top plate will not. (See the images below)


5. Use a craft knife and ruler to remove the excess cardstock from the bottom of your card, and you have completed the base of your Die Cut Edge card.


6. If you don't have a matching die for your image it's possible to use a pair of scissors to get the same result. Stamp the image in the location you desire. Measure and mark how much of the cardstock you wish to remove from around the image. In this case, I'm going to cut a curvy line to give the impression the gnome is walking up and down a hillside. I've used a pencil to mark a cutting line.


7. Cut along the line until you reach the edge of the image. Fussy cut around the image until you arrive back at the line you marked earlier, then continue cutting until you reach the fold of the card.


8. Cut along the card fold and remove the top portion. Your card base is done!


9. Stamp a sentiment and colour the image as desired. I'm also going to add a piece of patterned paper on the inside of each card to contrast with the image and highlight the shaped edge.


Products:

Tuesday, September 13

Hot Tip Tuesday


Printing Tip
My printer can be rather choosy about what cardstock it will accept when printing digital stamps. Some cardstock will go through without a problem, while others, even though they're the same weight, simply won't go through the rollers. A little work-around I use quite often is to tape my cardstock to a sheet of printer paper, a few inches down from the top edge. The printer has no trouble picking up the paper and will also allow the attached cardstock to feed through. Just remember to account for the space at the top of the sheet when laying out your image.

Sunday, September 11

Spiced Cider


Kathy has created a wonderful card celebrating all the flavours and colours of autumn. She coloured the apple cider image from the new Pumpkin and Spice set of digital stamps and layered it over a fabulous printed recipe, which has a magnet affixed to the back so it can be removed from the card and used as holiday décor!


Kathy has kindly included a link to the printable recipe over on her blog.

Friday, September 9

Relax...


Carla has coloured these adorable cards with Polychromo pencils, leaving lots of texture to give the impression of fur. For her first creation, she layered one of the raccoons from the new Cake Time set onto a piece of blue striped paper that has a definite water vibe. She placed a ring around the image, tucking the tail in behind and lifting the feet so it looks as though his little legs are in the air! Too cute!


Carla's second card has been created in a clean and simple style. She added a fine line, black border around the image panel and a scattering of ink drops next to her stamped sentiment.


Wednesday, September 7

Apple Cider

Apple, cinnamon, cloves and anise... definitely a delight for the senses!
I've coloured the image with alcohol markers, mostly using earth tones and yellows to match my patterned papers and the autumn feel of the design. I'm thinking this card would work for just about any of the end of year holidays - Thanksgiving, Halloween or even Christmas.


Stamps:

Monday, September 5

Birthday Drinks!


The images from the Pumpkin and Spice digital set are perfect for friends and family who celebrate their birthdays during autumn, and Karin has created two fabulous cards for just that purpose. She teamed the images with a mix of patterned paper in coordinating colours and patterns for a fun and festive result.


Sunday, September 4

Limited Time

Our clear stamps and cutting dies will be available for wholesale purchase from the beginning of 2023,
which means you might start seeing them in your favourite scrapbook stores in the New Year!
In the meantime, you can still purchase them in the Beccy's Place online store until the end of October.

FREE SHIPPING to all Australia and New Zealand addresses.
FLAT RATE to all other destinations.

Saturday, September 3

Oh No!

Don't you hate that sudden feeling that you've forgotten something, but not being able to remember quite what it was? It happens to me more than I'd like, and I'm quite sure my facial expression is very similar to the one this little raccoon is making!


Stamps: