Showing posts with label Hot Tip Tuesday. Show all posts

Monday, May 20

Quick Tip!

I don't know how it happens, but I regularly end up with a drawer full of odd-sized envelopes that don't seem to fit any standard card bases in my collection. To make use of them, I cut custom card bases from A4 or 12"x12" cardstock that fit the odd envelopes. Just make sure you store them together in your card box!


Digital Stamps:

Tuesday, February 13

Hot Tip Tuesday


Use the back of the stamp (the side that normally clings to the acrylic block) to stamp a foundation shape on your cardstock, then stamp over the top with the detail. This works best with stamps that are mostly symmetrical, as once you turn the stamp over, it will be the mirror image.

Tuesday, January 9

Hot Tip Tuesday


When printing digital elements, resize them to match the tools you have in your collection. Punches and dies are handy and quick for cutting basic shapes, so make sure they match for quick and easy cutting!

Tuesday, December 12

Hot Tip Tuesday


An easy way to accurately place letter stickers is to line them up first on a clear, centring ruler, leaving half of the sticker protruding from the top (step 1). Place the ruler on your surface and use a tool to press the tops down, adhering them in place (step 2 & 3). Gently remove the ruler and press down on the bottom half of the sticker to secure (step 4).

Tuesday, October 10

Hot Tip Tuesday


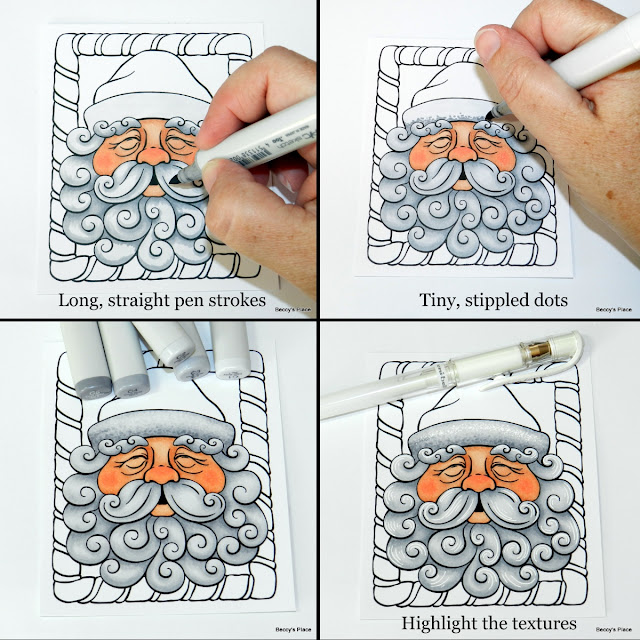
The way you apply your mediums is just as important as the colours you choose. Different applications will result in different textures that give the viewer an idea of what an object is made from and how it would feel. In the images below, the same colour pens have been used to create a fluffy fur hat AND a long silky beard. The difference is in the way the colour is applied.

Tuesday, September 12

Hot Tip Tuesday


Black and white or grey and white papers are always a good investment. It's easy to colour them with markers, inks, paints and sprays so that they perfectly match your images and embellishments. If you're feeling particularly creative, you could even try colouring them with multiple colours!

Tuesday, August 8

Hot Tip Tuesday


Choosing colours for images doesn't have to be a difficult process. Start by selecting the cardstock and patterned paper you wish to use, then match your markers, pencils or inks. Generally, you'll achieve a better result by limiting the palette to two or three, plus black & white. But... if it's a riot of colour you're after, then go for it!

Tuesday, July 11

Hot Tip Tuesday


Where possible, fussy cut or die cut your paper elements before applying dimensional mediums, heat embossing or gel pens to help prevent cracking and peeling.

Tuesday, June 13

Hot Tip Tuesday


Clogged Tips?
Pushing a pin into the tip of your glue applicator will actually force the clog into the bottle, leaving the potential for more blockages later. To remove the clog completely, unscrew the cap and use a pin from the inside to push the clog completely out of the bottle.

Tuesday, May 9

Hot Tip Tuesday


Buying a new tote or trolley?
Ensure it can hold a 13" item (or larger). Most rulers, trimmers, storage boxes, mats, etc. are often longer than 12" to accommodate for hinges and borders. The extra space is also useful for toting your scrapbooks, journals, big projects and folders.

Tuesday, April 11

Hot Tip Tuesday


Basic punches are ideal for pre-cutting shapes from scraps of patterned paper that would otherwise be thrown away. Little squares are great for creating patchwork backgrounds; circles can be made into interesting and pretty cards; and hearts, stars and other shapes are always handy for layouts, journal pages and cards.

Backgrounds made with small squares

Tuesday, March 14

Hot Tip Tuesday


Stationery stores are a great place to find interesting embellishments for your cards, layouts and papercraft projects. They have fancy coloured tapes and aisles of pens and markers, little envelopes for holding ephemera as well as clips, tags and pins of every kind. You can add colour to staples or split pins with alcohol markers and permanent inks, or jazz up some paperclips with a piece of washi tape cut to look like a little flag. 

Tuesday, February 14

Hot Tip Tuesday


Love a bit of washi tape? Then consider creating your own!
DIY washi tape can be made very simply with strips of double sided tape and some tissue paper. You can decorate the tissue with inks, paints, markers and stamps or purchase pre-decorated tissue paper or even serviettes.

Tissue Paper + DS tape = DIY washi tape

Tuesday, January 10

Hot Tip Tuesday


Today's quick tip is to use a lens cloth to clean fingerprints from gloss paper, metallics or mirror board. Don't be tempted to add any liquid, just polish the prints with the dry cloth until they disappear.

Tuesday, December 13

Hot Tip Tuesday


There are countless cutting dies on the market featuring beautiful flourishes, tiny flowers and all manner of gorgeous lace-work that elevate our cards to the next level. The problem with intricate die cuts, aside from choosing amongst all the beautiful designs, is securing them to our projects.
Today's tip is to get your adhesive on your cardstock before you start cutting. Apply strips of double-sided tape or jac paper to the back of your cardstock, leaving the second backing strip in place while you run it through your machine. The dies should have no trouble cutting through the extra layer of adhesive. Once your shape is cut, simply remove the backing strip and secure the die cuts to your project. 

Tuesday, October 11

Hot Tip Tuesday


Precision Gluing
When gluing shaped objects, such as flowers, only add adhesive to the areas that touch the surface of the project so that it retains its shape. Adding glue to the entire object and then pushing it onto the project will result in the item flatting out and losing all it's texture and dimension.

Tuesday, September 13

Hot Tip Tuesday


Printing Tip
My printer can be rather choosy about what cardstock it will accept when printing digital stamps. Some cardstock will go through without a problem, while others, even though they're the same weight, simply won't go through the rollers. A little work-around I use quite often is to tape my cardstock to a sheet of printer paper, a few inches down from the top edge. The printer has no trouble picking up the paper and will also allow the attached cardstock to feed through. Just remember to account for the space at the top of the sheet when laying out your image.

Tuesday, August 9

Hot Tip Tuesday


Upcycling and recycling are popular in the papercraft world. Not many of us can resist re-using the beautiful ribbons from chocolate boxes, re-purposing the acetate from packaging or harvesting the chipboard backing from notebooks. Another great source for upcycled elements are the fabulous gift bags that are available in most stores. They come in a huge range of colours and finishes including metallics, embossed, glossy and glittered. Open the bag by unfolding the bottom section and you have enough paper for backgrounds, paper strips or die cuts.

Tuesday, July 12

Hot Tip Tuesday


Got Sticky Bits???
As papercrafters, we inevitably end up with sticky patches on cardstock from excess glue, tape, mediums or even mystery sources! For some adhesives you can simply pick or roll the dry adhesive off with your fingers, taking care not to tear the paper. You can also purchase adhesive erasers and solvents that will take off the sticky residue, and some people even pat Scotch tape over the affected area in an attempt to lift some of the tackiness. Another simple solution is to rub over the sticky area with an embossing buddy, dust it lightly with some cornflour or even sprinkle some ultra-fine embossing powder over the top and then brush the excess away. The idea is that the fine powder will stick to the adhesive removing the tacky feel.

Tuesday, June 14

Hot Tip Tuesday


Spritzing
Many papercraft techniques use water and water-based mediums to create fabulous effects on paper and card. Unfortunately, once the mediums have dried, we're often left with warped or curled paper that can be difficult to use on a project. One tip, is to lightly spritz the back of the paper first. This will give a more even amount of moisture and a better chance for the paper to dry flat.