Monday, July 31

Quackers!

Easel cards are one of my favourite folds as they're so easy to make and always look fabulous when open for display. I decorated this one with one of the little ducks from the Hello Ducky set, which I coloured using the no-line technique.


Stamps:

Saturday, July 29

Bright and Cheerful


Carla has created two different cards using one of the little mice from the Little Surprises set of digital stamps, and decorated with die cut flowers and leaves. The bright green with pops of red and yellow make for festive cards that are sure to bring a smile to someone's face.


Thursday, July 27


Selected, retired digital stamps at an incredibly low price for just 48 hours.
No rainchecks. No repeats.

True Beauty
digital stamps

Wednesday, July 26

Koala Days


"Koala Days" clear stamps are available through our wonderful Retailers


Our cute and cuddly koalas are back with messages of love and support.
Perfect for birthdays, Valentine's Day, or just to let someone know you're thinking of them.


Koala Days
clear stamps

Tuesday, July 25

A Little Joy

Colours that sit opposite each other on the colour wheel, such as red and green, always look striking when placed together. I've kept the rest of my card simple by using plain white cardstock as a contrast.


Stamps:


Sunday, July 23

Tutorial - Arrow Fold Tent Cards


Arrow Fold Tent Cards are a fabulous combination of slimline and arrow fold. They only require a couple of pieces of cardstock for the base, and then some patterned paper and a few embellishments to decorate.


1. Start with two 5" square pieces of cardstock. (The starting size of the cardstock is the size of your finished card, therefore, if you want a 6" card, start with two pieces of 6" square cardstock. If you'd like a 4" card, start with two pieces of 4" square cardstock, and so on.)


2. Place one piece of cardstock on your scoreboard and score at 21/2". Fold along the score line to form a slimline card. Set aside.


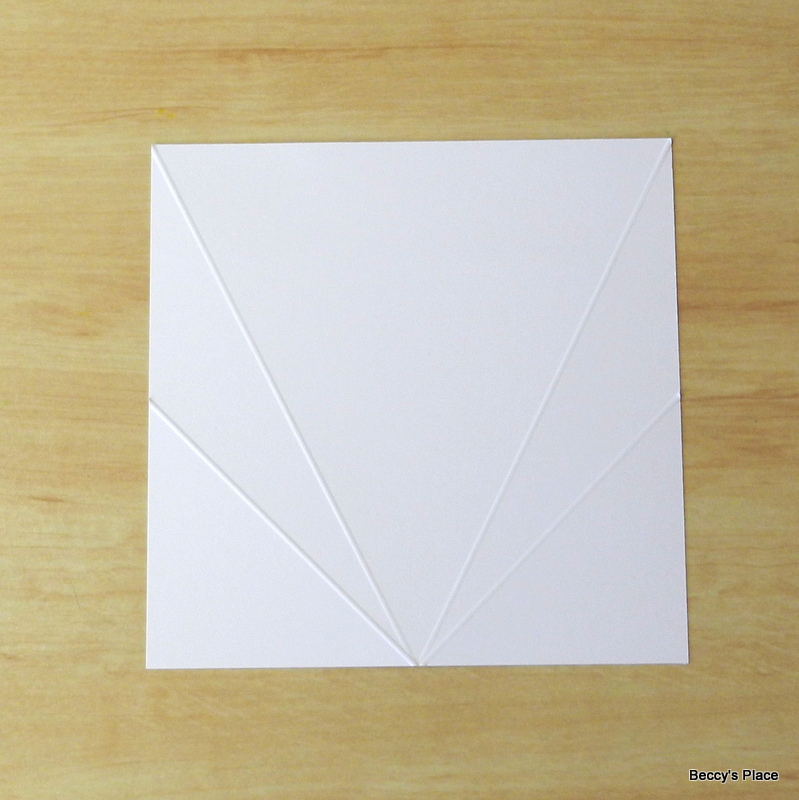
3. Take the second piece of cardstock and mark the half way point (21/2") along three sides.


4. Position the card so the unmarked edge is farthest from you. Score from each of the top corners to the centre bottom of the cardstock. Score from each of the sides to the centre bottom of the cardstock. Refer to the template below for correct placement.


5. Fold along the score lines - one valley and one mountain fold on each side. Set aside.


6. To decorate, trim a piece of patterned paper to 43/4" x 43/4". Mark the half way point along three sides in the same way you did in step 3. Instead of scoring, cut the paper along the same lines using a trimmer, scissors or a craft knife.


7. Trim another piece of patterned paper to 23/8" x 47/8" to decorate the front of the slimline card. Secure the patterned paper to the cardstock with glue or double sided tape. You'll have two long triangles left over, which you can discard or use for another project.


8. Flip the large square of cardstock over and apply glue to the long, thin triangle section in the middle of one side (see photo below). Fold along the score line to secure the cardstock in place.


9. Add glue or tape to the other side of the large, thin triangle and fold along the second score line. This will secure the smaller triangle in place. Repeat for the other side to form your arrow fold.


10. Secure the arrow fold to the front of the slimline card, lining up the point with the bottom edge and keeping it centred. See photo below.


11. Add a sentiment, image and embellishments to complete your card.


Stamps:

Saturday, July 22

Blue Wrens


"Blue Wrens" cutting dies are available from our fabulous Retailers


The Blue Wrens cutting dies can be used in conjunction with the clear stamps, or alone for beautiful embellishments to decorate your papercraft projects.


Blue Wrens
cutting dies

Friday, July 21

Hello Ducky!


The contrasting colours on Deanne's Hello Ducky card are bright and eye catching... perfect for a birthday, a celebration or to cheer up a friend. She has added a layer of glitter to the little duck's bow tie and some glossy accents to his beak, feet, and eyes for that extra "Wow!" factor.


Wednesday, July 19

New Arrival

Sometimes all you need is a pretty piece of paper, a cute image and a happy sentiment.


Stamps:

Monday, July 17

Just For You


Check out the fabulous slimline card Karin created using images from the Little Surprises set of digital stamps. She coloured two of the little mice with pencils, layered them onto red cardstock and positioned them inside this fabulous die cut frame, along with a couple of sentiments, patterned paper and embellishments. Fun!


Sunday, July 16

Basic Sentiments


"Basic Sentiments" clear stamps and cutting dies
are available through our Retailers.


Our first ever sentiment-only set, with words and phrases to cover most occasions. Use them alone or combine them with your favourite images for fabulous cards, layouts and journal pages.


Basic Sentiments
clear stamps and cutting dies

Saturday, July 15

Everything Papercraft - Aperture Cards


The word “aperture” means an opening, hole, or gap, so an aperture card is any card that has an opening, hole or gap as one of it’s features. Paper crafters use a range of tools to create apertures, such as cutting dies, punches, and circle cutters, and this means that we’re able to produce an endless array of fabulous designs. Apertures can be decorated to resemble windows, doors, or even peep holes into secret gardens, and they’re a great way to give a little sneak peek into the card or to help bring design elements together.