Thursday, February 28

Warm Wishes

This is the very last card for our two-month long digital extravaganza! Thank you to everyone who purchased stamps during our sale period, I'm looking forward to seeing lots of new cards and papercraft projects over the coming months. We'll have some brand new designs in store from tomorrow... can you believe it's already March?!... and of course, a new monthly challenge will kick off.


Wednesday, February 27

Last Day

Just over 24 hours left before our digital offer expires.


Tuesday, February 26

Still Getting Festive

Although it looks like I'm getting an early start on Christmas, I'm actually just showcasing the last of our digital files for this month. Emu Parade was a hugely popular clear stamp that is now available in digital format.


Stamps:

Saturday, February 23

Lovely Lilies

"Lovely Lilies" is one of the clear stamp sets that we've recently released in digital format.
They're great for wedding cards, thank you's, anniversaries and sympathy cards.


https://beccysplace.com/lovely-lilies-digital-stamps/


Thursday, February 21

SALE Ends Soon!


Our digital extravaganza comes to an end
at midnight on the 28th of February 2019 (AEST)
Grab those bonus digi sets while you still can!

Tuesday, February 19

Three Little Cards

Using the same patterned paper stack, in this case a collection from Doodlebug Design, will result in a set of coordinating cards, tags or other creations. Although the colours and patterns aren't the same, they all work beautifully together to create a set that can be given as a gift or sold in a pack. 


Sunday, February 17

Choosing Colours

Choosing the colours for your project is sometimes the most difficult part of designing the card. Generally, I begin by deciding on what papers or embellishments I'd like to add to the finished project, which then informs my choice of colours. In this case I've used a fabulously bright paper pad from Doodlebug Design called "Fun In The Sun". It makes me think of vacations and tropical beaches... perfect for caravan holidays!


I have colour charts for my pencils and markers, which makes it much easier to choose colours. Many companies, including Copic and Prismacolor have free, downloadable colour charts that you can use for reference. Simply Google "copic chart" or "prismacolor chart" or whatever medium you own and you should see lots of free printable charts.

Stamps:

Friday, February 15

Everything Papercraft - Glitter


Glitter describes an assortment of very small (roughly 1 mm²) pieces of paper, glass or plastic painted in metallic, neon and iridescent colors to reflect light in a sparkling spectrum. It’s usually sold and stored in canisters somewhat similar to salt shakers, which have openings that control the flow of the glitter. In craft terms, it can be applied to projects with strong glue, jak paper or a variety of sticky tapes.

Glitter was invented by Henry Ruschmann on his Hereford cattle farm in Bernardsville, New Jersey. Accounts conflict as to when glitter was invented - some say 1934 and others claim it was shortly after World War II. Today the company he founded, Meadowbrook Inventions, is still producing and supplying glitter. (source: Wikipedia)

Happily, we are now able to purchase environmentally friendly glitter products made from eucalyptus tree extract mixed with aluminium, or even a cellulose version. Both decompose in soil and don’t add to the ever increasing problem of plastics in our oceans and landfills.

A side note for those crafters involved in making cards for military personnel – cards containing glitter are often rejected. Contact your local coordinator for all the details.


Thursday, February 14

Tutorial - Matchbook Card


These cute little matchbook cards are a wonderful way to present someone with a gift card or some birthday money. You could expand the centre pocket with a gusset to add a larger gift, such as a fancy chocolate or perhaps a beautiful herbal teabag.


1. To create the gift card pocket on the inside of the card, you'll need a piece of card stock measuring 51/2" x 21/2".


2. Lay the card stock horizontally on your scoreboard and score at 1" and 31/2". Fold along each score line.


3. Apply a line of glue or double sided tape to one side of the card stock and secure the ends together to form an open-ended pocket. (If you prefer, the pocket can be made from a heavy weight piece of patterned paper).


4. I used a circle punch to add a little arc to the top of my pocket. Although not really necessary, it's a nice finishing touch and helps to identify it as a pocket. Set aside.


5. Take a second piece of card stock measuring 81/2" x 4". This will form the outside of the card. (Please note: I added extra width to the card so I could punch a decorative edge along each side. If you prefer to have plain sides, cut your card stock to 81/2" x 3" and skip step 7.)


6. Lay the card stock horizontally on your score board and score at 3/4", 43/4" and 5". Fold along the score lines.


7. If desired, use a border punch to add a decorative elements to both long sides of the card stock.


8. To decorate, I used some coordinating patterned paper squares cut to fit each space, including the front cover and the inside pocket.


9. Apply a line of glue or a small piece of tape at the very bottom of the pocket. The adhesive should be no wider than 1/4" or you may have difficulty opening and closing your matchbook card. Place the pocket inside the card, flush with the first score line. Bring the bottom flap up and secure over the adhesive.


10. Decide on the type of fastening you'd like to use. Traditionally, matchbooks are simply stapled closed at the bottom, but you could apply brads, which is what I've done, or even some stitching. To apply the brads, I punched two evenly spaced holes all the way through the bottom of the matchbook card, then pushed the brads through and secured them on the back of the card.


11. Decorate the card as desired. I applied a stamped sentiment and image to the front of the card and another sentiment on the inside.


12. To close the card, tuck the top flap under the bottom flap just like the old matchbooks used to do, and voila... you're done!


Products:

Tuesday, February 12

Geared Up

After creating cards with two of the truck images from "The Long Haul" set, I felt it was only fair to make something with the third image as well. Happily, I found these Tim Holtz metal "gears" that I've had in my stash for a very long time... I think they're a perfect match for the sentiment!


Sunday, February 10

Loads of Love

This little truck is my favourite image from The Long Haul set. I love that I can fill the back with whatever I like... in this case, tiny paper hearts that match my background paper.


Thursday, February 7

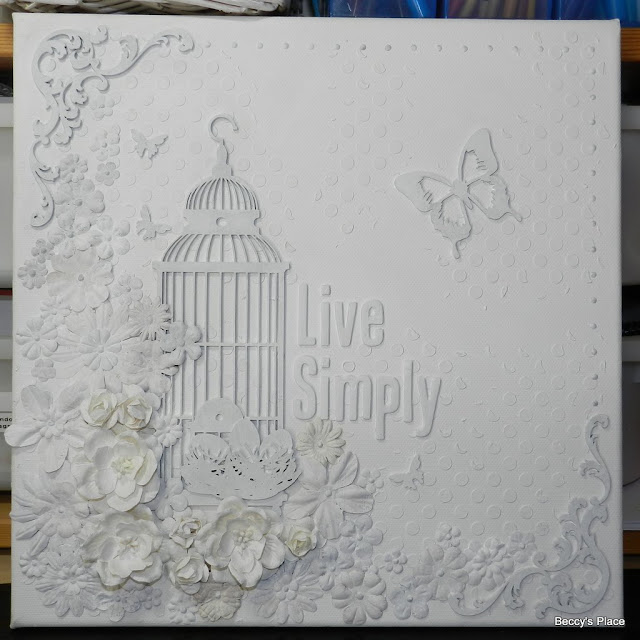
Live Simply

Every now and again I enjoy spending a few days creating mixed media projects. Things can get quite messy with bottles of glue, paints, brushes and ephemera scattered all over the desk, chairs and every other surface in the room!

Here are some step-by-step photos I took of my most recent project, which is a decorated canvas. My favourite part of the process is just after everything is glued down and the first layer of gesso is applied. That's when it's all about the texture and design rather than the distraction of colour... but I also enjoy slopping all the paints and mediums around too!