Monday, January 29

Digital Release: With All My Heart

This year, we'll be gradually releasing our line of clear stamps as digital sets. They'll be available in store alongside the other new releases for the month. For January, we're starting with a beautiful floral set called "With All My Heart". It's perfect for birthday cards, Mother's Day, friendship, weddings, anniversaries and Valentine's Day greetings.

With All My Heart
digital stamp set


With All My Heart
clear stamp set


Saturday, January 27

Big Hugs

I coloured this little guy with pencils and layered him over lovely soft background papers. A simple button and length of twine finished my card nicely.


Stamps: Bear Hugs

Friday, January 26

Snuggly Hugs

Is there anything better than a big squooshy hug? I imagine pandas would give some pretty impressive hugs if they were so inclined. All that fur would sure make them soft and cuddly!


Stamps: Bear Hugs

Wednesday, January 24

New Release: Bear Hugs

Evelyn, a lovely lady from my stamping club, gave me the idea for the hugging bears in this set. She showed me a very old clipping from a newsletter she'd saved, which featured a sweet, cuddly bear snuggling up to a little child. I happened to see a few funny Panda gifs around the same time, and voila, a new digital set was born!

Bear Hugs
digital stamp set

And here's some goodness from my clever designers...


Monday, January 22

Slugs & Snails

I'm planning to continue adding images to my catalogue as new stamps are released. Having everything coloured and in one place saves a lot of time and makes designing so much easier... no more rooting through baskets and folders to find the image you want!


Sunday, January 21

Slugs & Kisses

Not sure that you'd want too many kisses from someone who drools as much as this!
Perhaps a hearty hand-shake would be more acceptable.


Saturday, January 20

Squishy Hugs

I'm well on my way to building up a tidy stash of cards!


Friday, January 19

One Slug One Snail

I'm really enjoying these funny little characters and the coordinating sentiments.
Here's another couple of cards I created using two of the designs.


Thursday, January 18

Cascade Card

I used all five of the characters from the new Slugs & Snails set to decorate my cascade card. For some reason it makes me think of my childhood when I had to line up with my class mates for school photos. We were sorted from tallest to shortest and then arranged on tiers with the teacher in the middle. I'm not sure this is a school I'd like to attend though... too much slime!


Wednesday, January 17

New Release: Slugs & Snails

This month's new clear stamp set is called "Slugs & Snails" and features a friendly gang of slimy, slippery, goggle-eyed beasties that are ideal for fun cards and projects. This set debuted at the Craft Alive Fair in November and was one of the top sellers at the show!


Here's some inspiration to get those creative juices flowing...

Monday, January 15

New Year Preparations

At the start of each new year I like to gather all my scissors, cutting mats and tools together and give them a good clean. It makes everything looks and feel nice and fresh and gets rid of any built up goo, ink stains and dirty marks. The other job I do, which I'm not quite as keen for, is to cut and fold a whole bunch of plain paper inserts for my cards. I'm always glad when that's over!

Are there any jobs that you like to tackle at the beginning of each year to prepare yourself or your craft area for twelve months of creativity?


Sunday, January 14

Tutorial - Decoder Cards


When I was a kid, cereal boxes would sometimes come with a hidden message or secret code on the back. All you need do was fish around amongst the cornflakes to find the "magic" glasses that would reveal all! Today I want to show you a technique that's basically the same idea... and just as much fun!


1. We'll start by creating the decoder window. You'll need a scrap of card stock that's about 21/2" x 5", a little bigger if you want a really large decoder window. Fold the card stock in half.


2. Use a punch or die to cut circles through both layers of card stock. Make sure you have at least a 1/2" border around the cut.


3. Using a larger circle punch or die (mine is 13/4"), line up the smaller hole so that it's in the very centre of the punch. HINT: Flip the punch over so that you can see where you're cutting.


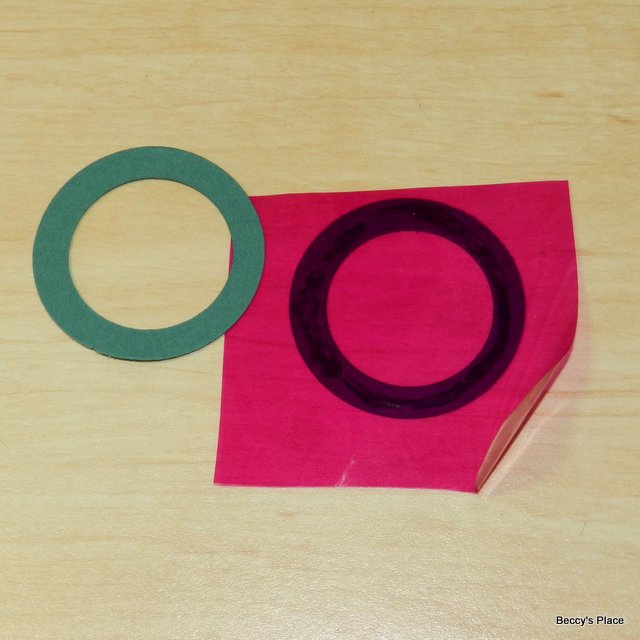
4. Punch the card stock so that you now have two rings.


5. Use some glue or strong tape to sandwich a small piece of red or dark pink cellophane between the two rings. Trim the excess cellophane. 


6. I added an eyelet to the edge of my decoder window and to the top right hand corner of my card blank. I plan to attach the decoder window with a piece of twine.


7. You can decorate the card blank however you like, remembering to plan for a "secret message" somewhere in your design. I started by stamping the main image in the bottom left hand corner so I can add three hidden messages around him.


8. Use the smallest circle punch or die to create a template. You want your secret messages to be the same size or smaller than this window.


9. Using the template, draw a circle or circles in the position you want your secret message to be.


10. Stamp or write the secret message in light blue or green ink - the colour is important as it will show up once the decoder window is placed over the top. I used Tumbled Glass distress ink.


11. I want a garden theme for the front of my card, so I'm going to draw in some petals and leaves to create large, quirky flowers. You can use stamps, stickers or just leave them plain.


12. Using a red pen or red ink and a stamp, add a pattern over the top of each secret message making sure to completely cover them. It doesn't matter what sort of pattern you add, even doodling or scribbling will work.


13. Now finish your card with colours, stamps, embellishments, etc. The secret message will appear once the decoder window is held over the top. The red cellophane cancels out the red stamping or doodling to reveal the blue ink!


14. Finish by attaching the decoder window to your card with a piece of twine or ribbon, but make sure it's long enough to reach the farthest message. 


Aren't these fabulous?! I know a couple of little boys who are just going to love receiving birthday cards with hidden messages. In fact, I know a few "big" boys and girls who would enjoy this too!

Stamps: