Showing posts with label sheep. Show all posts

Tuesday, March 10

Adding Detail

Do you background?
I often see beautiful cards that feature a wonderful stamped and coloured background that coordinates perfectly with the focal image. Oftentimes, it's achieved with masking or fussy cutting to add extra elements. I tend not to add much of a background to my cards, even though I love how it looks (pure laziness, I think), but today I decided to flex my creative muscles a little further than normal.


Products:

Monday, August 28

Wild About You

I have this fabulous wood grain embossing folder that looks awesome when used with kraft cardstock and a swipe of brown ink. It's the perfect foreground for a happy collection of farm animals!


Digital Stamps:

Friday, August 4

Tutorial - Printing Cards


Today I'd like to show you how I create single-layer cards using digital stamps and Microsoft Word.


1. Start by opening a blank page in MSWord (or your preferred software equivalent)


2. Click on the "Layout" tab at the top, then select the first option, "Margins". Change the top, bottom, left, and right margins to 0cm and click OK. If a warning pops up to tell you the margins are too small, simply select "ignore".


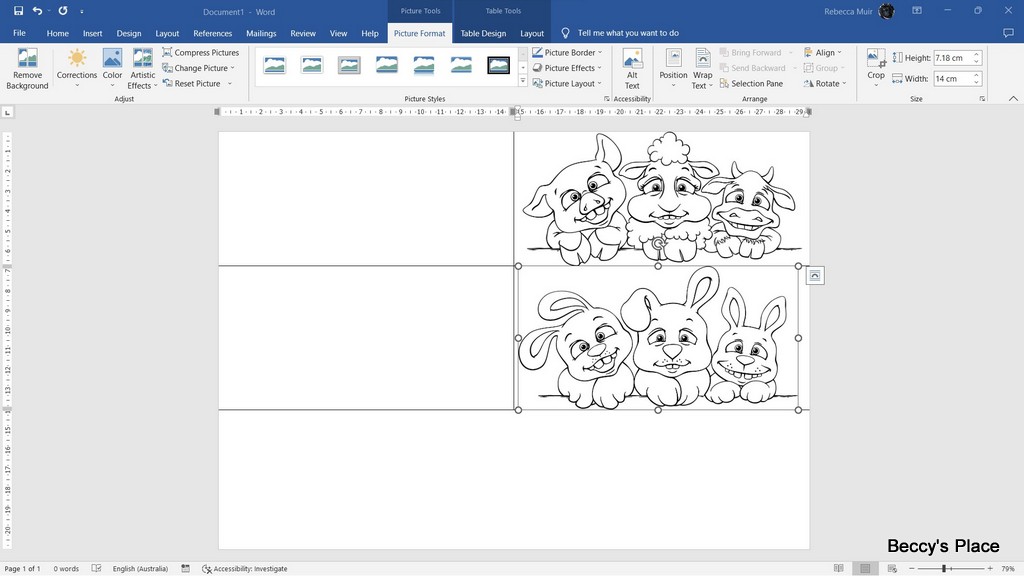
3. Click on the "Insert" tab, then select "Table". You want a table with two rows and two columns. Click OK.


4. Click in the top, right hand box so that your cursor appears. Select the "Insert" tab at the top of the page to access your picture files. Find and click on the image you want to use, it should appear in the table. Select the "Home" tab while the image is selected, then click centre to place the image in the middle of the box.


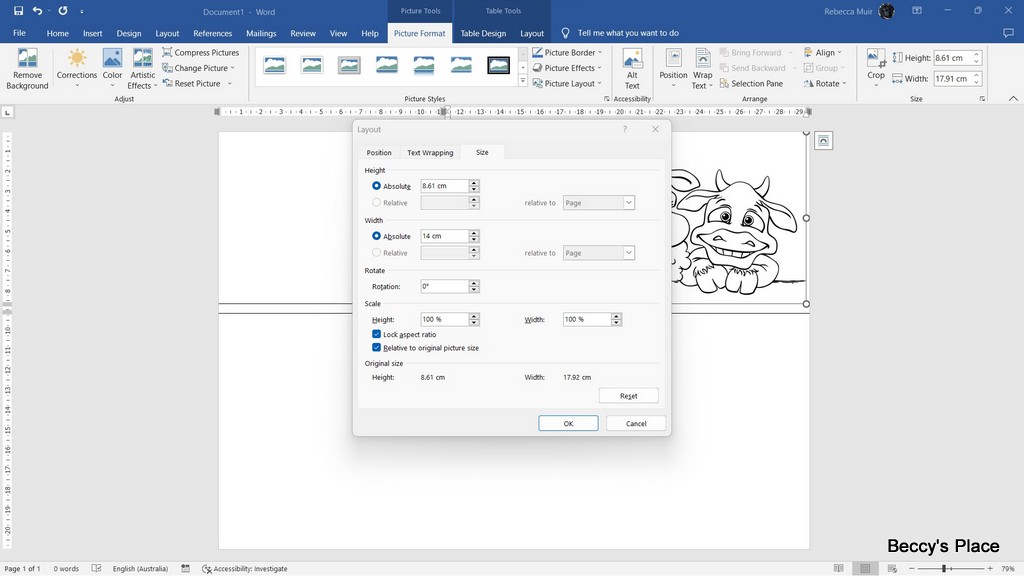
5. Resize the image by right clicking on it and selecting "Size and Position" from the drop-down menu. Change the width to 14cm.


6. Repeat the process with another image in the bottom, right hand box. This will give you two cards on the same sheet of A4 paper.


7. Click on the top image again, then hit the right arrow key so that the cursor is to the right hand side of the image. Press the "Enter" key so that the cursor is now below the image. 


8. Select the "Insert" tab again and then choose a sentiment from your files. Resize it in the same way you resized the image, or drag the corner boxes in or out if you prefer. My sentiment is 1.5cm high. Repeat for the lower image.


9. Click on the top image again, then hit the left arrow key to bring the cursor to the left hand side of the image. Press the "Enter" key to add some space at the top of the image. Repeat for the bottom image. Ideally, you want the same amount of space at the top of both images and at the bottom of both sentiments.


10. Right click in the top, left hand box, then select "Table Properties" from the drop down menu. At the bottom of the box, click on "Borders and Shading". Select "None" in the first column and then hit OK, and OK a second time. You should notice that the lines of your table are now dashes or dots rather than solid.


11. Time to print! As you can see, the lines don't show up in the print dialogue and they won't print on your paper either. Make sure you change your settings to suit the weight of paper you're using and the quality of the print.


12. Once printed, cut the A4 sheet in half horizontally, then fold each piece to create your cards. To create the specific card at the beginning of this post, I coloured, then fussy cut around the top of the image and adhered a piece of patterned paper to the inside.

Tuesday, August 1

Sunday, November 21

Day 21 - "S"

Sheep aren't exactly the first animals you think of when the holidays roll around, but this cheerful lady definitely looks the part in the little Santa hat I added!


YOUR TURN: Create a card or papercraft project using the letter "S" as your prompt.
Click the link below to upload it to the challenge:
CLICK HERE

INSPIRATION WORDS:
Santa, stockings, star, snowman, shepherd, sheep, s-fold card, shutter card, shaped card, step card, star fold, scallops, stitching, sponging, stamping, stencils, scarlet, sepia, silver, sparkle, sequin, snow, snowflake

Stamps:

Sunday, August 22

Tutorial - Triangle Corner Pop Up Card


This cute pop up card is made from a single square of card stock with the addition of a little easel card in the centre. Although it's not really suitable to send through the post, it would be great to attach to a little gift, a box of home baked goodies or just to hand to a special friend or family member.


TEMPLATE:

1. Place an 8" square of card stock on your score board and score at 4".


2. Rotate the card stock 90 degrees and score at 4", stopping at the first score line you made. Refer to the above template for correct placement.


3. Score diagonally from the top of the second score line you made to the start of the first score line you made. Turn the card stock and score diagonally from the top of the second score line to the end of the first score line. Again, refer to the template above for correct placement.


4. Use a craft knife or trimmer to cut from the end of the second score line, straight down to the bottom of the card stock. Fold along all the score lines. Your card should look like the photos below.


5. The card is formed by folding one of the bottom sections of the card stock over the other.


6. To make the small easel card for the centre, place a 6" x 3" piece of card stock horizontally on your score board and score at 3". Fold.


7. Now place a circle die slightly over the folded edge of the small card and cut to create a circle shaped card. Cut an additional piece of card stock the same size and shape to create the front of the easel. (It doesn't matter what shape you choose as long as the entire easel card fits completely within the card base.)


8. Fold the front of the easel card in half so that the fold line is parallel to the centre fold of the card.


9. Time to decorate! You'll need images or embellishments for the two sides of the card base and the front of the easel card as well as a sentiment or embellishment to act as an anchor inside the easel card. To decorate the panels, you'll need one 33/4" square of patterned paper, two 31/2" squares of patterned paper cut in half diagonally to form four triangles, one 37/8" square of black card stock, and two 33/4" squares of black card stock cut in half diagonally to form four triangles.


10. Adhere all the patterned paper to the black card stock with glue or double-sided tape.


11. Complete the easel card by attaching the image to the front and the sentiment to the inside with foam tape. Adhere the patterned papers to the different sections of the card base.


12. To help the card stay open, attach two tiny magnets to the bottom corners of the two bottom sections. I punched two small circles from a flat, business card-type magnet and secured them with glue.


13. Start by gluing the magnet on the left hand panel, as shown below. Add the second magnet on top of the first making sure they are lined up so they attract rather than repel. Add a spot of glue to the second magnet and bring the right hand section of the card over the top. Hold in place for a few seconds until the glue dries.


You should have a magnet on the top part of the left hand section and the bottom part of the right hand section, as shown below.


14. Use glue or double-sided tape to secure the easel card in the centre of the card base so that it faces forward. No part of the easel card should extend beyond the sides of the card base.


15. Finish by adding additional images, sentiments and embellishments. You may like to close the card with a belly band or a simple piece of ribbon or twine.


Products: