Showing posts with label paper tole. Show all posts

Thursday, April 24

Layering Images


I have another quick idea to share with you today, using three of the big cement truck images from The Long Haul cut sheets. By layering parts of the image together, similar to paper tole, you can get a wonderful 3D-look that pops right off your card!


1. You'll need three or more of the same image.


2. Use a pair of small scissors to cut out the details. Keep one full image as the base to build on, then cut out layers until you're left with the section of the image that is at the forefront. For me, that is the cab of the concrete mixer.


3. In traditional paper tole, the layers are secured together with silicone glue, but I've used small pieces of thin chipboard to build up my design. Lay the chipboard (or foam tape) on the back of the second image piece then secure over the truck base. Give it a moment to dry, then repeat for the top layer, which in my case is the cab.


For even more dimension, you can use two or three additional images to create more intricate layers. For example, you could add the wheels as a separate layer.

Products:

Sunday, August 7

Layering Images


Fussy cutting and layering parts of an image to create a 3D effect is a great way to add extra dimension to your cards. You can use as many layers as you like to build up the image, sandwiching them with foam tape or silicone glue to lift each section. Paper tole artists create amazing works of art using this process, completing the project with a shiny layer of varnish to protect the surface and intensify the colours.


I'm keeping things super simple by using just two pre-coloured images. One will form the base and the other will be selectively cut to create the dimension.


I'm going to start by adding some background colour to my base image using alcohol markers (B02, B01, B00, B000 and B0000). The first layer, which is the darker of the blues, will be concentrated toward the bottom of the image and under the flowers and leaves. As you can see from the image below, I'm colouring in horizontal sections that taper to rough points at either end to simulate little wavelets.


Bring in the next shade of blue and work over the first layer. You don't want to actually blend the colours together, just soften the edges slightly, and continue to work in horizontal sections.


Work through all the blues until you are at the lightest colour. Fill in any remaining space with the lightest shade of blue.


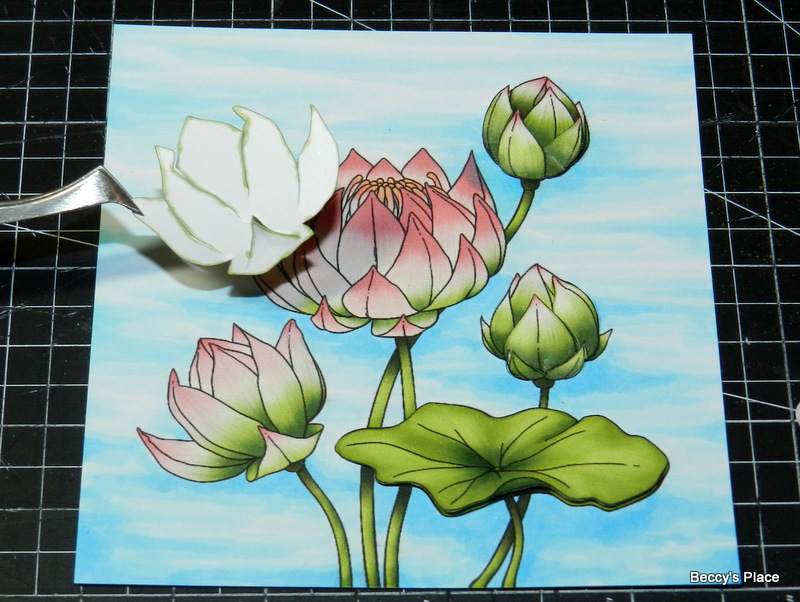
Now it's time to harvest sections of the second image. You want to choose petals that are at the front of the flower rather than the back.


I have a friend who creates beautiful paper tole images and one of the tips she shared with me is to colour the very edges of the pieces you fussy cut. This hides the stark white of the paper and helps each piece blend with the base image. Make sure you work from the back of the piece so the ink doesn't run into the image.


Use a ball tool on a piece of foam to give a little extra shape to the piece you're placing. Add some glue or foam tape and secure the piece onto the base image.


I cut out the large lily pad and secured it to the base with a combination of foam tape, at the bottom of the image, and glue, at the back of the image. This means that the bottom of the leaf stands up off the background while the back of the image is flush, adding to the illusion of depth.


Rather than trying to cut each individual petal on the large flowers, I cut the entire shape and slit down the sides of the petals. Some foam tape in the bowl of each petal will give the dimension I'm looking for.


Stamps:

Wednesday, December 8

Layer Upon Layer

Some images are just made for layering, like the new bouquet of candy canes from the Candy Canes set. I printed the image several times, fussy cut the elements and then built up the image for a three dimensional look.


Stamps:

Wednesday, August 19

Paper Tole (part two)

A couple of days ago I started a paper tole project, which I originally intended to use on the front of a greeting card, but after all the work and the fabulous results (if I do say so myself), I decided it needed to be displayed in a different way. I oscillated between creating a framed picture and using it on the front of a notebook or album. In the end, it was the frame that won.


I sandwiched a piece of acetate between the top of the frame and the side layers to keep the image clean and protected. You can buy sheets of acetate from your local craft or scrapbook store, or you can recycle it from packaging, which is what I generally do.

Stamps:

Monday, August 17

Paper Tole

A clever friend of mine taught me a few tricks for making beautiful paper tole pictures, so I thought I'd give it a go using the double birdhouse from the Precious Memories set. I started by printing three of the full colour images with the intention of building them up to form a three dimensional scene.


I cut the base layer with a scalloped circle die. As you can see from the photo, the die doesn't quite fit the image, cropping out some of the leaves and the top of one of the birdhouses. I chose the small die so that some of the image will extend beyond the border of the base layer.


It was at this point that I realised I would need a couple more images to get a really detailed result. Thankfully I remembered the size and settings at which I printed the image and was able to produce two extras. (Hooray for digital stamps!)


For the second layer I trimmed away all the openings in the bird houses, then fussy cut the entire image, right up against the printed lines.


One of the tricks of the trade that I learned from my friend is to use a marker to reduce the amount of white paper that shows from your cuts. I used a light green shade to colour the edges of all the cuts. Make sure you work from the back though, as it's fairly common for the marker to slip and leave a trail of ink!


I adhered the second image directly over the first with a layer of silicone. You can buy specific silicone based glue for paper tole projects, but I was able to purchase a tube from my local hardware store that does the same thing at a better price.


I harvested a variety of different pieces from each of the other printed images. I ended up with a lot more than what you see in the photo below. Each of the pieces (except the birdhouses) were shaped with ball tools for a little more realism.


I'd originally intended to use the finished piece on the front of a card, but after all the work it took I felt I should do something more... which I haven't quite figured out yet. Hopefully inspiration will come to me in the next day or two!


Stamps: