Showing posts with label Hello Sunshine. Show all posts

Wednesday, January 20

Hello Sunshine

Sunflowers seem so happy with their golden petals, wide open flowers and long stems that reach up to the sky. It's hard not to feel cheerful when you see some. I often think of the quote about turning your face to the sun so the shadows fall behind you... a lovely thought that can be interpreted in so many ways. 


Stamps:

Sunday, January 17

A Touch of Sunshine


Karin is bringing a little touch of sunshine from her studio to our computers today with two pretty cards she made with the Hello Sunshine set of digital stamps. She's used lovely bright yellows, reds and oranges to colour the blooms and then teamed them with vibrant green and burnt orange card stock for fabulous seasonal creations. 


Thursday, January 14

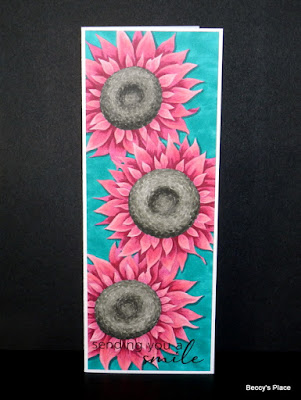
Sending You A Smile

I love big, happy, yellow sunflowers, but every now and then you just want to change things up a bit, if only to see what will happen. I really enjoyed working with this colour palette, it's not one I choose very often but it sure is eye-catching!


Stamps:

Tuesday, January 12

Hot Tip Tuesday


Today's hot tip -
GO BIG!

One of the benefits of digital stamps is that you can control the size at which they are printed. Have a go at printing the images at a much larger size than you normally would, and don't worry about trying to fit the whole thing on your project either...


I started by setting up a 1x1 table in MSWord that was the same size as my card blank - in this case 3" x 81/4". I inserted the three flowers and manoeuvred them into place so that they were overlapping each other as well as the sides of the table. Once they're coloured I'll simply trim away the lines of the table and layer my coloured image onto a card blank.

Stamps:

Sunday, January 10

Tutorial - Asymmetric Box Card


If you love funky, mind-bending, pop-up cards then today's tutorial is right up your alley! The asymmetric box card has a central section that pops up in a most perplexing way when the card is opened. Once you've figured out how it works you'll want to create lots of different variations just to test how far you can take it... the last photo in this post is the result of a happy afternoon spent cutting, folding and measuring!


CUTTING TEMPLATE: 


SCORING TEMPLATE:

1. Since there are so many cut lines, score lines and measurements, I created two templates to make it a little easier to follow. Place a 6" x 8" piece of card stock horizontally on your desk and use a pencil and ruler to mark in the cut lines - refer to the cutting template for placement and lengths. Use a craft knife and ruler or a trimmer to cut along all six lines.


2. Now place the card stock on horizontally on your score board and score in all the lines indicated in the scoring template. In most cases, the score lines begin and finish at the ends of cuts.


3. Folding each score line is the tricky part as you don't want to add any folds where none were scored. Take your time and carefully manipulate the card stock to fold along the lines indicated. Refer to the photo below for the direction of each fold.

TOP VIEW:

4. Decorate the inside of the card with patterned paper or stamps. Due to the difficulty of cutting the paper to fit the shape of the card, either piece together the background with small rectangles of paper, which is what I did, or create a template with a piece of printer paper.


5. Add an image and sentiment to the right hand pop-up section. I left the remainder of the right side clear so I'd have a place to write a personal message, but you can decorate with patterned paper or stamps if you prefer.


6. Create a card base for your pop-up section by scoring a 6" x 81/16" piece of card stock in half. The extra 1/16" is to allow a little more room in the spine of the card to accommodate the pop-up section. Place the card stock horizontally on your score board and score at 4", then move it slightly to the right and score again so you end up with two score lines side by side (see the photos below).


7. Decorate the front of the card base as desired. I stamped and coloured one of the large sunflowers from the Hello Sunshine set and layered a sentiment over the top.


8. Flip the pop-up section of your card and add glue to the outside sections only (see below). Position it on the inside of your card blank, taking care to line up the right, left, top and bottom edges. Use clips to hold the card stock in place as it dries.


Once I figured out the basics of this card I spent some time playing around with different designs. It was fascinating to see how many variations I could create using the basic principles of the pop-up section!


Stamps:

Thursday, January 7

Sending Smiles


We're headed to Judy's studio today to see two beautiful cards she created with the Hello Sunshine set of digital stamps. Judy used one of the single flowers to create a fabulous slimline card, which is the perfect shape for the long design of the image. Her second card features several of the individual images grouped together to create a beautiful floral cluster.


Click on the link below to visit Judy's blog, and while you're there, head over to her Etsy page to pick up some of her beautiful cards, invitations and handmade projects!

Sunday, January 3

Tutorial - 4 in 1


Today I want to show you a handy technique for creating four hand-coloured cards from one large image. Perfect for card sets, invitations or just to build up your ready-made stash so you always have something on hand for a special occasion. 


You'll need a large image printed in the centre of a sheet of A4 paper. I used digital stamps, which can easily be enlarged, flipped and layered for techniques such as this one. I found it easiest to open the images in MSWord where they could be moved and stacked and then printed in a very light shade of grey. Although the layout looks a little odd, I had the end result in mind when I layered the flower, leaves and sentiments in the grouping you can see above.


I coloured the images and background with a combination of alcohol markers and coloured pencils. If you prefer, you could start with a pre-coloured image to save time.


The next step was to cut the A4 sheet into four pieces, taking care to centre the image so that each piece had an even share of the flower.


After trimming some of the excess card stock, I mounted each piece onto a card base and added a couple of borders to create four, fabulous, hand-coloured cards!


Although you might feel a little daunted by such a large image, it's actually a lot easier to colour a bigger picture because there are no tiny spaces in which to negotiate your brush markers and the details don't get lost when you add multiple layers of colour. If you're still feeling unsure, perhaps you could try the technique with a pre-coloured digi first. And remember, you can add as many elements to the centre of the card as you like, it doesn't have to be a single flower with a few leaves. Have fun!

Stamps:

Friday, January 1

New Releases


Great News! This year we're going back to monthly releases, which means new designs at the beginning of each and every month. We're kicking things off with a couple of fun sets called Hello Sunshine, filled with happy sunflowers, and Must Be Love, for all those with a soft spot for Valentine's day.

Hello Sunshine
digital stamp set


Must Be Love
digital stamp set