Showing posts with label embossing. Show all posts

Saturday, March 22

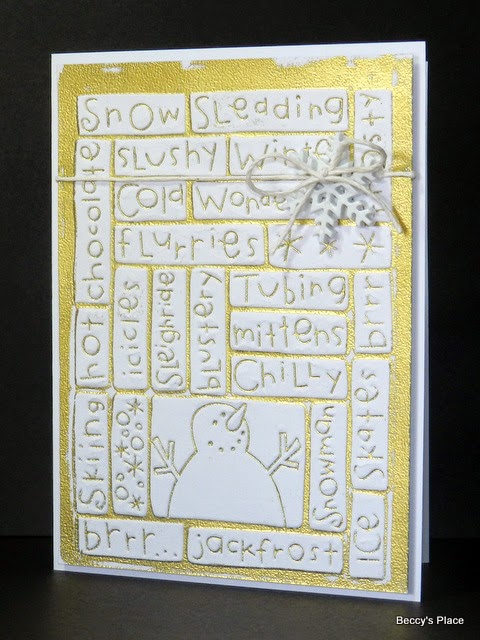
Double Embossing

Double embossing is a great way to get extra oomph from your embossing folders. Not only do you get the impression from the folder, but you can also add a great texture and colour with your embossing powders. There are two ways to do this technique, the first is to swipe a versa mark ink pad over the embossing folder before running the cardstock through your machine, then sprinkling it with powder and heat setting. Or, you can dry emboss the cardstock first, swipe the ink pad over the raised sections of your cardstock, then sprinkle it with powder and heat set. Try both methods to see the difference!


Products:

Monday, November 6

Day 6 - "E"

I've been embossing! I used the same folder for both cards, but added some heat embossing to the purple one to really lift the design. Both have large poinsettia die cut embellishments and a simple strip of cardstock stamped with a sentiment.


YOUR TURN: Create a card or paper craft project using the letter "E" as your prompt.
Click the link below to add your creation to the challenge:

INSPIRATION WORDS:
elves, eggnog, evergreens, easel cards, exploding cards, embossing, ecru, ebony, embellishments, encaustic, envelopes

Stamps:

Monday, February 6

Faith Over Fear

I've used one of the images from the La Femme set to create this wrap around card. The base has been double embossed with both embossing powder and an embossing folder for a fabulous, shiny finish. Last month I made a similar card using the Popping In set of digital stamps. Here's a little TUTORIAL for those who are interested.


Stamps:

Tuesday, March 8

Hot Tip Tuesday


There's no need to stock up on coloured embossing powders if you already own lots of coloured stamp pads. Simply load up your stamp with coloured ink, add a layer of Versamark (if the ink is quick drying), stamp on your prepared surface and apply clear embossing powder. Heat set the image for a fabulous coloured result!

Friday, November 19

Day 19 - "Q"

I have this fabulous embossing folder in my collection that adds a wonderful quilted texture to my card stock. To really emphasise the design, I added some clear versamark ink to one side of the folder, embossed on a piece of kraft card stock, and then heat set white embossing powder over the pattern.


YOUR TURN: Create a card or papercraft project using the letter "Q" as your prompt.
Click on the link below to add a photo of your creation to the challenge:

INSPIRATION WORDS:
quilt, quilted paper, quote, quilling, quill, quiet, quarter fold card, quatro fold, quartz

Stamps:

Tuesday, December 15

Everything Papercraft - Embossing


In papercraft terms, there are two main types of embossing – dry embossing and heat embossing. Although two very distinct techniques, they both produce a raised pattern on paper, cardstock and other materials.

Dry Embossing
Dry embossing is the shaping of materials such as paper and cardstock using pressure to press a pattern into a surface. There are a number of techniques and tools for this process, which has enjoyed quite a resurgence in recent years.
Stencil embossing is done by tracing a stencil with a ball tool or stylus. Stencils are generally made from metal or sturdy plastic and are secured to a bench top, table or light box to prevent them moving during the embossing process. The material to be embossed is laid over the stencil and then rubbed with the stylus to press the material through the stencil creating a raised pattern.
Pressure embossing is now the prime technique used in papercraft to dry emboss. There are many different machines on the market, including the Cuttlebug, EZ Cut, and Sizzix that use applied pressure to push paper into shape using an embossing folder or plate.

Heat Embossing
Heat embossing is a completely different technique that is similar only in the fact that you achieve a raised pattern on the object being embossed. To heat emboss you require an embossing medium, such as a Versamark ink pad; an applicator, such as a stamp; embossing powder and a heat source. The embossing medium has a longer open time than most inks, meaning it stays wet for a long period. This gives the crafter an opportunity to apply embossing powder, which is a fast melting powder that melts into the shape of the stamped image once heat is applied. The resulting image is shiny and slightly raised from the surface of the paper.

Example of dry embossed background (left) and a heat embossed image (right).

Wednesday, April 15

Everything Papercraft - UTEE


UTEE (Ultra Thick Embossing Enamel) is a specially formulated, large particle embossing powder for paper, fibre and decorative arts. It is used in much the same way as regular embossing powder, but because of its larger particles it produces a much heavier textured embossing.

To use UTEE, stamp the image that you wish to emboss with clear versa mark, apply UTEE over the image, shake off the excess then melt the UTEE with a heat gun. If you want even more texture, sprinkle additional powder onto the hot UTEE and hit it again with the heat gun. You can continue building it up in this manner until you're happy.

UTEE can also be poured into moulds and heated to create three-dimensional embellishments. Try adding a little versamark ink to solid objects like buttons and brads and then dip them into the UTEE and heat for an embossed surface.

Sunday, January 12

White Embossing


You don't always need to spend lots of time colouring stamped images to get a great looking card.  There are many different techniques we can use with our stamps that don't involve lots of tricky blending, colour selection, shading and highlighting and today I want to share one of my favourites with you. This technique uses heat embossing and a white pencil for a lovely soft look that resembles vellum. For that extra wow factor, I've used a base of shimmery green card that glimmers when the light hits it at certain angles.


I began by heat embossing onto the green card stock with white embossing powder. Don't forget to use an anti-static bag on your card stock before you begin. This will help prevent stray embossing powder from clinging in places you don't want it to be.


Next, I used a white pencil to highlight the different areas of the image. To get the look I wanted, I applied more pressure in the higher areas, such as the tips of the petals, and then gently and consistently released the pressure until the pencil faded away to nothing. You can see the transition on the petal below.


For extra interest, I heat embossed some of the individual flowers and a sentiment from the set onto a piece of vellum-like plastic that I have in my stash. You could do the same with a sheet of vellum, but just take care not to bring the heat gun too close or hold it in one spot for too long.


I used the coordinating dies to cut around the sentiment and individual flowers.


I wanted to add a little more depth to the design so I decided to adhere the additional flowers with foam tape. As the plastic is transparent, I took care to add little pieces of foam tape behind areas that had a lot of embossing, mostly the centres of each flower. The embossing camouflages the foam tape so it's not too noticeable from the front. 


The sentiment was adhered with both foam tape, in the very centre, and glue on either end to give it a kind of banner look. As the sentiment is heavy on embossing, there was no problem disguising the piece of foam tape.

Stamps and Dies
    

Monday, September 30

Bright and Cheery

I've been doing some more emboss resist, but this time with a bolder colour palette!


Stamps:

Tuesday, September 24

Emboss Resist

Emboss resist is a fun technique for those days when you want to play with colour without too much effort. It involves heat embossing an image onto card stock, usually white, and then sponging coloured ink over the top. The areas that are embossed will resist taking up the colour revealing the stamped image.


Stamps:

Sunday, August 11

Black or White

Today I'm using one of the stamps from the Welcome Home set to do a comparison between black and white embossing. I've stamped and heat set both images then coloured them with watercolour paints. It's amazing what a difference the colour of the line work makes to the finished piece.


I personally prefer the black embossing powder, I think it works better with the subject matter and gives an earthy, solid feel.


Stamps:

Tuesday, January 22

Bronze Geums

I'm always looking for something new to try, so when my eye spied a packet of bronze metallic card stock I knew it was time to play! I heat embossed the image with white embossing powder then added some dimension with a white pencil. The image is really vibrant and contrasts beautifully with the metallic background.


Tuesday, November 15

Day 15 - Opposites

There are lots of different ways you can use opposites to make a pair of cards - embossing and debossing, positive and negative die cuts, curved lines and straight lines, opposite colour schemes, etc. etc. I decided to make two cards using all the same items, but in a different order. I was surprised by how much of a difference a simple change can make to the look of a card... which one do you prefer?


YOUR TURN: Create two cards that are opposites in some way.
Upload a photo of your creation HERE.

Stamps: Kaisercraft

Monday, November 2

Day 2 - Embossing

Embossing is one of those techniques that gives you lots of bang for your buck.  It's relatively easy to do and adds great texture and dimension to your work.  Embossing can be done either by the heat technique, which involves heating and melting embossing powder onto cardstock, or by the dry technique, where patterns and shapes are pressed into the card.  You can combine the two techniques, as I did today, by adding Versamark ink directly onto the embossing folder with a brayer, embossing the cardstock to transfer the ink and then adding some embossing powder and heating it with a heat gun.
 
 
YOUR TURN: Create a card that features either heat or dry embossing... or both!
Upload your creation HERE.