Showing posts with label heat embossing. Show all posts

Friday, September 4

Delicate Freesias

After stamping and heat embossing the image, I added a bit of colour with a white pencil to give the flowers a soft, delicate look. I love how they almost have the appearance of vellum. The freesias would look even more striking on a really dark background... perhaps that will be my next project!


Products:

Friday, August 29

White and Gold

I like to use lots of texture and dimension on white cards to help distinguish between the layers and elements of the design. A little touch of gold doesn't hurt either, and helps to elevate the card even more.


Sunday, July 6

Remember When...

When I first started paper-crafting, embossing on plain cardstock was just gaining popularity (yes, it was that long ago!) In those days, I didn't have a heat gun and would anxiously wave my cardstock back and forth over the toaster. Needless to say, there was a lot of scorching and a great deal of unpleasant odours coming from the kitchen! Thankfully, times have changed and we have lots of great tools and products to help us get the results we want without the smell of burned paper.


Products:

Friday, April 18

Tutorial - Embossed Silhouettes


Back in January, I shared a tutorial about heat embossing on the coloured, cut sheet images. That same technique can be applied to the silhouette images from the Blue Wrens cut sheets, giving you beautiful results that would look wonderful on wedding or anniversary cards.


1. Secure the die cut silhouette image to your stamping platform with a small piece of double sided tape or repositionable glue. Don't add too much or you will have trouble lifting the image from the platform.


2. Carefully position your stamp over the silhouette image, lining up the edges as best you can. It helps to have a very clean stamp so you can see through to the image underneath.


3. Use an embossing buddy on your image before stamping with versa mark ink. Apply your embossing powder as normal, then set with a heat gun.


Combine the image with matching mirror card and crisp white cardstock for beautiful results.


Products:


Saturday, March 22

Double Embossing

Double embossing is a great way to get extra oomph from your embossing folders. Not only do you get the impression from the folder, but you can also add a great texture and colour with your embossing powders. There are two ways to do this technique, the first is to swipe a versa mark ink pad over the embossing folder before running the cardstock through your machine, then sprinkling it with powder and heat setting. Or, you can dry emboss the cardstock first, swipe the ink pad over the raised sections of your cardstock, then sprinkle it with powder and heat set. Try both methods to see the difference!


Products:

Saturday, January 18

Cut Sheets, Stamps and Dies III


The final technique I want to show you in this series brings together all the different products to add outlines to your images. You can use plain inks, coloured inks or embossing powder, which is what I'm doing today. The stamping technique is basically the same regardless of what ink you're using.


I started by die-cutting the images from the cut sheet, then used a tiny piece of double sided tape to secure each image to my stamping platform. Make sure the piece of tape isn't too big or you'll have a difficult time removing the image when you're ready. (If you prefer, you can place a whole sheet onto your platform and use the magnets to hold it in place.)


Line up the stamp and the image, then press the platform closed to pick up the stamp.


Don't forget to use your embossing buddy on the image, you don't want any stray embossing powder!


Ink up the stamp with versamark, close the platform and apply pressure directly over the stamp. 


Lift the stamped image from the platform taking care not to put your fingers on the surface. (I slid a skewer under the edge of the image so that I could get a hold of the sides with my fingers.)


Apply your embossing powder and heat set as normal.


A comparison...


This time I created three different cards using the images. I particularly like this colour scheme for masculine birthday cards, but it also works a treat at Christmastime!


Here's a comparison of one of the images from the Reindeer Games cut sheet sets, stamped with black ink instead of gold embossing powder. As you can see, it's an easy way to add the stamped lines back into the image.


Products:

Sunday, February 4

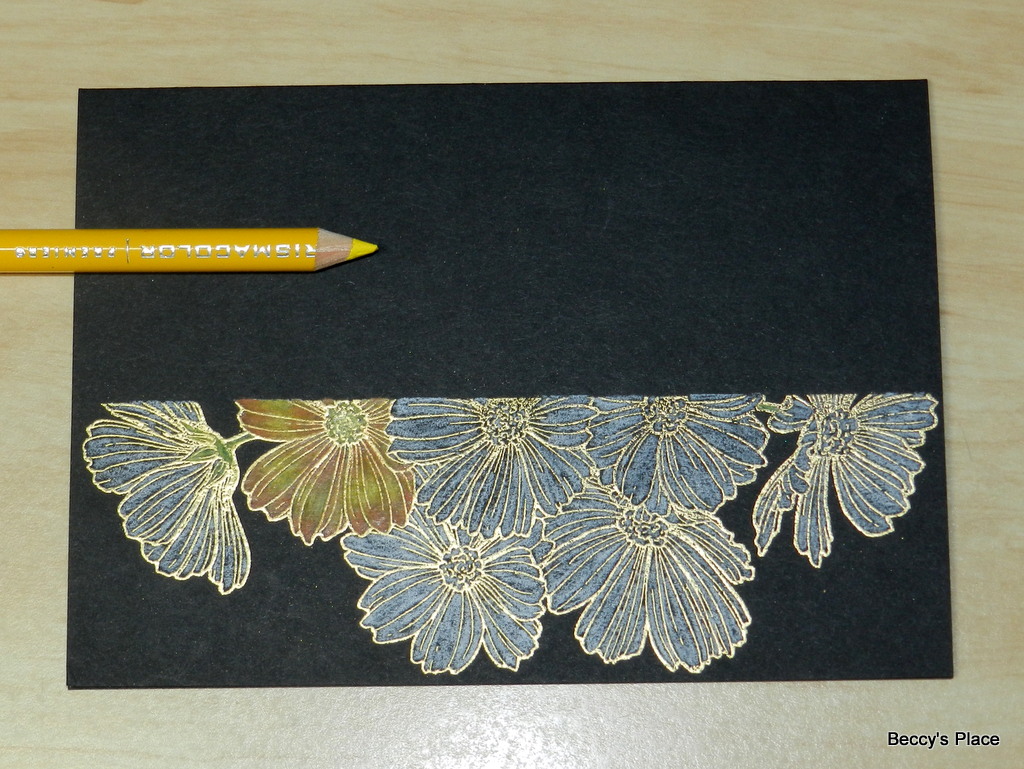
Tutorial - Cosmos Edge Card


Today I want to show you a fun way to use the large stamp from the new Cosmos clear stamp set. I've designed this particular image so that it can be used in any orientation, and for this card, I'll be using it horizontally with the flowers facing downward.


1. Start by choosing your colours. I'm using a black base card for a strong contrast with the orange and yellow pencils and the gold embossing powder.


2. Stamp and heat emboss the large cosmos image along the bottom edge of the A5 card. I used gold embossing powder, but you can use any colour you wish.


3. Colour the flowers with a base layer of white pencil. This will help make the other colours more vibrant against the dark background.


4. Add some extra white pencil to the middle of each petal to create a highlight. The light areas will appear closer to the viewer, while the dark areas on either end will recede. This gives the petals shape.


5. Colour over the entire petal with a layer of your lightest colour, in my case, yellow. You can see how the extra white pencil has created a lighter area - a highlight.


6. Use your darkest colour at the base of petal, where it grows out from the centre of the flower, and at the tip of the petal. I'm using red, not only because it's darker, but also because I want my flowers to be variegated.


7. Now bring in your middle colour, which for me is orange, and add it between the yellow and red.


8. Colour over the entire petal again with your lightest colour to blend everything together. (If you prefer, you can use a blending pencil)


9. The centre of the flower is coloured in the same way. Add some extra white pencil to the highlight areas, which is in the very centre, and then colour over the top with your lightest colour.


10. Add some darker pencil around the outer edge, and blend with the lighter colour again.


11. Repeat the process for all the flowers.


12. If desired, you can darken some of the shadow areas with a very dark grey or black pencil. These would be the spaces where one flower tucks behind another, or where the petals cross over each other. Take care not to apply too much pressure to the pencil, you want to gently build up the colour.


13. Now do the same with the white pencil, concentrating on the highlight areas. Again, be gentle with the colour, you want it lighter, but not white.


14. Once you've finished colouring, use a pair of small, sharp scissors to cut through both layers of the card leaving a small border of cardstock around the edges of the image.


15. Emboss a strip of gold cardstock with a simple sentiment and attach it along the top of the flowers. Trim the ends to fit the card.


16. Scatter some rhinestones around for a little extra sparkle.


Products: