Saturday, December 26

Christmas With Carla


Carla has used the Snowman set to create a wonderful collection of holiday cards filled with Christmas cheer, frosty evenings and cute snow people. She coloured the images on her first card with pencils and added a gorgeous night sky with Distress Inks and a stencil. Check out how beautiful and bright that moon looks!


This cute card was created by printing the little snowman on blue card stock and then adding some white gel pen highlights. Carla completed the look with a little touch of red.


The last two cards in the collection have both been coloured with Distress inks through stencils. Don't you just love the beautiful smooth colour blends?


Stamps:

Wednesday, December 23

Good Tidings

Sometimes I like to change things up a little, just to see what will happen. Instead of leaving a white border around my coloured image, I opted to add black marker instead. The result is an image that pops right off the white card blank!


Stamps:

Monday, December 21

Festivities With Judy


Judy has created two fabulous, festive cards just in time for Christmas gift giving. The first features a gorgeous holly background that has been embossed and lightly sanded to help reveal the beautiful pattern. She added a stocking full of happy gingerbread men to sweeten the deal!


Judy's second creation is a gorgeous card in the shape of a bauble, complete with hanger and satin ribbon. She has decorated her project with gold card and a hand-coloured image from the Home for the Holidays set of digital stamps.


Saturday, December 19

To You And Yours

I've coloured the gingerbread church from the Gingerbread Wishes set using the no-line colouring technique, which gives a much softer look to the design. The layered mats started as white cardstock until I added marker around the edges to match the image. It's a great way to make sure everything coordinates nicely.


Stamps:

Thursday, December 17

Christmas With Jackie


Jackie has two beautiful, traditional Christmas cards to share with us today, both created using images from the Jolly Holiday set of digital stamps. She has kindly included a colour chart for those who are curious about her selections.


Have a look at the fabulous technique Jackie has used to colour the Christmas stocking. Using the digital stamp as a guide, she has added her own pattern to the diamonds on the sock creating a luxurious, multi-coloured fabric pattern. She finished the card with three layered poinsettia die cuts.


Jackie has mounted the red and green stocking image onto a beautiful blue background for a great contrast. The white sentiment and tiny snowy dots also contrast well with the darker background.


Tuesday, December 15

Everything Papercraft - Embossing


In papercraft terms, there are two main types of embossing – dry embossing and heat embossing. Although two very distinct techniques, they both produce a raised pattern on paper, cardstock and other materials.

Dry Embossing
Dry embossing is the shaping of materials such as paper and cardstock using pressure to press a pattern into a surface. There are a number of techniques and tools for this process, which has enjoyed quite a resurgence in recent years.
Stencil embossing is done by tracing a stencil with a ball tool or stylus. Stencils are generally made from metal or sturdy plastic and are secured to a bench top, table or light box to prevent them moving during the embossing process. The material to be embossed is laid over the stencil and then rubbed with the stylus to press the material through the stencil creating a raised pattern.
Pressure embossing is now the prime technique used in papercraft to dry emboss. There are many different machines on the market, including the Cuttlebug, EZ Cut, and Sizzix that use applied pressure to push paper into shape using an embossing folder or plate.

Heat Embossing
Heat embossing is a completely different technique that is similar only in the fact that you achieve a raised pattern on the object being embossed. To heat emboss you require an embossing medium, such as a Versamark ink pad; an applicator, such as a stamp; embossing powder and a heat source. The embossing medium has a longer open time than most inks, meaning it stays wet for a long period. This gives the crafter an opportunity to apply embossing powder, which is a fast melting powder that melts into the shape of the stamped image once heat is applied. The resulting image is shiny and slightly raised from the surface of the paper.

Example of dry embossed background (left) and a heat embossed image (right).

Sunday, December 13

All The Info...

I have finally taken some time to sit down and figure out a few of the stats from the November Month of Holiday Cards Challenge... a big shout-out to Sarah for reminding me... thanks Sarah! Although there weren't quite as many entries as 2019, we still did an awesome job filling the gallery with beautiful cards, tags and holiday projects that covered everything from Easter to Christmas and even Halloween. Well done to us!

TOTAL ENTRIES
1079

TOTAL PARTICIPANTS
58

TOTAL INDIVIDUAL WINNERS
47

TOTAL PRIZES
165

PRIZE POOL VALUE
$1560.00AU

Tutorial - Milk Carton Box


Create the perfect little box to hold homemade Christmas treats for neighbours, friends and family. These Milk Carton Boxes are relatively easy to make and can be decorated for any holiday or occasion where little gifts are exchanged. It could be lined with tissue paper and filled with fresh baked gingerbread men, cookies, or mini candy canes and they would also look fabulous on the Christmas table, personalised with each guest's name and a special little gift inside.


1. Place a 81/4" x 103/4" piece of card stock horizontally on your score board and score at 21/2", 5", 71/2" and 10".


2. Turn the card stock 90 degrees to the right so that all your score lines are horizontal and the 3/4" section of card stock is now at the bottom of your score board. Score again at 21/2", 6" and 71/2". Your card stock should resemble the template below:


3. Continue to refer to the template below for the remaining score and cutting lines:


4. With your card stock horizontally on your score board. Score a small line at 33/4" that begins at the top of the card stock and ends a the first score line. Score a similar line at 83/4". At the bottom of each of these small score lines, you are going to score two diagonal lines that end at the intersections of the score lines below. See the template above for correct placement. 


5. Use a craft knife and ruler or a trimmer to cut along the lines indicated in the template to create the bottom of the box. The narrow sections of card stock should be about 1/2" wide. They will form the tabs that hold the box closed.


6. Trim away the corners of the little tabs as shown in the image below. This will give you a neater finish and reduce the bulk in each corner.


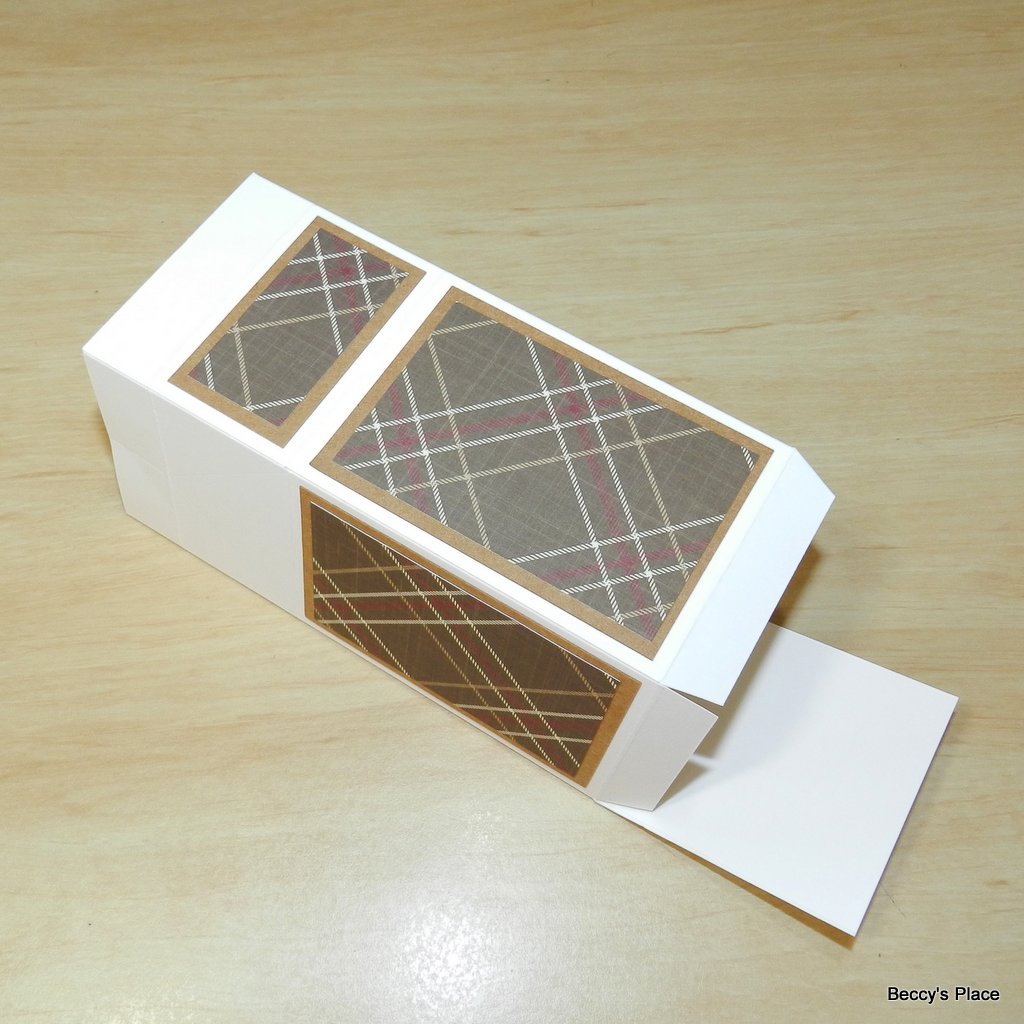
7. Prepare your card stock or patterned papers for the different sections of the box. You'll need two pieces measuring 21/4" x 11/4" and four pieces measuring 21/4" x 31/4". (I used two pieces for each section to create a double mat. If you wish to do the same, you'll also need two pieces of patterned paper measuring 2" x 1" and four pieces measuring 2" x 3".)


8. To assemble the box, add liquid glue on the 3/4" panel on the right hand side. Fold the card stock along all the vertical score lines to form a box. Secure the 3/4" panel on the inside of the box.


9. Add your patterned paper to the box. The two small pieces are added to the top of the box where you did not add the diagonal score lines.


10. To close the bottom of the box, fold in the three narrow tabs, add glue to each one then bring the large square section over the top. Place the box on your desk top and use a ruler, paint brush or other narrow object to press the tabs securely in place through the top of the box. Make sure you have lined everything up properly and that your box is square.


11. Once the glue has dried, pinch the top together. The box should fold along the diagonal score lines you created to form a milk carton shape.


12. Use a hole punch to create two little holes in the top of the milk carton and thread with string or ribbon. (Alternatively, you could use a clip or a peg to hold the box closed.)


13. Decorate the string with a little sentiment or personalised gift tag and add a stamped image or embellishments to the sides of the box as desired.


NOTE: If you plan to use the box to hold food, take care to ensure that all adhesives, paints, inks, embellishments and other items used to construct or decorate the box are non-toxic.

Products: