


Create the perfect little box to hold homemade Christmas treats for neighbours, friends and family. These Milk Carton Boxes are relatively easy to make and can be decorated for any holiday or occasion where little gifts are exchanged. It could be lined with tissue paper and filled with fresh baked gingerbread men, cookies, or mini candy canes and they would also look fabulous on the Christmas table, personalised with each guest's name and a special little gift inside.

1. Place a 81/4" x 103/4" piece of card stock horizontally on your score board and score at 21/2", 5", 71/2" and 10".

2. Turn the card stock 90 degrees to the right so that all your score lines are horizontal and the 3/4" section of card stock is now at the bottom of your score board. Score again at 21/2", 6" and 71/2". Your card stock should resemble the template below:

3. Continue to refer to the template below for the remaining score and cutting lines:

4. With your card stock horizontally on your score board. Score a small line at 33/4" that begins at the top of the card stock and ends a the first score line. Score a similar line at 83/4". At the bottom of each of these small score lines, you are going to score two diagonal lines that end at the intersections of the score lines below. See the template above for correct placement.


5. Use a craft knife and ruler or a trimmer to cut along the lines indicated in the template to create the bottom of the box. The narrow sections of card stock should be about 1/2" wide. They will form the tabs that hold the box closed.

6. Trim away the corners of the little tabs as shown in the image below. This will give you a neater finish and reduce the bulk in each corner.

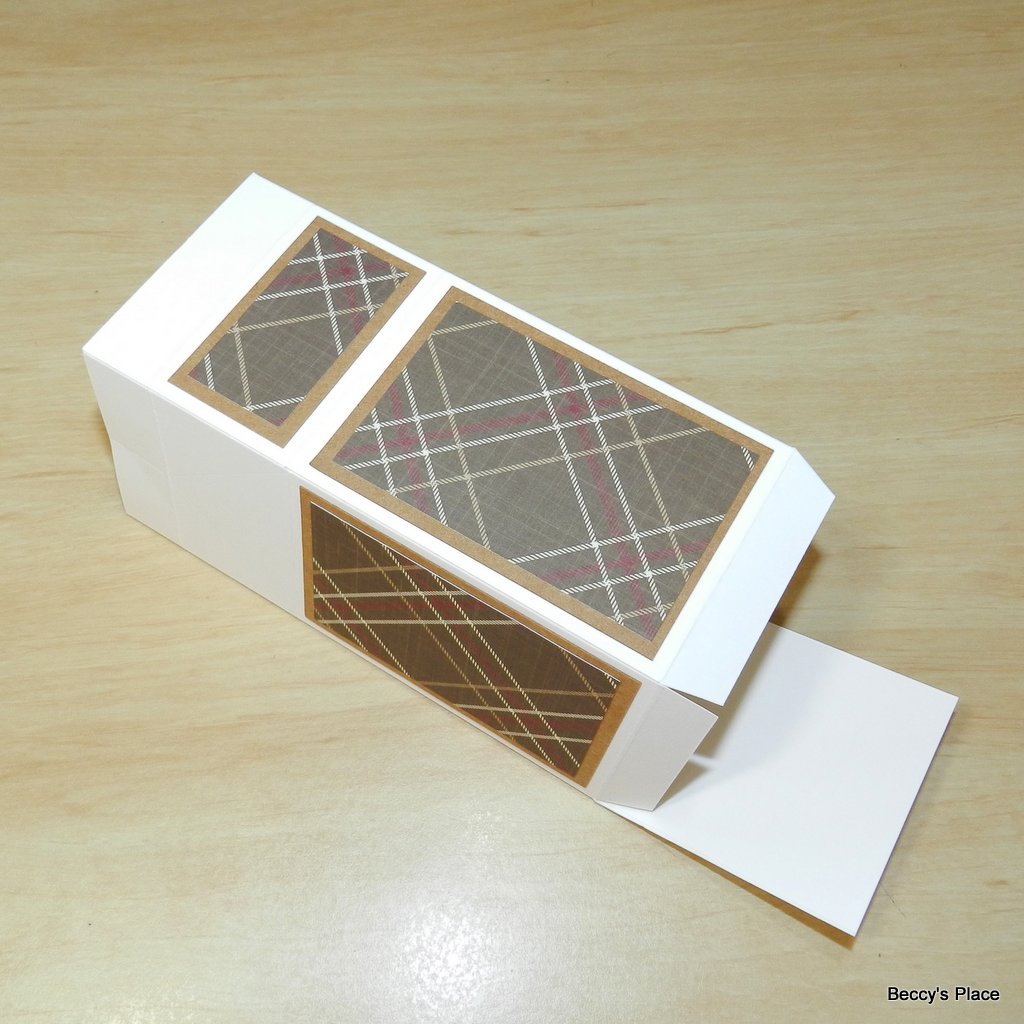
7. Prepare your card stock or patterned papers for the different sections of the box. You'll need two pieces measuring 21/4" x 11/4" and four pieces measuring 21/4" x 31/4". (I used two pieces for each section to create a double mat. If you wish to do the same, you'll also need two pieces of patterned paper measuring 2" x 1" and four pieces measuring 2" x 3".)

8. To assemble the box, add liquid glue on the 3/4" panel on the right hand side. Fold the card stock along all the vertical score lines to form a box. Secure the 3/4" panel on the inside of the box.


9. Add your patterned paper to the box. The two small pieces are added to the top of the box where you did not add the diagonal score lines.
10. To close the bottom of the box, fold in the three narrow tabs, add glue to each one then bring the large square section over the top. Place the box on your desk top and use a ruler, paint brush or other narrow object to press the tabs securely in place through the top of the box. Make sure you have lined everything up properly and that your box is square.


11. Once the glue has dried, pinch the top together. The box should fold along the diagonal score lines you created to form a milk carton shape.


12. Use a hole punch to create two little holes in the top of the milk carton and thread with string or ribbon. (Alternatively, you could use a clip or a peg to hold the box closed.)


13. Decorate the string with a little sentiment or personalised gift tag and add a stamped image or embellishments to the sides of the box as desired.


NOTE: If you plan to use the box to hold food, take care to ensure that all adhesives, paints, inks, embellishments and other items used to construct or decorate the box are non-toxic.
Products:

11 comments:
Wauw Beccy, its a nice one! Thanks for the tutorial.
Hugs and love, Wilma xx
How wonderfull, it looks gorgeous with the gingham paper and the cute gingerbread man! Thank you for the tutorial and what a lovely idea to put on the christmas table!
Enjoy your day,
Colinda
Fabulous tutorial, Beccy...so easy to understand. It could be used for any occasion by changing the papers and embellies. Love it.
Jennifer. x
Wonderful! I like your box, the papers and the stamps.
All the best!
Ilse (thera)
Oh Beccy this is fantastic. I want to make one. Take care. Hugs Jackie
So cute and great idea and tutorial x
So adorable I love Milk Carton boxes and I love the plaid and added Gingerbread and small tag - sweet! TFS
How sweet is this gingerbread box and a perfect gift box for all occasion..
Thank you Beccy...Happy Holidays
So cute!
This looks fun Beccy. I think if I was going to put food inside, I would probably seal it in a food-safe bag to retain freshness. Another one for my "to do list" for 2021.
Thanks so much Beccy! I was even able to accomplish it following your great instructions.
Post a Comment