


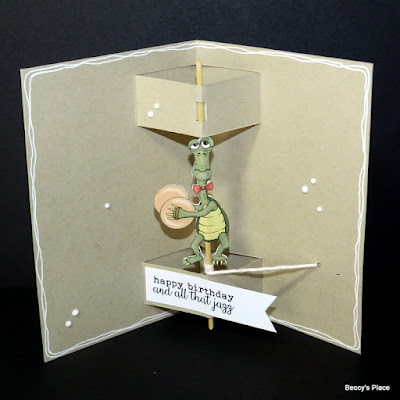
This card is definitely one the engineers among us will enjoy. The centre has a mechanism, created with a skewer and some clever folding and cutting, that rotates as the card is opened and closed. Adding a little image or sentiment panel results in a twirling decoration that will certainly surprise and delight whoever is lucky enough to receive it.
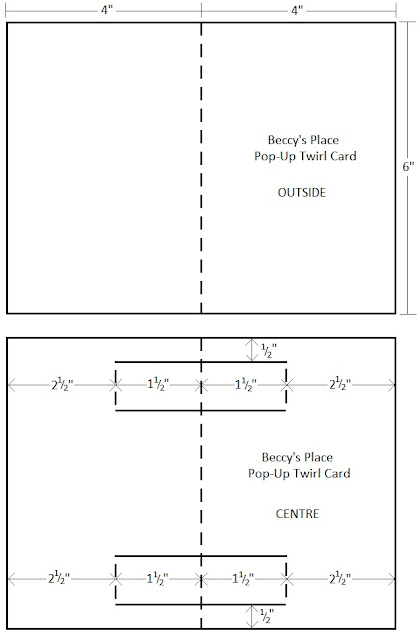
TEMPLATE

2. Use a pencil and ruler to measure and mark the cutting lines on the folded edge of your card. Refer to the template above for measurements and placement.

3. Use scissors or a trimmer to cut along the four lines, beginning at the spine of the card and ensuring you cut through both layers. These will form the two pop-up sections in the centre of the card.

4. OPTIONAL: Score between the ends of each cut line to ensure an accurate fold.


5. Refold the cards and make two 1/8" long cuts in each of the pop-up sections, keeping them as evenly apart as possible. See the photo below.

6. Open the card and push the pop-up sections out again so they stand away from the card blank. Use the tip of your finger to push the card between the two little nicks you made in the step above, then slide a skewer through both sections. See the photos below.


7. Remove the skewer and use a small hole punch to make two holes in the card. One hole should be about 1/4" from the spine of the card and a little above the lower pop-up section. The other hole should be about 1" from the side edge of the card and about the same height as the first hole.

8. Cut a 12" piece of string or twine. Thread one end through the first hole and secure on the back with glue and/or tape.


9. Replace the skewer. Wrap the string around the skewer two or three times and then thread the end down the second hole. Adjust the tension of the string until you can easily open and close the card, making the skewer spin in place. Trim excess string and secure on the back of the card with glue and/or tape.


10. Use a pair of snips or sturdy scissors to remove the excess length of skewer. If desired, glue a bead or button to either end of the skewer to prevent it sliding out of the card.


11. Decorate the inside of the card as desired. Keep the twirling embellishment to around 11/2" wide and no longer than the gap between the string and the top pop-up panel. Make sure the embellishment is able to twirl freely when the card is opened and closed.


12. Secure the card to the inside of the other card blank with glue or double-sided tape, taking care not to add any adhesive to the pop-up sections.


13. Decorate the front of the card and you're done!

Stamps:

7 comments:
Wow, that's amazing!
xxx Margreet
Wonderful card, lot this tutorial. Hope to try. Anesha x
How cool, thank you for the tutorial, this looks like a fun card, hugs, Lori m
i love this - going to try it now!
What a wonderful tutorial Beccy and a Super card.
Faith x
*wow* how cool is that!!!! Bye, I'm going to my table for work ;) Thank you for this tutorial :)
Fabulous interactive card! Love it!
Post a Comment