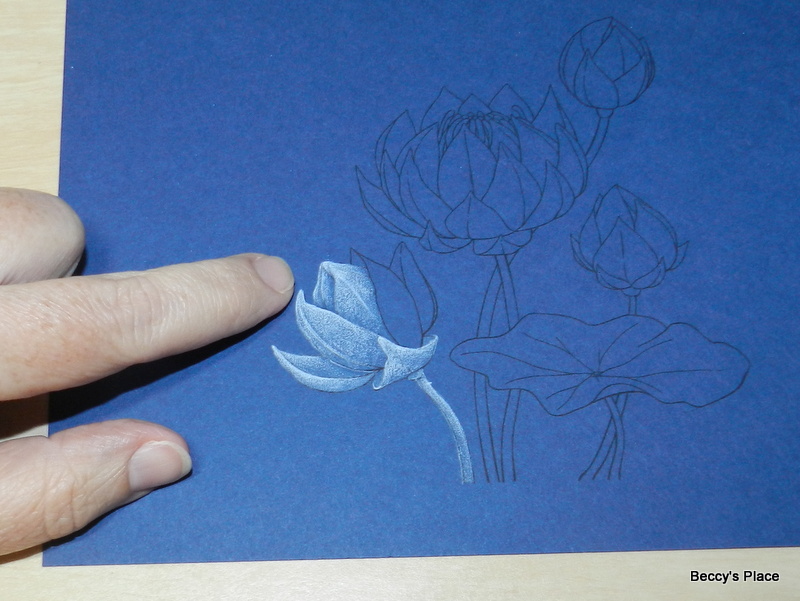
Colouring with a white pencil on a dark background produces a striking result that has an almost ghostly feel. The idea is to colour the highlights and use the dark background to form the shadows and recesses of the image, which is basically the reverse of how we normally colour.
Start by printing or stamping an image onto a smooth piece of dark coloured cardstock. Since we'll be using pencil, it doesn't really matter what ink you choose, but you do want it to be completely dry before you start colouring. I'm using a white, Prismacolor pencil, which is lovely and soft and will give me a good range of shades. Artist quality pencils tend to be softer allowing you to add more pigment than a hard pencil, so always purchase the best brand you can afford.
Work through the image one section at a time and always start on the opposite side to your dominant hand. For example, I'm right-handed and will therefore start colouring over on the left side of the image so that I'm not constantly dragging my hand over coloured areas as I work.
The method I use to colour is always the same for this technique - lay down a VERY LIGHT layer of pencil (photo above), go back and mark the highlight (photo below), in this case the edge of the petal, then soften the edges with more pigment (two photos down).
As you can see, I'm colouring one section at a time to make sure I distinguish all the different parts of the flower... you don't want to end up with a vague white shape.
Light layer of colour
Mark the highlight
Soften the edges.
Light layer of colour, mark the highlight, soften the edges.
Continue using the same method for all the different parts of the image, including the stems, buds, stamens and leaves. Light layer of colour - mark the highlight - soften the edges.
The darkest areas of the image will be under the petals or beneath the leaves. To keep these areas dark, add less pencil allowing the dark cardstock to show through. You don't want a sharp line between the highlight and the shadow when it's on the same section, such as a single petal, so make sure you work the pencil from the highlight area to the shadow area releasing the amount of pressure as you go. Pressing hard on the pencil will leave more pigment, forming those areas of light, and releasing the pressure so that the pencil is barely touching the surface of the paper will allow more of the background to come through.
Once you've completed a full section of the image, such as the flower below, take a moment to look at it as a whole and determine whether it needs additional pigment. Lighter areas will come forward and darker areas will recede, so you can "shape" the image by using light and dark.
I thought the left side of my flower needed a little more light, particularly the large petal I'm pointing to. By adding a circular spot of colour on the wide section of the petal, it will take on a rounded appearance. Just remember not to leave hard lines or it will look more like a polka dot!
The individual stamens are coloured using the same method as the petals - light layer of colour, mark the highlight, soften the edges.
Once the flower is complete, remember to check for areas that need a little more pigment.
Colour each of the flower buds in the same way remembering to take advantage of the dark background for shadows and contours.
The leaf is one large area of colour but we still want to add some shape by using what we know about light (comes forward) and dark (recedes) areas. As usual, add a light layer of colour to the entire leaf then mark the highlights. As you can see in the photo below, I traced around the edge of the image adding more pigment to the lines as they came up and less as they went down. This gives me a guide to which areas of the leaf will be light and which will be dark.
The leaf is a circle with the centre acting as a kind of hub, so the easiest way to colour this shape of leaf is in "wedges". However, don't keep them all the same width and resist the temptation to make them even or you'll end up with a pizza rather than a nice lily pad.
Colour the highlights in wedge shapes tapering the colour as you reach the middle. Some wedges will be narrow and high, while others will be quite wide and flat. Try to vary the intensity of colour you add to each highlighted area. You want some to seem very bright while others are less so.
Spend some time practicing with your pencils, particularly the technique of working from light to dark and vice versa. Having control over the pencil is very important for colouring as it allows you to work through a range of shades and highlights and makes shaping the image much easier.
Stamps: