Thursday, July 11

Tutorial - Squash Book Card


If you're looking for a cute little card that will fold out to give you plenty of room for messages, then today's tutorial might just be the answer. Squash Book Cards fold out to reveal lots of space for photos, embellishments, stamps, sentiments... whatever you wish to add! Perfect for those special occasions when you need a group card to hold lots of signatures, or as a little memento filled with photos of a memorable event.


1. You'll need three square pieces of heavy double-sided patterned paper or card stock. My pieces are 6" square, which will give me a finished, folded card that measures 3" x 3". I've also printed some images and sentiments and trimmed them down to 23/4" x 23/4" to embellish my finished card.


2. Place one of the pieces of patterned paper on your score board and score at 3". Rotate it 90 degrees and score again at 3" so you have score lines forming a cross in the middle of your patterned paper.


3. Score the paper diagonally from corner to corner. You only need to do this once.


4. Now fold and burnish along each score line.


5. Fold your patterned paper by pushing the diagonal folds inward and squeezing the two square sections together as shown in the photo below.


6. Repeat steps 2 - 5 for the other two pieces of patterned paper.


7. The next step is to adhere the squares together so that the diagonal score lines are vertical and the two end pieces are on top of the centre piece as shown below.


8. Use glue or strong double sided tape to adhere the pieces together, taking care not to cover the score lines so that your card folds freely.


9. Time to decorate! I used an image and some of the sentiments from the Button Collector digital stamp set. I also added some hand drawn borders around the other sections of the card.


10. As this is a bulky card, I decided to add a piece of twine to hold it closed. You could also add ribbon or a belly band if you prefer.


11. Secure the twine ONLY on the front of the folded card with glue or very strong tape. I used a combination of both so that the tape would hold the twine in place while the glue dried.


12. Add some foam tape on either side of the twine to hold a sentiment or image panel. You can add some additional glue on the back of the sentiment to ensure the twine is ultra secure.


Stamps:

Tuesday, July 9

Hot Tip Tuesday


Today's hot tip is all about shaped cards and how to avoid having a flat section along the fold.


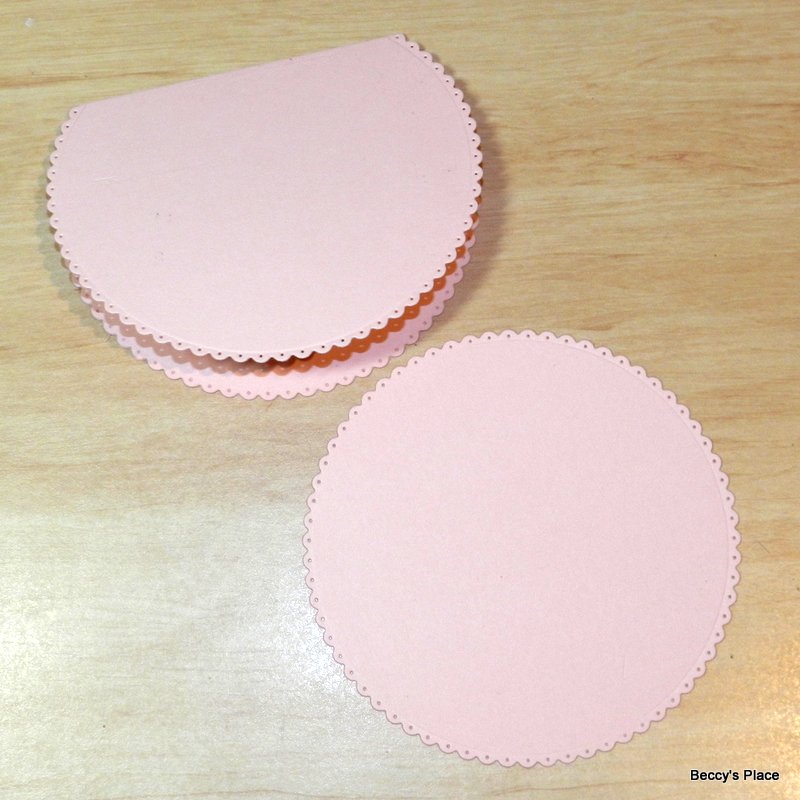
I've used circle dies for today's hot tip, but you can use any shape you wish. Start by cutting your card base, which is a folded piece of card stock. When you line up the die, make sure some of the fold will remain in tact. This will give you a shaped card with a flat edge on one side, as in the photo below. Using the same die, cut a single shape of the same size.


Add the adhesive to the front of the card base, paying particular attention to the edges and along the fold.


Secure the die cut shape over the top, lining it up carefully with the card base. Now you'll have a perfectly shaped card, with no flat section, that's ready to decorate!


Sunday, July 7

Blooming Beautiful - with Jackie


I'm so thrilled to share these cards with you today, not only are they gorgeous to look at, but there's some fantastic little ideas lurking just under the surface that you might not notice until I point them out. Get set for some serious inspiration courtesy of the lovely Jackie Trinder!


Jackie has actually cut out the pre-coloured leaves from the Painted Blooms set and adhered one end flat to the surface of the card and the other popped up. It adds lots of dimension and tricks the eye into thinking that the leaves are growing out from behind each blossom.


Look really closely at the patterned papers Jackie has used for her cards... notice anything?
Yep, that's right! She has created her own patterned paper by shrinking and repeating the flower images from the set. What an awesome way of ensuring the perfect combination of paper and focal image!


For more inspiration visit:
Jackie's Blog

Saturday, July 6

Adding Penwork

Although the Painted Blooms set does contain bonus coloured images with a dark outline, sometimes it's just fun to have a little play to see what happens. Inking or doodling is a technique that you can use on any image to add a little oomph!


I've printed one of the pre-coloured images from the set onto a piece of smooth, white card stock. I'm not going to worry about following the shapes exactly, which would give a fairly rigid feel to the image, instead, I'm going to add short, curved lines that loosely follow the shapes within the image.


If you look closely at the card you can see that I also added some grey shadows to the right and bottom of each leaf and flower. This just gives the image a little more weight and substance.

digital stamps

Friday, July 5

Painted Blooms Card

Adding lots of layers to a card can sometimes add too much bulk, which can be problematic if you want to send your card through the post. One way of reducing the amount of card stock or paper that you're using on a project is to cut mats from the centre of your layers. For this card, I've taken circles from the centre of both the red and blue piece of card stock and used them to mat my image. It reduces the bulk in the centre and saves on card stock too!


I started by die cutting circles from the centre of each piece of card stock. The red circle has a larger diameter than the blue circle so that they can be layered together.


Secure the red piece to your card base, then simply build up the layers making sure you cover each cut as you go. This technique will work with squares, rectangles and most other standard shapes. You might have a little trouble with fancier shapes so it's best to try them out before you begin cutting. Just lay the dies on top of each other to give you an idea of how the cuts will look.


digital stamps

Tuesday, July 2

June Challenge Winners

Congratulations to the June Challenge Winners!
Terrie, Carol and Gail
You are the randomly chosen winners of last month's challenge.
If you already have a Beccy's Place store account, I'll be adding a $20.00AU credit very soon.
If not, please email me at beccy@beccysplace.com to claim your prize.

Monday, July 1

It's a Garden Sale!


July New Releases


We have two fabulous digital releases for you this month - The Button Collector and Painted Blooms. 
Both sets are now available for purchase in our online store.

Painted Blooms
digital stamp set


The Button Collector
digital stamp set

July Challenge

Create a card or paper-craft project using any Beccy's Place image, upload a photo of it to your blog or other hosted site, and submit a direct link below. The challenge runs from now until midnight on the 31st of July 2019 (AEST).


To keep things interesting, I'll be adding an additional optional element to the monthly challenges. This month it's a CASE (Copy And Selectively Edit) yourself challenge. Find a card that you really enjoyed making, or perhaps one that didn't turn out quite as you would have liked, and recreate it with a few tweaks. As always, keep in mind that the additional challenge is just an optional extra!

PLEASE READ THE CONDITIONS CAREFULLY
BEFORE ENTERING THE CHALLENGE
  • Entries that don't meet the conditions will be deleted from the challenge.
  • Your project must be created during the month of July 2019 and entered into the challenge during the active challenge period. Due to an automated system, late entries cannot be accepted.
  • Each month I will include a re-mastered digital image from my library of freebies as well as a bonus challenge, such as a card sketch, bingo grid, etc. You DO NOT have to use the image or bonus challenge on your project, but you MUST use a Beccy's Place image, either free or purchased, to be eligible for entry.
  • You can enter as many times as you like and you can submit your card to any other challenge you wish.
  • At the end of the month three winners will be chosen to receive a $20.00AU store credit for any digital stamps at Beccy's Place.
  • To redeem the store credit, winners must have a Beccy's Place customer account. (Please note, you do not need an account to enter the challenge. It is acceptable to create an account in the event that you win. Accounts can be closed at any time.)
  • Store credit won during any Beccy's Place challenge is only redeemable for digital stamps.
  • Entries can be uploaded to the challenge from any hosted site including blogs, online galleries, Google photos, etc. If you do not have access to a hosted site, please feel free to email your photos to me and I will add them from the Beccy's Place Guest blog.
  • Beccy's Place designers may enter the monthly challenge but are not eligible to win prizes.