Showing posts with label ribbon. Show all posts

Thursday, March 9

Upcycled Pin Cusions

Last year, as I trawled the Pinterest boards, I came across lots of wonderful examples of "up-cycled" crafts. For those who haven't heard the term before, "up-cycling" means taking an item that would otherwise be thrown away and turning it into something of higher value. Although I'm not sure these pincushions are of a higher monetary value, I do think they look prettier than when I started.


I used fabric, ribbons, trims, beads and embroidery cotton to transform unwanted egg cups and little jugs into pretty pin cushions. I've also seen these done with children's toy cards, baby shoes and garden items!

Sunday, April 12

Scrap Card #13

I don't generally use a lot of large flowers on my cards, mostly because they don't go through the post easily.  However, I recently had a splurge at the gorgeous Wild Orchid Crafts and just couldn't resist using some of my beautiful purchases.


Thursday, November 21

Day 21 - Ribbon

The majority of card makers have vast collections of ribbon in their stash... myself included!  We use it to add beautiful bows, to hold charms and other embellishments, sometimes we stamp sentiments on it or even make little flowers from it.  It's a versatile and relatively inexpensive embellishment that can add a great deal to the overall composition of a card. 
 

YOUR TURN: Raid your ribbon stash and create something beautiful!
Upload your creations here.

Sunday, November 10

Day 10 - Gift Giving

I have lots of card-making friends and the one thing I know we all share is our tendency to hoard our scraps.  Yes... you know you do too!
Every now and then I like to pull out my scraps and try to create something with them.  One good idea is to make cards that look like little Christmas packages.  It only takes a few squares of patterned paper and cardstock, a length of ribbon and a tag to create a great card that can even be personalised to a particular family or individual.  If you're feeling particularly eco-conscious, you can even recycle those old tags you've been saving. 
 

YOUR TURN: Make some Christmas packages to embellish the front of your card.  They can be any size or shape you like... and don't forget to add a tag!
Upload your creations here.

Wednesday, July 24

Gnarled Wreath Freebie


Originally designed July 2013.
Digitally remastered July 2019.
Original artwork by Beccy Muir, all rights reserved. Images are for personal use and must not be copied, swapped, shared, resold or mass produced without the express written permission of the artist.

Wednesday, July 17

A Friend

I recently purchased this lovely new set of nesting dies from Sizzix called Majestic Labels #2.  The largest in the set is big enough to create a shaped card base with smaller ones for building up the front.  I used a pretty piece of patterned paper from my scrap drawer, a stamp from my Shabby Chic Birdhouse set, a Martha Steward butterfly punch and a lovely red-brown ribbon to complete the card.  Simple, but pretty.
 

...                                                                                    This is a scheduled post                                                                                    ...

Friday, May 24

Heartfelt Wishes

This week our Card Camp challenge was to CASE (Copy And Selectively Edit) a beautiful card chosen by the group owner.  The card used for inspiration featured layers of die cut cardstock with a beautiful stamped floral feature at the top.  I used my favourite shaped die and a new Stampin' Up set I just purchased to create my challenge card.
 

Wednesday, February 13

Altered Desk Caddy

I took a trip to Ikea the other day and found these gorgeous little white tins with a lacey metal border around the top.  The first thing that sprang to mind was all the pretty paper, ribbon and flowers I had waiting at home for just this type of project!
Instead of trying to cut the paper to fit the curve of the tin, I decided to keep it simple by cutting the paper into 1/2" strips and layering them around the tin.  A couple of coats of varnish, some pretty trim, ribbon and a lovely Prima flower and my desk caddy was done.
 

Tuesday, February 5

Technique Class - Bow Tying

I am asked fairly regularly about how I tie bows on my cards and paper craft projects.  It seems to be one of those techniques that cause a lot of frustration with crooked ribbon, upside down knots and frayed ends!
There are many different techniques for tying bows and today I want to show you the way I generally do the bows I add to my cards and projects.  This works well for me, but you might have to continue practicing until you find a method that fits your own style.
 
1.  My first hint: I always loop a short piece of ribbon around a piece of cardstock and secure the ends at the back.  I have seen this referred to as a "cheater bow", presumably because you aren't actually tying the ends of the ribbon together in one continuous length.
 

2.  Make sure you don't have the ribbon stretched too tightly across the cardstock, it needs enough slack to bunch together when you add the bow.
 

3.  Take a length of ribbon, no shorter than 12", and slide it under your ribbon loop.  This will form your bow.
Now here's my second hint: your finished bow will turn out facing 90 degrees to the way your ribbon ends are facing.   Take a look at the photo below.  Notice how the long length of ribbon is vertical with one end going up and one going down.  This will form a bow that will sit horizontally on the card stock.  (To tie a bow that sits vertically on the cardstock, skip down to step 13.)
 
 
4.  Turn the project so you can easily grasp one end of the ribbon in each hand, then form a loop on each side.

 
5.  Cross the left hand loop over the right hand loop as shown below.  Hold the two ribbons together with your left hand where they cross over.

 
6.  With your right hand, take the top loop and push it down and around the bottom loop.

 
7.  You will have a ribbon end loose at the very top as shown below.

 
8.  Simply flip that ribbon end up and let it fall where it wants to go.

 
9.  Now grab a ribbon loop in each hand and....

 
10.  ... pull tight!  That's the third tip!

 
11.  Now the trick is to get your loops to be the same size and facing in the direction you want.  My fourth tip is to adjust the loops by holding the ribbon ends and the ribbon loops at the same time... don't just pull the ends.  You want to keep that knot in the centre nice and tight as you make adjustments.
 
 
12.  My fifth tip is to pull the ribbon loops and ends in the direction you want them to sit.  It's no good pulling the ends of the ribbon upwards if you want them to go down and vice versa.  Keep fiddling until you get the look you want.
 
As you can see, I have ended up with a bow that sits horizontally across the project. 
 
 
13.  Now, if you need a bow that sits vertically you need to firstly get those ribbon ends to a horizontal position.  The easiest way to do that is with my sixth tip - tie a half hitch (that's the first little knot you do when tying your shoe laces!)  As you can see, the ends are now horizontal across the project.

 
14.  If I start with a half hitch I generally tie my bow a little differently.  I make a loop with the right hand piece of ribbon and then bring the left hand piece of ribbon over the top.

 
15.  Tuck the top piece of ribbon down and around the loop and push it through with your fingers to form a loop.  Now follow steps 9 through 12 to form your bow.

 
16.  My seventh tip is to add a few drops of clear glue beneath the knot so the bow cannot be pulled undone (my friend Penny taught me this).  Make sure you add the glue in inconspicuous places as most glues will leave noticeable marks on ribbon.
 
 
My final tip (and you must promise to keep this secret!) is to add a few little pieces of double sided tape in strategic places to hold your bow in place if you need to!  If you've got a loop that just won't sit flat, simply add a little square of DS tape to the back of the loop and secure it exactly where you want it.... just make sure you don't stick the loop down flat, that's always a dead giveaway!

Sunday, February 3

Card Making Classes - Day 3

Day 3 of the Clean and Simple class was all about stamping techniques and the various effects you can achieve with your stamps and ink pads.  Our homework was to create a card using a stamping technique, so I chose the lesson on gradient stamping to create the two cards below.


Posey Freebie

I love daisies.  They are such a happy, unassuming flower that will even grow at my house... and that's saying something!
 

Original artwork by Beccy Muir, all rights reserved.

Wednesday, January 23

Tutorial - Diamond Fold Card


This is a pretty little card that folds up into a nice, tidy 4" square.  It reminds me of the Japanese art of origami because of the folds required to create it, but fortunately it's not too complicated for those of us who could never quite line up our folds!
 
 
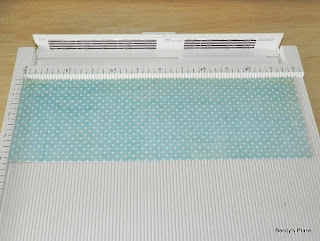
1. Start with a 12" x 4" piece of sturdy, double-sided, patterned paper.  Cardstock really isn't suitable for this card as it's too heavy for the folds required.
 
2. Score the paper at 2" and 10", then crease firmly along the score lines.
 
3. Hold a ruler vertically along the mid-line of the paper, which is at 6".  Fold the right hand side of the paper down along the ruler as shown in the picture below.  Crease firmly.
 
4. Repeat for the left hand side, bringing the two edges together.  Crease firmly.
 
5.  Unfold the paper and turn it around on your score board so that the previous two creases now form a "V".
 
6. Repeat steps 3 and 4 pressing all the creases firmly.
 
7. Unfold your paper.  You should have a number of intersecting creases that form a diamond shape in the centre of the card.  Crease all of the folds again, one way and then the other (mountain then valley) so that you have plenty of movement in the creases.
 
8. On either side of the diamond you will notice several triangles.  Hold the paper so that one of the ends is facing downward.  Press your thumbs into the triangles and bring all of the creases together lining them up carefully.  Press the folds firmly.
 
9.  Repeat step 8 on the other end of the paper.  Remember to press the creases firmly so the card holds it's shape.
 
10.  All that's left is the decoration.  I used a stamped image from Flourishes, an old corner stamp from my stash and a scallop edge punch to decorate my card.  I then made a ribbon loop that slides on and off to hold the card closed (see the first image).  Have fun!

Wednesday, January 16

Challenge Card

The challenge over at Card Camp was to create a card using three components from a bingo grid.  I went with "red", "designer paper" and "ribbon" to make this Thank You card that features gorgeous Flourishes stamps, coloured with pencils.