Saturday, February 26

All About The Colour

The last two cards I want to share with you this month feature lots of fabulous colour! The first card has a background inked with all the colours of the rainbow. My intention was to reflect the colours from the little robot's control panel, but I'm not sure I quite pulled it off... I do like the rainbow effect though.


My second card uses the classic combination of red, white and blue for a bold but fun look. I coloured and fussy cut the image before popping it up with a few pieces of foam tape.


Stamps:

Thursday, February 24


Selected, retired digital stamps at an incredibly low price for just 48 hours.
No rainchecks. No repeats.

Robins

Tuesday, February 22

Decorate Everything!


Kathy regularly decorates the inside of her cards with papers, images and embellishments that coordinate with the outer design. With just a few small additions, she shows us how easy it is to take our designs up a notch.


Sunday, February 20

Tutorial - Stamping on Fabric


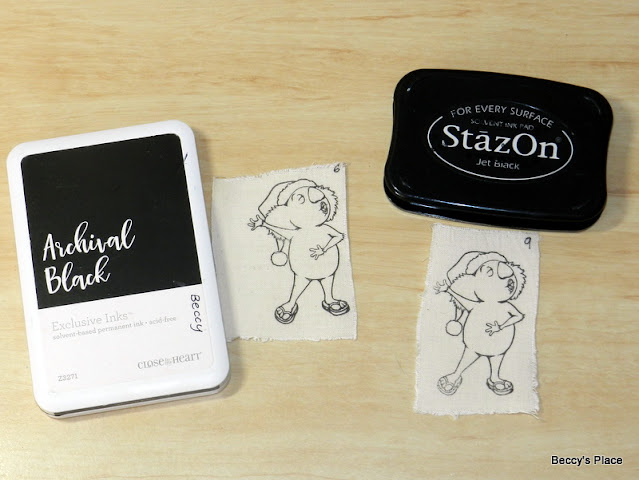
Stamps are a great way to add decoration to t-shirts, bags, pencil cases, placemats and many other fabric items. The trick is in finding an ink that will leave a crisp, clear impression and stand up to the laundering process. I happen to own many different types of stamp pads, so decided to put ten of them to the test!


I stamped the images on small pieces of cotton calico, looking to see how much the ink bled into the fibres of the cotton. I was surprised to see that they all did well, producing nice, crisp imprints. Next, I tested colour clarity and intensity, but to be fair, some of the ink pads were VERY old and perhaps not as juicy as they could be. Overall, I was happy with the impressions from all ten.


Since a number of the inks were water based, I really didn't think they would stand up to the laundering process, which involved a hand wash with laundry detergent, a clean rinse and drying with a hot iron. As you can see from the photos below, many of the inks did very well, with only one disappearing completely.


Although many of the ink pads produced great results, my preference would be either Archival or StazOn for permanent, crisp and clear impressions on fabric. Keep in mind though, that I didn't take longevity into account, so you might want to do your own test to see how many launderings your ink choice can take.

Saturday, February 19

Beep Beep!


Gears, cogs and steel sheets are all features of these fabulous cards from Carla. She has combined embossed and die cut elements with the robots from the new Nuts 'N' Bolts set of digital stamps to create fun cards that are sure to appeal to the mechanically minded amongst us. The frame on her second card was actually hand cut by Carla to fit two images, sentiments and embellishments.


Thursday, February 17

A Great Day

I created the background for this card by dry embossing a piece of kraft cardstock with a folder I had coated with versamark ink. Silver embossing powder was then sprinkled over the design, clinging to the inked areas, which I set with a heat tool. For even more sparkle and shine, I coloured the robot with a silver metallic pen, then applied a liberal coating of glossy accents! 


Stamps:

Tuesday, February 15

Everything Papercraft - Chipboard


Chipboard is a wonderfully versatile product that is very popular in paper-crafting. It's basically compressed, unbleached paper pulp that is coated, coloured or shaped to make embellishments and alphabet pieces for scrapbooking, card-making and other paper based crafts. It can be cut with scissors or blades, coloured with paints, inks and dyes, stamped, embossed, stitched or textured.

Some uses for chipboard:
  • Cover chipboard pieces in glue and place tissue paper on top. Allow the tissue paper to wrinkle and let dry. Apply another coat of glue and tissue paper and when dry, trim edges and paint with chosen colour. After the paint has dried you can rub over with gold or any metallic finish to bring up the texture.
  • Another method is to paint with an opaque colour and when dry, stamp part images on top.
  • Bring out your crackle paints, memory mist or dye inks and let the colours soak into the chipboard.
  • Press the chipboard into a clear Versamark stamp pad and apply embossing powder. Heat for a beautiful shiny finish.

Monday, February 14

Cards By Jackie


Jackie has used the two of the characters from the new Chute! set of digital stamps to make these cute cards, both with coordinating cardstock and fun embellishments. The little panda has been teamed with a fun collection of papers in different colours and patterns, separated by stitched, grosgrain ribbon, which Jackie has used as inspiration for the fabulous faux stitched border she added.


Visit Jackie's blog for more of her work!

Saturday, February 12

Tutorial - Balcony Cards


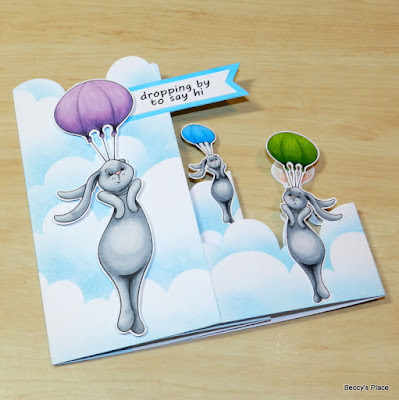
Although construction of this fabulous card is relatively easy, the wow factor lies in its decoration. Two additional pieces of cardstock allow you to build up a wonderful three dimensional scene with the added bonus that we all expect from great folds... the ability to slip into an envelope for posting.


This card fold was suggested to me by Hilary Wilson from Craft Oasis.
She has a wonderful video tutorial, including several beautiful examples, on her YouTube channel.

1. To make a basic card you'll need a piece of cardstock measuring 53/4" x 53/4", a piece measuring 63/4" x 11/2" and a third piece measuring 43/4" x 3". This will create a card with an overall measurement of 53/4" square.


2. Place the 53/4" square of cardstock on your score board and score at 27/8". Fold along the score line to form the card base.

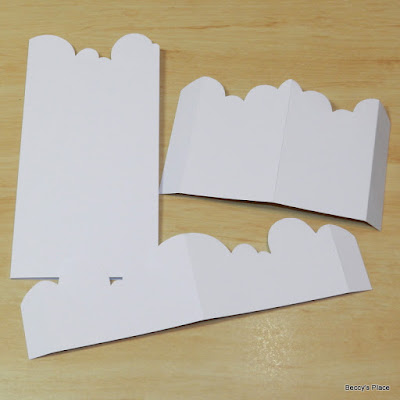
3. Place the 63/4" x 11/2" piece of cardstock horizontally on your score board and score at 1/2", 33/8" and 61/4". Fold along each of the score lines.

4. Place the 43/4" x 3" piece of cardstock horizontally on your score board and score at 1/2", 23/8" and 41/4". Fold along each of the score lines.


5. To construct the card, place the 43/4" x 3" piece of cardstock over the card base, carefully lining up the centre fold and ensuring the bottom edges are flush. Apply glue or double sided tape to the 1/2" tabs on either end, then tuck them under and secure to the card base. (see photos below)


6. Repeat for the longer piece of card, ensuring the bottom edges are flush and the centre folds align. The tabs should tuck under so that the side edges are flush with the sides of your card base. 


7. The card is designed to fold flat with the extra pieces on the outside, as shown below. These extra pieces, or balconies, are the areas that hold the decorations.


8. I had a specific idea in mind for my balcony card, which I'll show in the remainder of this tutorial. If you wish, you can decorate the card you've made up to this point with patterned papers, stamps and embellishments as desired. Keep the decorations to the 53/4" square formed by the side and bottom edge of the card base and longest balcony. This will ensure it fits into a square envelope.

9. I created a "cloud" template from a piece of cardstock, which I then used as a guide for cutting the shapes on the top of my card base and both balcony pieces.


10. I used the same template to ink a cloud design onto the front and inside of my card base as well as the two balcony pieces. I then constructed the card in the same way as described above.


11. To decorate, I printed, coloured and fussy cut a number of the bunnies from the Chute! set of digital stamps, altering the sizes and flipping some for a bit of variation.


12. The largest bunny was secured to the front of the card with foam tape. I also added a flag sentiment, which I printed twice so I'd be able to layer them back to back.


13. When decorating, keep in mind that some of the elements will be seen from the front and inside of the card, so take care to place them well.


Stamps: