Monday, January 30

Sunshine and Flowers


Cynthia has created a beautiful piece of wall art using the flowers from the new Art of Friendship digital stamp set. She printed the image onto a large sheet of watercolour paper, coloured with distress inks and then mounted the painting onto a printed sheet of burlap.


Cynthia also made a beautiful card with a matching tag that would be perfect for a friend's birthday or other important occasion.

Saturday, January 28

Birthday Bears


What's a birthday party without a couple of bears popping in to join the celebrations?! Karin has flipped one of the digital images in the Popping In set to create a frame around the central panel of her card. Flipping, resizing, skewing and recolouring are just some of the reason we love digital stamps!


Thursday, January 26

Store Credit Issue

We're currently having an issue with store credit when attempting to check out. The support team for the online store is working on the problem, but in the meantime, here is a work-around for those attempting to make purchases with store credit:

1. Place the digital stamps you want in your cart and head to the checkout.

2. Sign in as usual and select your billing address.

3. Uncheck the "Apply store credit to order" box, this should allow the other payment methods to appear.

4. Select the "Direct Deposit" option by clicking in the corresponding circle.

5. Now go back and check the "Apply store credit to order" box. This should activate the "Place Order" button and allow you to finalise your order using your store credit.


Selected, retired digital stamps at an incredibly low price for just 48 hours.
No rainchecks. No repeats.

Simple Sentiments
digital stamps

Tuesday, January 24

Tutorial - Slimline Cards


Slimline cards have become very popular recently and with good reason. They're super easy to make, appropriate for any occasion and can be altered for most card-making styles. There are no hard and fast rules for making slimline cards, just a few things to consider regarding envelopes, decorations and size ratios.


I find it easiest to think about my envelope before deciding on the overall size of my slimline card. Most countries will have a business size envelope that corresponds with the standard paper size for letter-writing. In Australia, our standard paper size is A4 and our business envelopes are DL.

If you don't like making your own envelopes, it's a great idea to size your slimline card to fit one of the standard sizes. For A4, you'll need to remove about 1/3 of the length, which is approximately 10cm.


I find business envelopes, and therefore business-sized cards, a little large for my liking and prefer to have a smaller card and make my own envelope. A good ratio for slimline cards is 1:2, which means the height is half the measurement of the length. To make that super simple, just cut a square of cardstock and fold it in half! Mine is 6" square, which creates a folded card measuring 3" x 6".


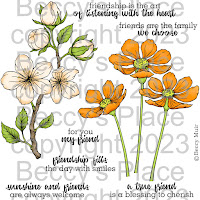
To decorate, I have used one image layered multiple times across a sheet of cardstock. You could also use a very tall or long image, or a series of die cuts, multiple frames, a big ribbon bow... just about anything really.


Trim the image panel to fit the front of your slimline card and add any extra embellishments to finish. I secured some scrap pieces of chipboard to the back of the panel for a little more dimension and weight, then added a sheer ribbon and some glittery stickles.


Stamps:

Sunday, January 22

Hooray!

I've tucked this not-so-little lady behind a frame I created with red and black cardstock. The frame was mounted on chipboard before I added it to the card, giving it some extra dimension and making it look a bit like a door.


Stamps:

Friday, January 20

Anesha's Art of Friendship


A handmade card from a dear friend is a beautiful gift to give or receive. Anesha has created several gorgeous examples using the Art of Friendship digital stamps. She has combined the images with sentiments from the same set, then decorated with beautiful die cuts, patterned papers and some pen work.


Wednesday, January 18

Heads Up!


I've been playing with the bear and hippo images again and wanted to share another fun technique with you. This could easily be used with other images you might have in your collection, just have a look for characters with fairly long necks or upper bodies that could be layered into a frame.


I used the snipping tool (built in to most PCs) to select the head, neck and some of the chest of both characters, then resized them so I'd have a large, medium and small image.


I coloured them all with copic markers, choosing different colours for the three bears, and different tones for each of the hippos. I fussy cut around each one leaving a small section of cardstock at the bottom, which I ended up colouring a little more.


Use dies to cut a rectangular frame. If you don't have dies, simply cut a rectangle of cardstock and use a craft knife to remove a portion from the centre, creating a frame. Make sure the frame is the right size to accommodate the three heads one on top of the other.


A few pieces of chipboard gave my bears a bit more dimension. I slipped the offcuts between the layers, securing them with a few spots of glue.


I used a larger die to cut a panel of cardstock in a contrasting colour. Before securing the bears I also brushed on a little bit of blue ink to simulate the sky and added a sentiment.


I secured a small, tent-fold card blank to the back of the image panel to complete my card.


If you were wondering what happened to the hippo heads... (not a phrase you hear too often)... here they are mounted separately into hexagonal frames.


Stamps:

Monday, January 16

Everything Papercraft - Digital Stamps


Digital Stamps

Digital stamps are images and sentiments that are downloaded to a computer and printed for use on cards and paper craft projects. They can be thought of as print-at-home colouring pages that can be resized, flipped, skewed and recoloured as desired. Many digital stamps include a full-colour version for quick crafting or for those who don’t like to colour. Another big attraction is the fact that they take up no physical storage space. Hundreds of images can be saved into assorted files to make finding an image quick and easy. There are many free images on the internet that can be instantly downloaded to your computer, including a long list right here on the Beccy’s Place blog: FREEBIES


For those who have never used digital stamps before, here's a simple way to save them in Microsoft Word:
1. Open a blank page in Microsoft Word.
2. Go to the image you want to use. Right click on the image and select "Copy".
3. Go back to your blank Word document and right click anywhere on the page. Now select "paste" and the image should appear.
4. You can now save the document so you'll always have the image in your Microsoft Word files, and you can print it ready for use.

And this is how you can save them to another location in your computer:
1. Go to the image you want to download.
2. Right click on the image (click with your right mouse button). A little box will pop up with a few different options. Click on "save as" or "save picture as".
3. Now you will be taken to a list of files in your computer. You can create a new file for all your pictures or you can simply pop it into one of the existing ones. Give the picture a name you will remember and then hit "save".
4. To use the picture, open Microsoft Word or your favourite photo editing program, and use the insert picture command to open it on a page. You can now resize, stretch, recolour or rotate the picture. When you're happy, click print and your picture will be ready to use.

Saturday, January 14

Popping In With Cynthia


If you pop in to Cynthia's place, you'll find these fantastic cards featuring the big old bear and the fun-loving hippo from the new Popping In set of digital stamps. She has used wonderful, vibrant colours for the images as well as the background papers and card bases. Perfect for birthdays, celebrations or just to say hello!


Thursday, January 12

Let's Get Wild


I want to show you a fun way to use the quirky characters from the new Popping In set of digital stamps. I've used the big old bear, but this technique would also work just as well with the hippopotamus.


1. Print the digital stamp slightly shorter than the long edge of your card. For me, that's 51/2" tall for a 6"x4" card blank. If you wish, use a pencil to draw a line from the neck of the bear to the belly where the lines end. This will give you a guide for where to colour.


2. Colour the image and then fussy cut around the edges leaving a "tab" on the right hand side (left hand side for the hippo). Your tab should be around 1/2" wide.


3. Use a craft knife to cut around the outer edge of the balloon, as shown in the photo below. (You don't need to do this step if you don't mind the balloon folding around the side of your card.)


4. Score along the pencil line you made earlier, avoiding the balloon, and fold the tab back behind the bear. Press the fold firmly with a bone folder.


5. With the coloured side face down, attach the tab to the back of your card with strong glue or double-sided tape. (See the photos below for correct placement.) Close the card, then fold the bear to the front.


6. Decorate the front of your card as desired. I used a nice bright piece of paper and one of the sentiments from the Popping In set.


Stamps: