Sunday, January 29

New Release: With All My Heart

Create gorgeous cards for special birthdays, Valentine's Day, weddings, anniversaries and little notes of love with our newest clear stamp set, "With All My Heart". The set contains a bouquet of roses with buds, a single rose, and five sentiments to mix and match. Everything you need to create cards and projects for the special people in your life...

With All My Heart
Clear Stamp Set


I'm thrilled to share the work my talented designers have done with this stamp set, their cards are absolutely beautiful and the images are coloured perfectly.

Petra created three beautiful cards using a combination of stamps from the set. She has kept her designs quite simple to allow her exquisite colouring to shine. The last card was created by stamping the single rose in a repeating pattern with green ink, then layering three panels together.

Carla made two beautiful, romantic cards with both of the images from the set. Her first card is feminine and pretty with lots of beautiful embellishments and a perfectly coloured rose. The second card uses much stronger colours for a gorgeous, striking project. 

Anesha coloured the bouquet of roses with fabulous yellows and greens. She included a watercolour background that compliments the image and really makes the colours come alive. The embossed, pearlised paper gives her project a lovely, romantic flavour.

Thursday, January 26

The Final Frontier...

Here are the two cards I created using the new "Out Of This World" digital stamp set designed by my daughter, Madison. For those who are curious, I've included links to some time lapse videos of me working on them.


Sunday, January 22

New Release: Out Of This World

Outer space is something that has occupied the minds and imaginations of human beings for millennia. From the first human who looked up and marvelled at the stars to the space pioneers of the modern age, we've been intrigued by what lies beyond our planet. So many of us had childhood dreams of becoming an astronaut, walking on the moon and meeting extra-terrestrial life! And while these images probably won't help launch anyone into space, they may just be able to feed the imagination of the little astronauts in your life.

Out of This World 
digital stamp set


My designers have been busy creating some fabulous cards and projects with the new set. There are some amazing techniques on display here, so please don't hesitate to visit their blogs to find out how they created their cards.

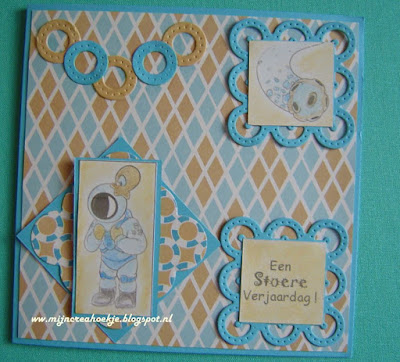
Karin has created a wonderful card in contrasting colours of blue and orange with lots of patterns and shapes. She used two of the images from the set and printed her own sentiment to match.

Don't you just love the bold and vibrant background that Anesha created for her card? All the deep, rich colours contrast beautifully with the fussy cut image of the astronaut.

Carla has made a really fun card that brings to mind all those great shows we watched while growing up... Lost in Space, Star Trek, Marvin the Martian, The Jetsons... it also makes me think of Hitchhikers Guide to the Galaxy.

Petra has become very adept at using these fabulous crayons to create gorgeous backgrounds for her cards. She's even helping out with a workshop to teach people different techniques to add colour. Make sure you stop by her blog to find out more!

AJ has put together two fabulous cards and a brilliant wall poster using this set. How great would the wall decor look in a kid's space-themed bedroom, or even in a study corner?

Check out the background paper on Judy's atomic card! She coloured the image with pencils and then matched it up with vibrant blues and reds for an out-of-this-world feel.

Thursday, January 19

Mmmmmm...

I have more dessert cards to share with you today, using the images from the new "Just Desserts" clear stamp set. This is my favourite set from the latest release, I love colouring all the different fruits and deciding on the "flavours" for the cakes. Hopefully my family and friends don't get tired of dessert themed birthday cards!


Tuesday, January 17

More Desserts!

Out of all the new stamp releases this month, Just Desserts is easily my favourite... and not just because I love desserts. I really like how easy the images are to colour and how vibrant the fruit looks. Plus there's the added bonus of being able to personalise the "flavour" of each dessert for the recipient... bring on the chocolate!


"Just Desserts" Clear Stamps

Sunday, January 15

New Release: Just Desserts

Of all the sets that have been released this month, this is easily my favourite. The cakes and pies are so easy to colour and the combinations are endless. I love the idea of personalising the "flavour" to whomever receives the card. You can have chocolate, strawberry, vanilla, mango... whatever you like!


My designers have been busy creating these
delicious projects to help get you inspired!

Carla created these two beautiful cards using the images from the new set. She coloured the layer cake and the little tartlet with pencils... don't those blueberries look good enough to eat?!

Petra has gone crazy with polka dots and lots of fabulous bright colours! She, too, has done an awesome job colouring the images to create lots of depth and dimension. The bottom card is a circular swing card with a central panel that rotates when the card is opened or closed.

Anesha's card features a lush background that makes me think of tropical outdoor dining, balmy nights and moreish desserts full of plump berries. She has presented her fruit tartlet on a luxurious gold platter to make the most of a special occasion.


Saturday, January 14

Warm Wishes

To add a frosty sparkle to my card, I added some Wink of Stella to the ground around the bunny's feet and a little splodge to his nose as well. Looks like it's time for him to head back to the lodge for a cup of hot chocolate!


Friday, January 13

For Someone Special

I haven't made a Joy Fold card in quite a while, so figured today was the day! I used some of the beautiful patterned paper by Maja Design, a wonderful collection of letter stamps that have an old printing press look, and one of the bunnies from my new "Snow Bunnies" digital stamp set. The big pink button, tied with twine, holds the front part of the card closed.


Thursday, January 12

Tutorial - Building Block Cards


Building block cards get their name from the square shapes that "pop up" when the card is open. They are handily placed to hold a sentiment made of individual letters, or even little images or embellishments. Usually these cards are created by cutting slits directly into the card base and then folding them inside. The method I want to show you today actually uses four strips of cardboard that are adhered to the card base in the same position as the traditional style.


1. Start with a piece of card stock measuring 53/4" x 111/4". Place it horizontally on your score board and score at 33/4" and 71/2". Make a mountain fold on the first score line and a valley fold on the second score line so that you end up with a Z-fold card.


2. Cut four pieces of card stock to measure 11/4" x 5". I've used the same card stock as my base, but feel free to experiment with other colours for a different look.


3. Score each strip at 11/4", 21/2" and 33/4" then fold along the score lines.


4. Starting at the top edge of the card, measure and mark your card base along the valley fold at 11/4", 11/2", 23/4", 3", 41/4" and 41/2".


5. Apply glue or double sided tape to one end of the first strip. Secure it between the top of the card and the first mark you made, keeping it flush with the top of the card and with the rest of the strip facing toward the right hand side. See the photo below.


6. Repeat with the remaining strips using the marks you made earlier to line them up. 


7. Bring the first strip back over to the left hand side and apply glue or double sided tape to the end square. See the photo below.


8. Bend the strip over and secure it to the centre piece of the card, matching the first end you secured. A little box will be formed.


9. Repeat with the remaining three strips until you have four little boxes or "building blocks" in the centre of your card.


10. All that's left is the decoration! Have fun.


Stamps:

Tuesday, January 10

Designer Cards: Snow Bunnies

I've got some more cards to share with you today, also using the new "Snow Bunnies" set of digital stamps. 

This beautiful centre step card was designed and constructed by Carla.
You can find the template for her design either on her blog or in the upcoming January newsletter.

Check out the awesome "fur" around this little guys cuffs and hat brim!
Petra's done a great job with the colours and textures on this card... the grey and blue work perfectly together.

Anesha has gone with some warmer shades of purple for her beautifully shaped card. The rhinestone snowflakes give it the perfect amount of sparkle.