


Monday, October 31
Saturday, October 29
Let The Destruction Begin
We've never owned a cat who particularly cared about decorations, but I do know many people whose pets felt that the garlands, baubles and tinsel were hung purely for their pleasure! Many a destructive tendency has been sated on Christmas decorations with the resulting chaos often covering several rooms of the house!

Stamps:


Tuesday, October 25
Merriest Wishes

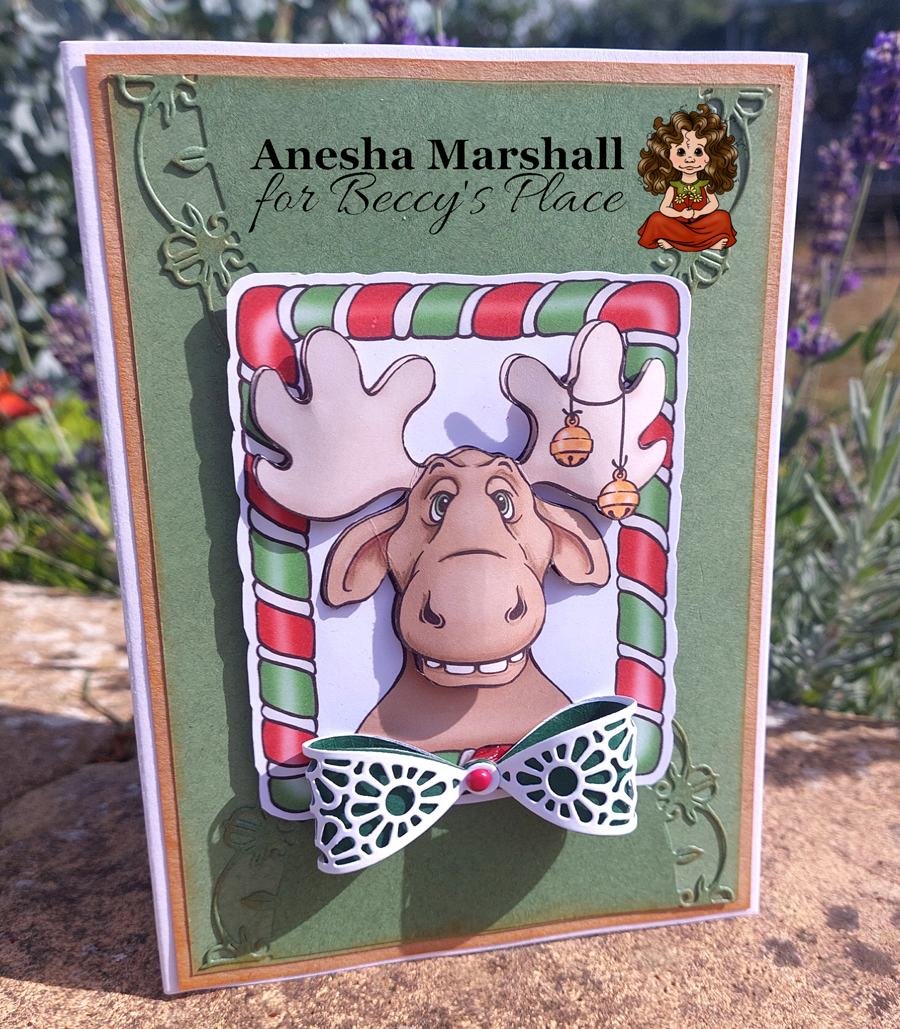
Anesha's fabulous Christmas cards are absolutely loaded with texture and dimension. She has fussy cut and layered several images from the Cozy Christmas set of digital stamps to give her creations a 3D-look. The addition of other dimensional embellishments and layered die cuts adds to the fabulous results.


Monday, October 24

Sunday, October 23
Tutorial - Surprise Pop-Up Cards

Surprise Pop-Up cards are fun to create and have plenty of room for sentiments and hidden embellishments. The mechanism creates a tiny, pop-up easel panel right in the centre of the card, with the added benefit of a large tag that's perfect for holding a handwritten message or bonus image.
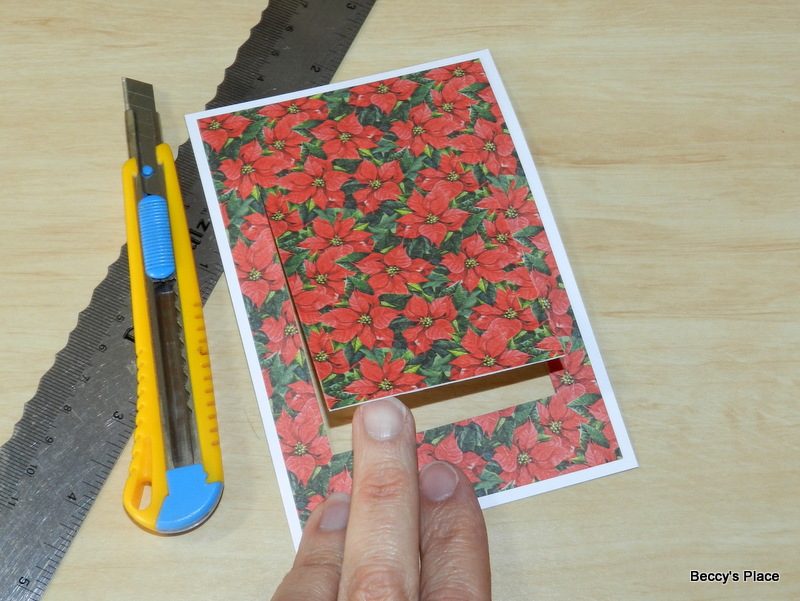
1. Cut a piece of card for the base measuring 8" x 53/4". Score and fold in half so that you have a 4" x 53/4" card base. You'll also need a piece of coordinating cardstock measuring 33/4" x 51/2" and a piece of patterned paper measuring 31/2" x 51/4".

2. Use glue or double sided tape to secure the patterned paper to the piece of cardstock leaving a small border around all four edges.

3. Turn the cardstock over and mark out the cutting and scoring lines for the mechanism of your card. See the template for measurements and placement.


4. Cut along the three cut lines, ensuring your knife or trimmer blade go through both the cardstock and the patterned paper. You've now created a window cover in the front panel of your card.
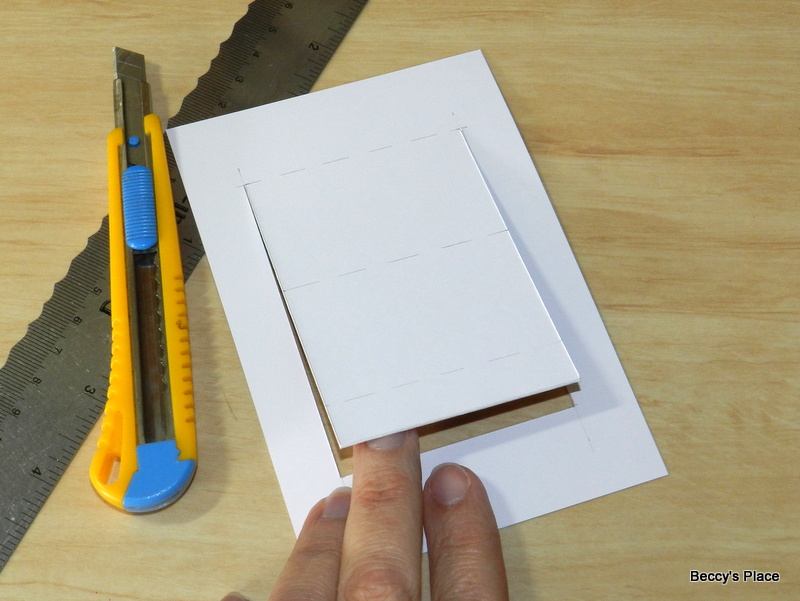
5. Score along each score line, then fold, pressing each crease firmly.


6. Cut a large tag measuring 3" x 5" from a piece of cardstock. If desired, round the top corners and punch a hole in the centre top.


7. Cut a long piece of cardstock measuring 71/4" x 1/2" and loosely fold it around your tag. There should be plenty of room for the tag to slide easily through the loop. Secure the loop with glue or double-sided tape.


8. Slide the loop off the tag and secure it to the back of the window panel, just above the first score line.

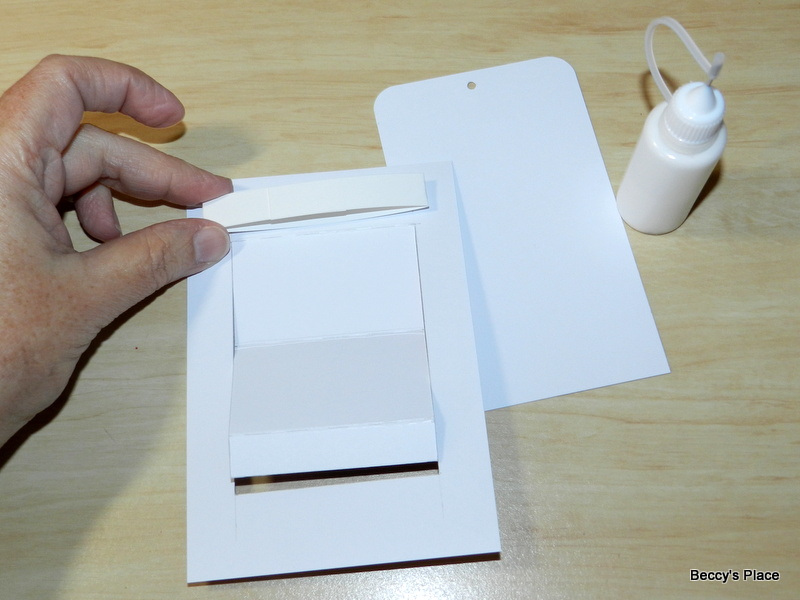
9. Once the glue is dry, slide the tag into the loop.

10. Apply glue or double-sided tape on the 1/2" section at the bottom of the window cover. See the photo below for correct placement.

11. Slide the tag down over the adhesive until the bottom edge is flush with the bottom edge of the window cover. Press in place to create the pop-up mechanism.
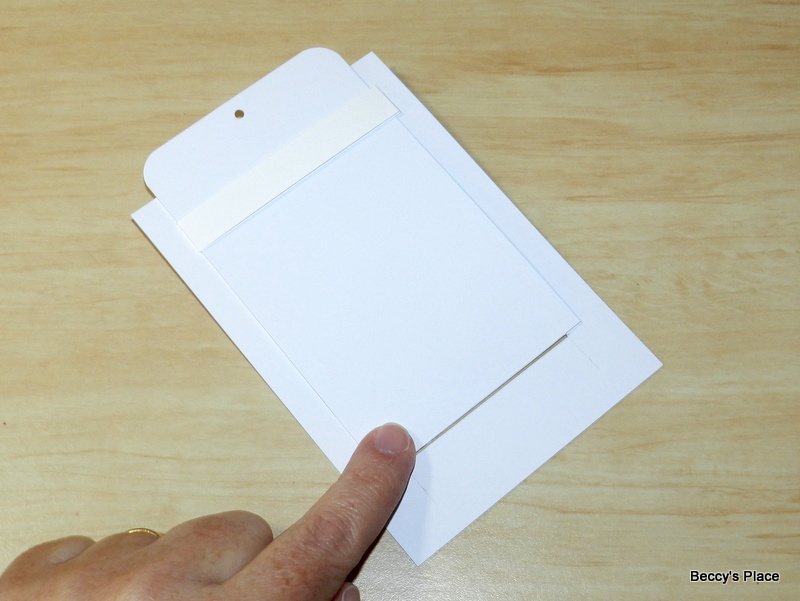

12. The front panel will eventually be fixed to the card front. Once the mechanism is activated, the window cover will slide back to reveal a hidden message or image. This message is actually located on the card blank. I used a panel of cardstock measuring 3" x 4" with a sentiment positioned at the bottom edge. If you prefer, you can stamp directly onto the card blank.


13. Use glue or double-sided tape to secure the front panel onto the card base. Position the adhesive down the left and right side of the panel, along the bottom edge and on the cardstock loop. I have marked the adhesive location in the image below. Secure the front panel to the card blank and allow to dry completely.

14. To decorate, add an image to the pop-up easel, taking care to only add the adhesive to the middle panel of the window cover. Tie a piece of ribbon or twine through the hole in the tag and add a sentiment if desired.


Stamps:

Friday, October 21
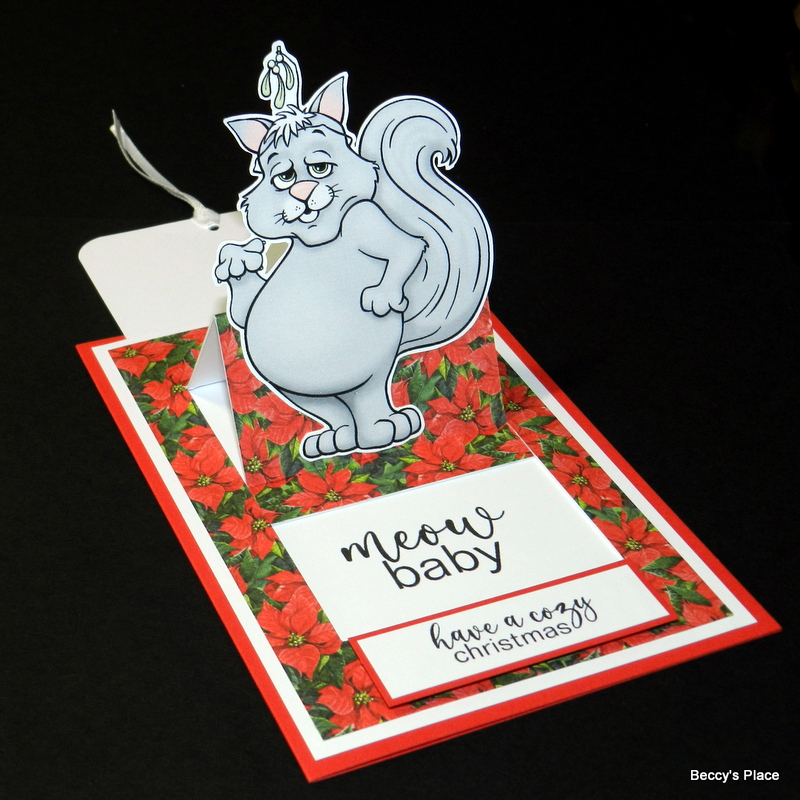
Meow Baby

Deanne created her Christmas card using one of the little cats from the new Christmas Kitties set of digital stamps. She combined the image with red and green festive paper then scattered some rhinestones around for a little bit of sparkle and shine!

Wednesday, October 19
One Layer Card

One layer cards are basically cards that have no mats, extra cardstock or patterned paper and generally, very few embellishments. The main thing to remember when creating your one layer card, is the properties of the mediums you're planning to use to colour or add interest. Since there's only one layer, you have to be careful about markers or paints seeping into the cardstock and becoming visible from the inside.

I'm using coloured pencils to colour my image. The pigment in the pencil actually sits on the surface of the cardstock rather than sinking into the fibres, guaranteeing that there will be no bleed through to the other side. I've printed the image and sentiment on a piece of kraft cardstock, which will provide a fabulous contrast for the colours, but you could use white if you'd prefer.

I start by adding a layer of white pencil to the entire image, which will help intensify the colours I add over the top. This isn't strictly necessary, but it definitely helps to keep the pigments true. Here's a little comparison I did for those who are interested: HERE

I'm using two pencils for each coloured section - a shadow colour and a mid-colour. I start by adding the shadow colour to the recessed areas of the cat's sweater. Around the neck, the fabric will be rolling away at the top, bottom and at the fold in the centre... all the places where you want to add some darkness. Feather the colour out so that you don't end up with sharp lines.

After you've applied the shadow, fill in the entire section with the mid-colour, working directly over the top to help blend the pigments together.

Repeat the process for the other colours you're using.


When colouring the front of the sweater, keep the shadows to the sides, under the collar and waistband. Don't add shadows to the centre of the cat as you don't want those areas to recede (dark colours recede and light colours come forward).


Repeat the process down each of the arms, remembering to keep the shadows to the top and bottom edges to help shape the arms.

Choose a colour for your cat. I want a little grey tabby, so I've chosen a selection of three warm greys plus black. Starting with your darkest colour, add some shading in the darkest, most recessed areas. I've added the black very sparingly to the bottom of the cat, near his tail and either side of his face, just behind his mouth.

Using the next darkest colour, work out from the shadow areas. Continue this process until you've worked through all the pencils and have the entire cat coloured.


I used the darkest grey to add some "stripes" to my tabby.

I like to add a little touch of white pen to the eyes to give them a boost and make them sparkle.

Now to work on the surroundings. I'm using several shades of French grey as well as black to add a shadow around the entire image. Focus the darkest colour under the cat, where he would be making contact with the "ground". Work around with the other pencils, slowly feathering out the colour until it's soft and barely noticeable.


If you like, you can now add some embellishments,
glitters or other mediums to complete your one layer card.
Stamps:

Subscribe to:
Posts (Atom)