I did lots of stamping on my card today, along with some heat embossing and a goodly amount of messy inking... my fingers will probably be green for days!
Sunday, August 30
Thursday, August 27
Tutorial - Twisted Easel Card
I have another version of an easel card to share with you today, and this one has a twist... literally!
1. Start with a square card blank, keeping the fold on the right hand side. My finished card measures 51/2" x 51/2", but you can use any size you like.
2. Score a line from the top left hand corner to the bottom right hand corner of the card front. Fold along the score line pressing firmly with your bone folder to create a crisp, sharp line. Refer to the photo below.
3. Secure a piece of patterned paper on the inside of your card with double sided tape or glue. When the card stands open this piece of paper will be visible so you want it to match your other papers and embellishments.
4. Cut a piece of cardstock that is the same size as your folded card. In my case that is 51/2" x 51/2". This will form the front panel of your card. Decorate as desired.
5. Apply double sided tape or glue to the lower half of your card front, below the score line. Make sure none of the adhesive spills over onto the top half or your card won't open properly.
6. Line up the decorated panel and secure it to the front of the card. You've now formed the base of your twisted easel card.
7. Add a three dimensional embellishment on the inside of the card to act as an anchor point. I used a circle of cardstock secured with some foam tape.
8. Add additional embellishments as desired... and you're done!
Stamps:
Labels:
easel card,
halloween,
pumpkins,
The Great Jack,
tutorial,
twisted easel card
Monday, August 24
Mini Sets
For those people who don't want to purchase the full Tea Party set I have three smaller versions available in store now.
Cup of Tea mini set
Friends are the Frosting mini set
Tea and Cupcakes mini set
Sunday, August 23
New Release: Tea Party Set
I confess to being a big fan of a cup of tea and a cupcake, and if you can combine those two things with friends, laughter and a good chat then you pretty much have one of life's best moments.
Tea Party Set
Christine created this gorgeous, colourful card.
This pretty, feminine card was created by Judy.
Petra added a hand stitched design to her beautiful card.
This warm and pretty country style card is from Shirley.
Anesha made these three beautiful cards using soft and pretty colours.
Tuesday, August 18
Scrap Card #28
The little bear I used on my card today is one of my old freebies (you can find him here.) I love his soulful expression and the big armful of happy daisies he gathered for someone special.
Sunday, August 16
New Release: Cool Chicks Set
This set began as a funny drawing for a card I wanted to make for my brother. He's a little bit younger than me and loves to remind me of that every birthday... especially those "big" ones we all dread! Well, he turned 40 this year so it was the perfect opportunity to get some of my own back. Can you guess which image and sentiment I used??
Cool Chicks Set
Judy's Card
Two Cards from Petra
Three Cards from Shirley
A wall hanging and card from Anesha
Astrid's Card
Two Cards from Christine
Saturday, August 15
Scrap Card #27
I can't help but think of an Andy Warhol painting when I look at this card... must be the repetition in the background!
Tuesday, August 11
Upcycled Canister
Up-cycling is all the rage at the moment, which is great for the environment since most of the items being decorated were once destined for the trash heap. You'd be surprised at all the creative projects people are making with throw away items or treasures found in second hand shops. A quick search on "upcycled" or "altered" will have you scouring the house, and the bins, for your own potential works of art.
1. Choose an item that can withstand heat, moisture and lots of handling so that it doesn't break or fall apart as you're decorating it. I used a sturdy cardboard cylinder that has a removable plastic lid and a solid metal base. Give it a good clean to make sure it's free of dirt and grease.
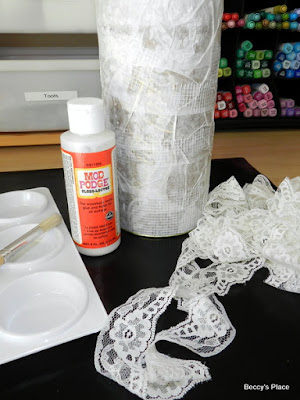
2. Apply a layer of masking tape directly on to the cylinder. Try to get lots of creases and ridges in the tape for added texture and interest. Have a look through your home and garage for other interesting tapes, such as plasterers tape or first aid tape which will give different textures while helping to hold everything to the surface you're decorating.
3. Continue adding texture with pastes, stencils, lace, textiles, string and other mediums. Don't worry about colours at this point, it's all about texture and dimension.
4. Time to apply a layer of gesso. Gesso is a thick, white (or tinted) paint primer that is usually applied to artist canvas before the art work is created.
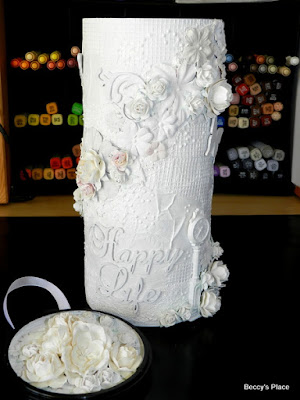
5. Now choose some embellishments. Once again, we're looking for textures and shapes rather than colours and surface patterns. This is a good way to use up all those odd coloured flowers, charms and letters we all have in our stash!
6. I like to adhere everything before painting, but feel free to paint each embellishment first if you prefer. Use good strong glues to secure the embellishments to your cylinder... I used a combination of tacky glue, a hot glue gun and glossy accents.
7. Time to gesso again. At this point, I left my project to dry overnight.
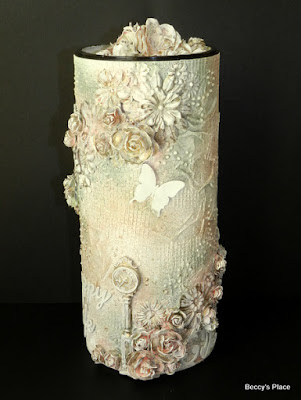
8. Now that the glue and gesso has dried, we can add some colour back in to the project. I used a variety of spray colours, alcohol ink and perfect pearls. Dry the project between colours, particularly with the sprays, so you don't end up with a muddy mess. Use a hair dryer or heat gun to help the drying process.
9. Use your finger to rub some more white gesso on some of the embellishments. This will help highlight them and lift them out of the background. You can seal your project with a light spray of varnish if you wish.
Photos and written instructions are copyright Beccy Muir.
All rights reserved.
Subscribe to:
Comments (Atom)


