Starts Tomorrow!!!
Tuesday, October 31
Sunday, October 29
Sunny and Bright
A brightly coloured image often looks great against a plain background. There's no competition for attention and the contrast can be quite striking. I've layered pieces of white cardstock with simple embossed edges behind my image panel. The raised areas create slight shadows that can be seen more easily, which is one of the secrets to successful white on white cards.
Digital Stamps:
Friday, October 27
Sunny and Bright
Check out the gnarly, beach-themed shaker card Cynthia created using one of the images from the Sandy Christmas set of digital stamps. The selection of beads and sequins she added to the window fabulously mimics the flotsam and jetsam you can find on sandy beaches, and the die cut palm tree and golden sun totally bring the tropical vibes!
After colouring, Cynthia added some sandy texture to the sandman on her second card, which also adds a little bit of sparkle.
Her final project is a collection of adorable tags that could double as tree ornaments or cute holiday bookmarks.
Thursday, October 26
Wednesday, October 25
Tutorial - Colouring Golden Bells
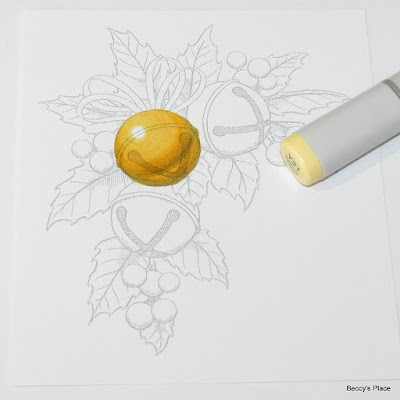
Today I want to show you one of the techniques I use to colour metal, specifically, these golden bells. You can change the colours and mediums for the results you want, such as silver bells (using greys), but the technique is basically the same.
1. Begin by printing the image and selecting your colours. I'm using Copic markers - E84, Y28, Y26, Y23, Y21 and the 0 blender pen.
2. Use the Y21 to mark out a highlight area, this will remain free of any colour and will appear to be a very high shine. I like to make a small circle (since the bell is circular) at the top and off to one side. Use the same pen (Y21) to colour the rest of the bell.
3. Now we're going to switch to the darkest marker, which is E84, and place our shadow opposite the highlight. In my case, that's around the base and right hand edge of the bell. Notice how I'm following the shape of the bell.
4. Metal often has a reflected highlight near the shadow. Use the E84 to add a second curve just above the first, connecting the ends.
5. Increase the size of the shadow with the Y28, blending into the darker colour. The second highlight will slowly decrease in size as you work through the other colours. Don't worry too much about this, as long as it's lighter than the areas around it, the final colour doesn't matter.
6. Next up is the Y26. Continue working on your shadow, ensuring that you follow the shape of the bell and the highlight.
7. Continue working with the Y23 blending all the tones together as you go. At this point, you will almost be at the small white highlight.
8. Work the Y21 right up to, then slightly into, the white highlight.
9. To help blend the white highlight and the yellow markers, apply one layer of the blending pen (0) around the edge of the highlight. Don't overwork the area or you'll end up with mottling.
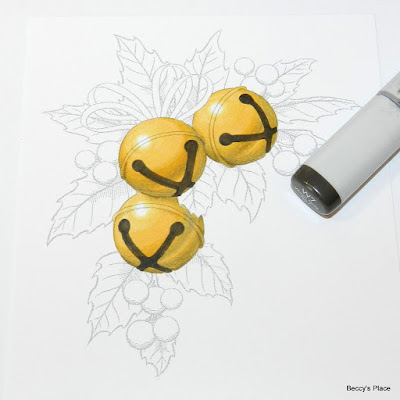
10. Now repeat the same steps for the other two bells, starting with the Y21 and marking out your highlight.
11. Once the bells are coloured, you can come back in with the E84 and add a little bit of darker detail. As you can see in the photo below, I added just a touch to the underside of the bells and around the centre rims.
12. Allow a few minutes for the image to dry completely. It's important not to work on wet ink when you're adding fine details as the alcohol can bleed and leave a fuzzy edge. With metal objects, you always want the edges to be straight and crisp. Once dry, colour the openings in the bells with W7, a nice warm, dark grey.
If you'd like to add even more shadows, highlights and details, you can do so with coloured pencils. They will easily go on over the alcohol ink without causing a disturbance, and can be removed with an eraser if necessary.
The completed image
Digital Stamps:
Tuesday, October 24
Sunday, October 22
Traditional Christmas
Carla has created these two beautiful Christmas cards with images from the Jingle Bells set of digital stamps, which she coloured with pencils in a traditional colour scheme. For her first card, she fussy cut around two of the bell images and used them to frame her holiday sentiment. Her second card features a star-stencilled background that coordinates nicely with the colours in the image.
Labels:
Carla Aerts,
christmas,
design team cards,
Jingle Bells
Friday, October 20
Tutorial - WV Fold
Created from two pieces of folded cardstock that resemble the letters "W" and "V", these fabulous cards are great for showcasing pretty papers and multiple images. They fit into a standard envelope and fold flat for postage, which is always a welcome bonus!
1. To create the card base, you'll need one piece of cardstock measuring 12" x 6" and one piece of cardstock measuring 6" x 3".
2. Place the larger piece of cardstock horizontally on your score board and score at 2", 4", 6" and 8". Make a mountain fold, a valley fold, another mountain and end with a valley so that you have a concertina.
3. Place the smaller piece of cardstock horizontally on your scoreboard and score at 3". Fold along the score line.
4. To decorate, you'll need:
- one piece of patterned paper measuring 33/4" x 53/4"
- four pieces of patterned paper measuring 13/4" x 53/4"
- three sentiment / image panels measuring 23/4" x 23/4"
(NOTE: I used the above measurements to cut pieces of silver card, which I then topped with patterned paper / cardstock that was 1/4" smaller)
5. Secure the patterned paper to the large card base with glue or double sided tape. Secure two of the image / sentiment panels to the small card base - the panel on the left hand side is the panel that will appear on the front of the closed card.
6. Secure the third panel to the end of the large card base, centring it as well as you can.
7. Now fold the small card and position it over the third panel. Take care to hold it perfectly in place while you complete the rest of the steps below.
8. Open the small card taking care to hold it in place.
9. Bring the closest fold over the top of the small card and mark the edge with a pencil. This will give you a guide for adding the adhesive.
10. Open the large card again and apply glue or double sided tape to the left hand side of the small card, up to the pencil mark. Remember to keep the small card centred over the panel. Once the adhesive is in place, bring the fold over again and secure the sections together.
11. Completely close the large card, and open the small card. Apply glue or double sided tape to the right hand side, no further than 11/4" from the edge. Close the small card securing it to the first panel of the large card base.
Digital Stamps:
Subscribe to:
Comments (Atom)


