Monday, January 29

I Love You More...

A simple card using one of the images from the French Fries set of digital stamps, coloured with copic markers, fussy cut, and popped up with scraps of chipboard. I printed a sheet of digital paper from the same set for my background.


Digital Stamps:

Saturday, January 27

Fun Fold


Kathy used one of the pre-coloured images from the new Ruff Day set of digital stamps to create this fun fold card. She added one of the sentiments in the set to the front of the card, and one to the inside, which are both visible when the card is completely open.


Thursday, January 25


Selected, retired digital stamps at an incredibly low price for just 48 hours.
No rainchecks. No repeats.

Cattleya Orchid
digital stamps

Tuesday, January 23

The Age Old Question...

Gravy or Tomato Sauce?

I'm from a generation where hot chips (fries) were wrapped in unprinted newspaper and shared communally with the whole family, usually outside, by the beach, and with a few pieces of battered flake (shark). Since the chips were shared, the argument was always about what sauce was going to be added. Mum, Dad, and my sister preferred salt and vinegar (quite a punch in the mouth), and my brothers liked tomato sauce (ketchup). I however, was, and still am, a gravy girl!


I coloured the above image in tribute to the delicious, and superior, mix of savoury gravy and hot crispy chips. Sadly, the contrast is lacking, which meant my mouth-watering gravy had to become ordinary, run-of-the-mill tomato sauce.


Digital Stamps:

Sunday, January 21

Hot and Crispy


The new French Fries set of digital stamps includes a variety of matching papers, two of which appear in the background of Anesha's fun creations. She coloured the images with fabulous, bright markers to really bring them to life.


Friday, January 19

Ruff Day?

A big, warm snuggle with this gorgeous fellow would have you feeling better in no time!
Coloured with Prismacolor pencils on smooth cardstock.


Digital Stamps:

Wednesday, January 17

Tutorial - Mirror Fold Card


A few additional score lines turns a simple tri-fold card into a fabulous mirror fold!


TEMPLATE:

1. Place a 53/4" x 111/4" piece of cardstock horizontally on your score board and score at 33/4" and again at 71/2". Make a valley fold and a mountain fold to create your card base.


2. At the first score line, measure 2" down from the top edge of the card and make a mark. At the second score line, measure 2" up from the bottom edge of the card and make a mark. (Refer to the template for placement).


3. Score from the top left-hand corner to the first 2" mark, then from the 2" mark to the top of the second vertical score line. (Refer to the template for correct placement).

4. Score from the bottom of the first vertical score line to the second 2" mark, then from the second 2" mark to the bottom right-hand corner.


5. Close the card and loosen the score lines by bending them slightly as shown below. This will help you create the folds.


6. Bend the cardstock along the score lines, in the opposite direction of the vertical folds. The first "triangle" will fold backwards, and the second will come forward. See below.


7. To decorate, cut patterned paper and/or cardstock to fit each section of the card. I found it easiest to cut three 31/2" x 51/2" pieces of cardstock - one for each panel - then used a pencil to mark the score lines before trimming them to shape. As you can see, I also added a layer of patterned paper over the top.


8. Embellish as desired.


Digital Stamps:

Monday, January 15

Happy Hounds


Karin coloured two of the images from the new Ruff Day set of digital stamps to create these fun cards! 


Saturday, January 13

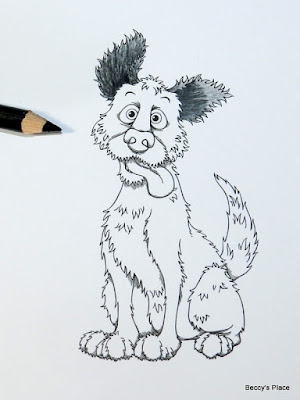
Tutorial - Colouring A Shaggy Coat


Today I want to show you how to colour the hair on a shaggy dog. In my example I've used black pencil, but you can switch it out for whatever colour you'd like your pooch to be.


1. Start by printing (or stamping) your image onto a piece of white cardstock, then begin adding the first layer of colour. It's important to colour in the direction of the hair growth, for example, the hair in his ears grows up toward the tip of the ear.


2. Now add in the darkest area of colour, which will be inside the ear. Again, make sure you follow the direction of hair growth. Keep your pencil quite sharp so that the individual strokes are visible.


3. Add more pencil strokes coming out from the darkest area. As you work outward, allow the strokes to become further apart so that "gaps" start to appear. These will naturally lighten the area.


4. As you get to the lightest area, apply less pressure to the pencil as well as keeping the strokes further apart.


5. Now apply a base layer of pencil to the face. In general, dog fur grows outward from the nose, so that's how you'll want to colour.


6. Add in the darkest areas of colour - around the eyes, which helps to sink them into the skull and prevent bulging, below the nose and around the back and bottom of the muzzle.


7. Now add in the mid strokes working through to the lightest pencil strokes at the top of the head and muzzle.


8. If you wish, you can use your black pencil to add more shading to the dark areas. You can do this in the traditional way or with short, dark lines. I've added more shading around his muzzle to help separate and distinguish it from the rest of the dog's head.


9. Add a light coat of pencil to the nose, then colour the nostrils black.


10. Shade from the bottom of the nose to about half way up, reducing the amount of pressure on the pencil so that the colour fades out. You don't want to use obvious pencil strokes on the nose as it has a smooth texture.


11. Complete the nose by shading in slightly from the top and each side. This will help to give the impression of shape. If you wish, you can add a little white pencil as a highlight.


12. Finish the dog's head by colouring his chin in the same manner as the rest of his fur.


13. Apply a layer of colour to the dog's body. (You can work in smaller stages if you prefer.) Remember to always follow the direction of the fur's growth, which is away from the head and toward the tail. The fur on the legs grows down toward the feet.


14. Add in the darkest areas and then work out toward the lighter sections.


15. Add additional shading where necessary, paying particular attention to areas that overlap.


16. Complete the image by colouring the eyes and tongue.


Digital Stamps: