Saturday, December 30

2023 in Review

My favourite makes for the year.
I hope you'll also post the cards you enjoyed creating in 2023 and share a link in the comments below.

JANUARY - Art of Friendship

FEBRUARY - Beachside Bliss

MARCH - Book Lovers

APRIL - Birthday Bears

MAY - Card Panels 1

JUNE - Fairy Folk

JULY - Sentimental clear stamps

AUGUST - Over The Back Fence

SEPTEMBER - Stack Of Jacks

OCTOBER - Sandy Christmas

NOVEMBER - Santa Claus

DECEMBER - Cat Tails

Tuesday, December 26

Cat Collection


Cynthia has created this fabulous set of cards using the Cat Tails set of digital stamps.


By brushing in some ink around the cat image, she's both grounded it and also tied it in with the colours in the patterned paper. More ink on the sentiment tag keeps everything beautifully coordinated.


For this card, Cynthia printed the cat image directly onto a piece of patterned paper, which she coordinated with the cardstock for her frame and card base. Some detailed embossing adds beautiful texture to the finished project.


This final card has been coloured with yellow and orange inks to simulate a beautiful sunset.

Monday, December 25

Sunday, December 24

Orange Tulip

I don't do a lot with the colour orange, so thought it was about time I cracked out the orange markers to do some no-line colouring. A blue green background gives me the perfect contrast for my orange tulip.


Digital Stamps:

Friday, December 22

Celebrate


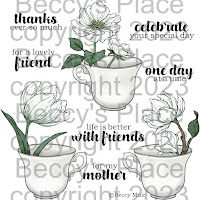
Deanne has used one of the pre-coloured images from the new Stem in a Teacup digital set to create this pretty card. A scattering of coloured sequins adds a little sparkle and a wide organza bow finishes the project nicely.

Thursday, December 21

Green and Gold

Like yesterday's card, I've used white pencils on dark green cardstock to colour the flower image. A white bow and some gold cardstock finish my design. I have to confess that I wish I'd chosen silver instead of gold, I think it would have complimented the green better... ah well, there's always next time.


Digital Stamps:

Wednesday, December 20

White on Dark Cardstock

White pencil on dark cardstock is one of my favourite colouring techniques, the end result is always so striking! I've also added black pencil to deepen some of the shadows and to ground the teacup to its surroundings.


A few process photos:


Digital Stamps:

Monday, December 18

Relax


Who wouldn't want to sit by the window watching a glorious sunset fill the evening sky?
Kathy has created a gorgeous scene using one of the images from the Cat Tails set of digital stamps and lots of spectacular colour! She also decorated the inside of her card with a sentiment and pieces of matching paper.


Sunday, December 17

Tutorial - Adding a Garden


Today I want to show you how to create a simple background for your silhouette images by using a combination of water-based inks, alcohol markers and a fine line pen. Since the inks and markers have a different base - water vs. alcohol - they can be layered without smudging or bleeding together.


1. Start by selecting a few base colours to ink the background. I've chosen a couple of greens, a pretty pink and a light blue for the sky. You'll also need blending brushes or daubers, and, of course, a printed silhouette image.


2. Blend some of the darker green into the base of the image. Don't worry about making it smooth and consistent, a few blotches will add to the effect.


3. Now blend some of the brighter green above the first layer of colour. (If you don't have another green, just continue with your first colour)


4. Bring in some blue for the sky.


5. Add some patches of pink here and there. This will be the basis for your flowers.


6. Use a fine line pen to create long blades of grass. These are formed with simple, slightly curved strokes. Remember not to have them all facing in the same direction, and you also want to vary the length and placement. There's no need to fill in the entire area, just have little "patches" here and there.


7. At the base of each patch of grass, add some tiny, broken, horizontal lines and various sized dots to simulate soil and pebbles. This will also give the impression of little shadows.


8. Now "blob" in some flowers with a pink alcohol marker. Don't spend a lot of time trying to draw realistic petals... five or six blobs of colour in a loose circle is all you need, and there's no need to complete every circle. Bunch your flowers together, and again, vary the sizes, shapes and distances between flowers.


9. Add in some tiny leaves and a few thin stems with a green marker.


10. Add some more pen lines around your flowers, leaves and stems. Don't outline every flower and keep the lines broken and inconsistent.


11. Using warm grey tones, add in some shadows beneath the image and around the base of each patch of grass. Start with a dark grey and blend it down the page with a few lighter tones.


Digital Stamps:

Saturday, December 16

Everything Papercraft - Water Markers


Water markers are felt-tip pens that contain a reservoir of water-based ink. There are hundreds of different brands that vary in quality and versatility, from the inexpensive markers used by school children to the artist grade pens you’ll find in well-stocked art studios.

Some of the main differences between water markers include the style of nib, the quality of the ink, the size and shape of the barrel, and the composition of the reservoir housed inside.

Nibs are generally made from synthetic fibres that are shaped in various ways, such as brush nibs, chisels and bullets. Different tips result in different lines and shapes and make certain techniques easier to achieve. For example, it’s easiest to form flower petals with a brush nib, while bullet tips are great for stippling.

Ink quality varies significantly between brands, so it’s always a good idea to do a little research before investing in a set of water markers. Good brands will have ink that is vibrant, long-lasting and blends well with other colours. It will also stay true to colour when thinned with water.

The ink reservoir is housed inside the barrel of the marker and can be made from a variety of materials, such as cotton filaments or polyester fibres, depending on the type of ink. Better quality pens will have reservoirs that hold lots of ink, which prolongs the life of the marker, reducing cost and waste.

The size and shape of the marker barrel is really a matter of personal preference. Large, wide pens are often good for children who are still developing their fine motor skills, while general crafters may prefer markers that are around the same shape as a biro.


Note: I personally prefer Distress Markers, but I also have Tombows and simple Crayolas from the grocery store that I use now and again. I always advise crafters to try out different brands, such as during craft shows, classes or in certain stores, until they find what best suits their needs and style.