


Friday, October 30
Thursday, October 29


Tuesday, October 27
Jack-O-Lanterns

It's pumpkin season at Deanne's house and she's creating lots of wonderful autumn themed projects to get the festivities going, including these two fabulous cards. Perfect for Thanksgiving, Halloween or as a seasonal greeting, her cards feature lots of warm, fall colours, cute embellishments and fabulous patterned papers.


Stamps:

Sunday, October 25
Pumpkin Season!

If you're not in the mood for pumpkin season then this glorious card by Judy will definitely tip you over the edge. She's used wonderful autumn colours and beautiful patterned paper to embellish the card and accentuate the big, round pumpkins.


Stamps:

Friday, October 23
Broderie Borders
I have several large border punches that don't see the outside of the drawer too often, simply because they are so large. But today is the day! I have used one of the punches to add a pretty broderie border down both sides of my card.

Stamps:

Thursday, October 22


Wednesday, October 21
Christmastime
I've made my mitten extra "snuggly" by stippling the marker rather than colouring with smooth strokes. The pigment doesn't blend evenly giving the impression of soft wool or fur. I made the background paper by using some of the alcohol markers I used to colour the image, which ensures a nice, consistent theme.

Stamps:
Monday, October 19
Handmade Gift Giving

I've been looking forward to sharing Kathy's project since she emailed the photos to me. It's such a great idea and so much fun that I feel sure many of you will want to create something similar for the young-at-heart in your lives.

Here's what Kathy had to say about creating this awesome hand-made gift:
For the Gingerbread set, I wanted to make a fun gift for our 3 year old niece… so printed off the gingerbread house on white paper to make it a coloring sheet. I attached magnet strips across the corners and along the edges, so that the finished coloring sheet can be attached to the refrigerator. I printed the candies (colored version) from the gingerbread house onto white paper, and traced the "snowy peaks" onto fun foam, trimmed them all, and attached magnets to the back of each. The final touch was to add sparkly Stickles to the spice drops and “snowy peaks.”


You can find more inspiration from Kathy by following the link to her blog:
Saturday, October 17
Jolly Holiday Easel Card
It's been a very long time since I've been in an old fashioned candy shop, but as a child, I can vividly remember buckets of multi-coloured and multi-flavoured hard candy sticks, almost like a candy cane, but without the bend in the top. I was fascinated by the range of flavours available and probably tried almost every one of them! These days I've seen multi-coloured candy canes in the grocery stores. I've never tried one, but I sincerely doubt they're as good as when I was young... but isn't that always the way?


Stamps:

Thursday, October 15
Everything Papercraft - Collage

Collage is a collection of assorted items organised in a visually appealing or artistic way. Collage techniques have been used for thousands of years, first emerging when paper was created in China around 200BC. These days collage techniques are used in painting, mosaics, wood projects, photo montage and even digital arts.
In papercraft, we arrange papers, photos, embellishments, stamped images and textiles to decorate cards, scrapbook pages and off-the-page projects. Admired for its relatively low cost and endless creative possibilities, collage is still popular today with professional artists and primary school children alike.

STAMPED COLLAGE CARD
Tuesday, October 13
Hot Tip Tuesday

To achieve a glow or shine on a coloured project, simply select a medium from another colouring family and add a blended ring of colour around the item that's glowing. For example, I've coloured my little reindeer with alcohol markers, which are from the oil/solvent/alcohol family. To add a glow around the reindeer's nose, I blended some pencil, which is a different family, over the top of the marker. Being from two different families means the pencils and markers won't react with each other so there's no worry about smudging or mottling.


Stamps:

Saturday, October 10
Tutorial - Yo Yo Spinner Card

Yo Yo Spinner cards contain an awesome, interactive element that spins like an old fashioned yo yo every time someone pulls the string. The spinner can be attached to just about any kind of card, and you can easily vary the size by simply cutting smaller or larger circles!

Requirements:
- 51/4" x 51/4" card base
- 5" x 5" piece of red card stock
- 43/4"x 43/4" piece of white card stock
- two 13/4" card stock circles (I have one red and one white)
- 11/2" card stock circle
- two 1" acetate circles
- small brad
- 12" length of string
- a sentiment and some embellishments

1. We'll start by constructing the spinner element. Measure and mark the centre of the three card stock circles and the two acetate circles. Use an awl or piercing tool to make a hole in the centre of each circle.


2. Use glue dots or high-tack double sided tape to secure one of the acetate circles to one of the 13/4" card stock circles. Avoid placing the adhesive over the holes you pierced earlier.
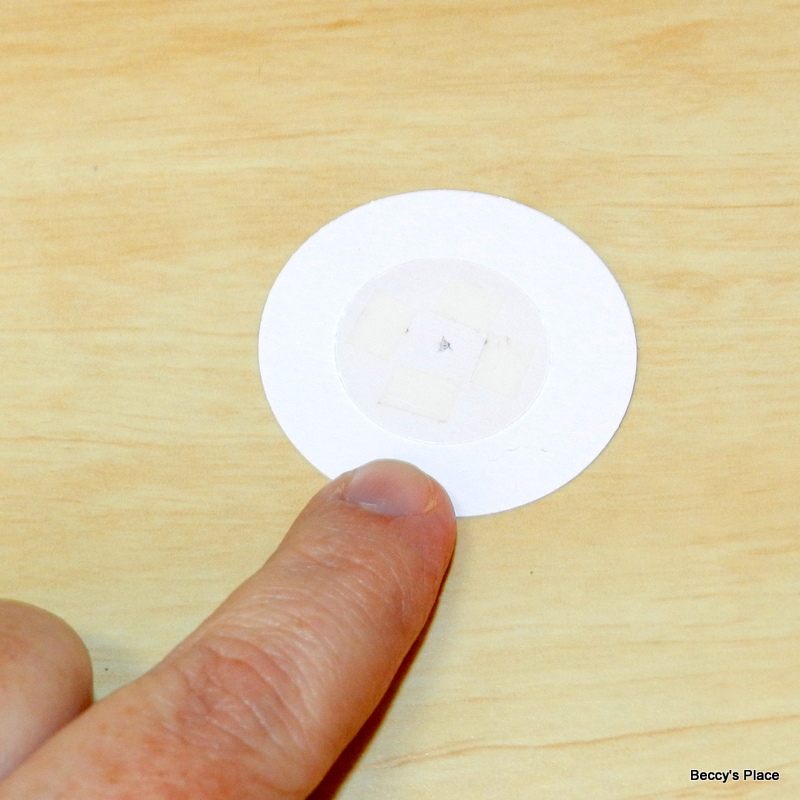
3. Trim a piece of foam tape into a rough 1/2" circle. (Start with a square of foam tape and trim off each of the four corners). Place it in the centre of the second piece of acetate, directly over the hole you pierced earlier.

4. Remove the backing, and secure one end of the string to the piece of foam tape. To ensure maximum hold, it's a good idea to fray the end of the string a little so that it sits flat against the adhesive.

5. Cut another piece of foam tape and place on top of the first, sandwiching the string between them.


6. Pierce through the layers of foam tape using the hole in the acetate as a guide. Keeping the acetate on your piercing tool, remove the backing from the foam tape and adhere to the second 13/4" circle of card stock. Use the piercing tool as a guide.


7. Now push the brad through the card stock, the foam and the acetate so that the head of the brad is against the card stock circle and the pins are protruding from the acetate. See the photos below.


8. Push the brad through the first 13/4" circle so that the two acetate pieces are touching. Open the brad pins but DO NOT make the brad too tight. The circles should move easily.


9. Decorate the spinner as desired. I added one of the candies from the Gingerbread Wishes set, but you can add any little image or sentiment you like. It doesn't have to be a circular image and it doesn't need to be smaller than the spinner, although you don't want it to be too big or you might have trouble winding the string around the mechanism.

10. Decorate your card base with the card stock squares, the embellishments and a sentiment, remembering to leave space for your spinner.

11. Apply adhesive to the back of your spinner taking care to avoid the brad pins. Make sure the string is completely unwound from the mechanism and your image or sentiment is upright before you secure it to the card base. Allow the adhesive to dry completely.


12. Now wind the string around the mechanism... and then pull! It may take two or three attempts to get the spinner to move smoothly.


13. The final step is to add a little grip to the end of the string. You could use buttons, tie a knot, add a bead or, as I've done, sandwich the string between two little circles of card stock.


This card is so much fun and will add an extra little surprise to your card-giving.
I hope you'll give it a try!
Stamps:

Subscribe to:
Posts (Atom)