Thursday, December 15

My Big Announcement

After much encouragement and support from dear friends and family I am about to embark on a new venture - my very own digital stamp store!  Needless to say, I'm very excited, but also a little nervous.  There's still lots to be done and even more for me to learn but I think I'm up for the challenge!


I'd like to take the opportunity now to thank you all for your  support, your comments and compliments over the last couple of years, you've really given me the motivation to continue.  In all the time that I've been running this blog I've never had a single negative comment, message or email and I think that just goes to show what a wonderful world we crafters share!

I'll be taking a bit of respite over the Christmas and New Year period to catch up with my family, eat, celebrate, eat, do some shopping, some more eating, a little bit of cooking followed by more eating - I'm sure you can all relate!  Somewhere in there we're planning a road trip down to Melbourne with the kids and Jeff's mum (who is coming all the way from Oregon in the U.S.).

May the spirit of Christmas bring you peace,
The gladness of Christmas give you hope,
The warmth of Christmas grant you love.
~ unknown
Cheers,
Beccy Muir

Monday, December 12

Tutorial - Box Cards


Today's project is perfect for this time of the year when you are giving little gifts to friends and colleagues.  Box cards contain not only your holiday greetings but also have room for a little treat... I've seen them filled with candy canes, chocolates or little handmade gift tags.


1.  Start with a piece of cardstock measuring 8" x 12".  Place it horizontally (landscape orientation) on your scoreboard with the wrongside facing up.  Score at 3.5", 4", 7.5", 8" and 11.5".


2.  Turn the cardstock 90 degrees so it is vertical (landscape orientation) on your scoreboard.  Score at 0.5", 1", 7" and 7.5".


3.  This part is a little bit tricky, so make sure you understand what you are cutting before you start.  You want to end up with a piece of cardstock that looks like the one below.  I used a craft knife and metal ruler to cut away the excess cardstock, but scissors would also work well.
 

4.  I found the box folded better if I cut off a very narrow piece of cardstock from the far right side.  You can see in the photo below just how narrow the piece is.  You don't have to be too precise since this edge will be folded inside the card.

5.  Fold and crease all the score lines.

6.  I used a little corner cutter to round off the edges of the top and bottom flaps making it easier to open the box and giving and neater appearance.

7.  Use your favourite tool to cut an opening in the cardstock.  It can be any shape you wish but make sure you stay within the fold lines.

8.  Cut a piece of clear plastic or acetate to fit over the aperture you cut in the cardstock.  For a great effect, run the piece of plastic through your favourite embossing machine.


9.  Use some double-sided tape to secure the piece of plastic to the cardstock, completely covering the aperture.

10.  Add some more double-sided tape to the underside of the far right flap.

11.  Remove the backing paper from the double-sided tape, then fold the box along the score lines.  Secure it to the first narrow area of cardstock on the left side.  This will give you the basic box shape.

12.  Trim about 0.25" from the little taglets at either end of the box.  This will make it easier to close the box.

13.  Close the ends, add some embellishments and you're done!

Thursday, December 1

Let it Snow!

This is an anything but a card project I made a few months ago for a challenge at Card Camp. I made it by cutting eight large snowflakes from the Snowflake Pendant dies by Spellbinders, then threaded some beads through the centre and added a piece of string at the top for hanging. Believe it or not, it now takes pride of place in my 8 year old son's bedroom, hanging from his light fitting!


Monday, November 28

The Family In Colour

Here's my coloured version of Family Reunion. I used a variety of copic markers to give a nice, bright, vivid look to this picture. And yes, Dad is wearing a quilted hat band... did I mention how much I love quilts??

copyright Beccy Muir 2011

Sunday, November 27

Family Reunion

Free Printable #193
Oh the joy of posing for holiday photos!

JPEG Image

PNG Image

copyright Beccy Muir 2011


Wednesday, November 23

Lady with a Hat

Free Printable #192
I thought I'd best put up an offering that isn't Christmas inspired for a change. Although, if you coloured her dress red and added a tiny piece of holly.....


JPEG Image

PNG Image

copyright Beccy Muir 2011

Sunday, November 20

Joyful Gingerbread

Free Printable #191
Here's a buddy for the Jolly Gingerbread man. Looks like blissful ignorance might be a requirement for baked holiday products!


JPEG Image


PNG Image


copyright Beccy Muir 2011

Thursday, November 17

And In Colour...

I printed and coloured this image at a fairly small size, around 2 inches I think, which means that the scan isn't all that wonderful. However, if you're only after a little image this coloured version should work well. My apologies to those who want something larger... but it is a good opportunity to drag out your art supplies!

copyright Beccy Muir 2011

Tuesday, November 15

Tutorial - Over The Edge Cards


Over the Edge cards, also known as Tent Topper cards, are really easy to make and can be modified to suit any occasion. The one thing you need to remember when making these cards is that the finished product may not be a standard size and may require a special envelope.


REQUIREMENTS:
Cardstock (approx. 8" x 6")
2 nesting die cut labels - any shape
patterned paper (approx. 7 3/4" x 2 3/4")
sentiment stamp
embellishments of choice

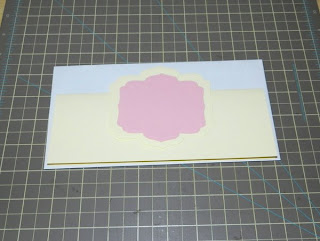
1. I really don't like making my own envelopes so I made sure my finished card would fit nicely inside a standard envelope, in this case business size, by laying the elements of the card on top of the envelope and taking measurements.


2. Fold the card blank in half longways to create a card that measures approximately 8" x 3".

3. Adhere the patterned paper to the front of the card, leaving a small border around all four sides.


4. Adhere the larger die cut shape to the centre top of the card, overhanging by the desired amount. (Remember to check that the completed card will fit inside your envelope before securing the die cut shape.)


5. Adhere the smaller die cut shape to the centre of the first and embellish as desired. Have fun!

Monday, November 14

Jolly Gingerbread

Free Printable #190

I really love the expression on this little fellow's face... he really doesn't have that much to look forward to, but yet he smiles anyway! Or maybe it's just blissful ignorance??

JPEG Image

PNG Image

Copyright Beccy Muir 2011

Saturday, November 12

November Christmas Cards

This month over at CCAYR we used a sketch as the basis of our Christmas cards. I decided to go back to one of my favourite Christmas designs from last year, the Christmas Goose, who proudly illustrated day six of the 12 days of Christmas.


Wednesday, November 9

Mum's Quilted Coat

Free Printable #189

I actually think I prefer the quilted version of this image to the plain coat... which won't come as much of a surprise to those of you who know how much I love quilts!

JPEG Image

PNG Image

Copyright Beccy Muir 2011

Monday, November 7

Mum's Coat

Free Printable #188

I think this little girl looks as though she is making a wish upon the first star, but my ten year old daughter assures me she is actually outside looking for Santa!

JPEG Image

PNG Image

copyright Beccy Muir 2011

Saturday, November 5

Cupcakes!

Last weekend my sister-in-law hosted a cupcake decorating party. I have to admit that I wasn't all that enthused when she invited us... cake decorating really isn't my thing... but we went along to support her (and on the off chance that we might actually get to eat said cupcakes!). Well, we had a blast! It was so much fun sitting at the table decorating these little cakes using a variety of pastes, icing and butter cream as well as tools, piping bags and cutters. My daughters thought it was fantastic and sat totally enthralled for two and a half hours! Plus, we got to take home six cupcakes each... much to the delight of my hubby and eight year old son.

My twelve year old showing off her beautiful cupcakes.

My ten year old with her wonderful creations.


The cupcakes I decorated... not so different from decorating cards really.