Monday, May 30

Rock On!

I used a comic book style technique to colour the cat from the All That Jazz digital set. Instead of blending the highlights and tones, I left the hard edges between the different colours. It's not a difficult technique, but you do need to ensure there isn't too much of a jump between the different tones or you'll end up with separate areas of colour rather than the illusion of highlights and shadows.


Stamps:

Saturday, May 28

Floating By

I used lots of lovely, bright papers to create this card, ensuring I used some of the same colours on the image itself, which helps to bring everything together. I also added thin, black frames to make the vibrant colours pop even more!


Stamps:
 

Thursday, May 26


Selected, retired digital stamps at an incredibly low price for just 48 hours.
No rainchecks. No repeats.

Romantic Roses

Wednesday, May 25

Hear The Music


Anesha has hand-coloured the images on all three of these cards using pencils on smooth cardstock. She has also added a hand-inked border around each image panel with a variety of dots, lines and crosses. This is a fabulous way to add a personal touch to your cards and papercraft projects!


Tuesday, May 24

Monday, May 23

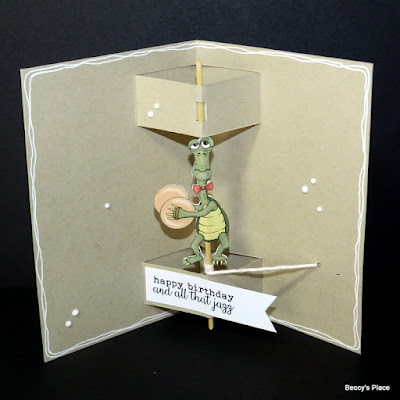
Tutorial - Pop-Up Twirl Cards


This card is definitely one the engineers among us will enjoy. The centre has a mechanism, created with a skewer and some clever folding and cutting, that rotates as the card is opened and closed. Adding a little image or sentiment panel results in a twirling decoration that will certainly surprise and delight whoever is lucky enough to receive it.


TEMPLATE

1. Start with two 4" x 6" card blanks. One will be the outer card, which you can set aside for now, and the other will hold the twirling mechanism.


2. Use a pencil and ruler to measure and mark the cutting lines on the folded edge of your card. Refer to the template above for measurements and placement.


3. Use scissors or a trimmer to cut along the four lines, beginning at the spine of the card and ensuring you cut through both layers. These will form the two pop-up sections in the centre of the card. 


4. OPTIONAL: Score between the ends of each cut line to ensure an accurate fold.


5. Refold the cards and make two 1/8" long cuts in each of the pop-up sections, keeping them as evenly apart as possible. See the photo below.


6. Open the card and push the pop-up sections out again so they stand away from the card blank. Use the tip of your finger to push the card between the two little nicks you made in the step above, then slide a skewer through both sections. See the photos below.


7. Remove the skewer and use a small hole punch to make two holes in the card. One hole should be about 1/4" from the spine of the card and a little above the lower pop-up section. The other hole should be about 1" from the side edge of the card and about the same height as the first hole.


8. Cut a 12" piece of string or twine. Thread one end through the first hole and secure on the back with glue and/or tape.


9. Replace the skewer. Wrap the string around the skewer two or three times and then thread the end down the second hole. Adjust the tension of the string until you can easily open and close the card, making the skewer spin in place. Trim excess string and secure on the back of the card with glue and/or tape.


10. Use a pair of snips or sturdy scissors to remove the excess length of skewer. If desired, glue a bead or button to either end of the skewer to prevent it sliding out of the card.


11. Decorate the inside of the card as desired. Keep the twirling embellishment to around 11/2" wide and no longer than the gap between the string and the top pop-up panel. Make sure the embellishment is able to twirl freely when the card is opened and closed.


12. Secure the card to the inside of the other card blank with glue or double-sided tape, taking care not to add any adhesive to the pop-up sections.


13. Decorate the front of the card and you're done!


Stamps:

Saturday, May 21

Colourful Creations


Don't you just love the bright colours Judy has used on these swim rings?! I particularly like the red and blue one she's given the grumpy guy floating around while on vacation. She has added a fantastic cloud filled sky complete with a bright shining sun, and gentle waves that are sure to rock a smile back on the old fella's face.


Thursday, May 19

Birthday Hit

Despite the sombre expression on this guy's face, you just know that when the time comes he's going to crash those cymbals like there's no tomorrow! I gave the cymbals a metallic look by filling them in with a gold pen, keeping the strokes rounded to follow the shape. The rest of the image was coloured with Prismacolor pencils.


Stamps:

Tuesday, May 17

Everything Papercraft - Fabric


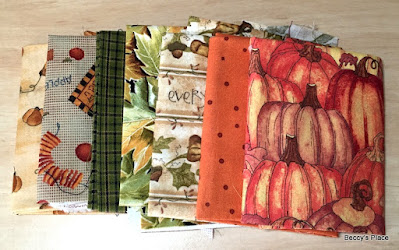
Fabric is a versatile and widely available item that can add both colour and texture to handmade cards. It comes in an endless array of patterns including holidays and celebrations, food, florals, children’s prints, animals, and so on. Most fabrics are easy to work with and can be glued, stitched or pierced to hold them in place.
Fabric can be used as a background by applying an adhesive, such as PVA, directly to the fabric and then laying it over a card front and smoothing out any air pockets, or it can be used in smaller pieces to embellish a larger design. Strips of fabric can replace ribbons, lace and pieces of patterned paper, and can be tied into decorative knots and bows.
It's also possible to stamp on fabric, which is great for making personalised t-shirts, bags or other items, or just to add a little more interest to your fabric embellishments. Here's a TUTORIAL.

Monday, May 16

Old Hound Dog


Kathy has created this cute card using the hound dog from the All That Jazz set of digital stamps as well as two of the sentiments - one for the front and one to decorate the middle. She has included a description of her card below.


I love how you colored the pup on this digi. So, I used the precolored version, adding a few shadows and highlights. I also attempted to add a bit of woodgrain texture to the base by sketching a wood pattern with a fine line tan maker, then adding some highlights with a white colored pencil to provide a light sheen. (I am not musically inclined- just ask my husband who has requested that I not sing in his presence- so I didn’t even recognize this instrument. My hubby identified it as a Bass or a Cello. So I did a it of research and learned a lot of neat things, including that this is a Bass, and plus found a photo that guided my coloring of it HERE