Wednesday, September 30

Bright and Cheerful


Our last card for this month's Encore Week was created by the lovely Deanne, and she has brought us a beautiful project that's bursting with colour! From the pretty background paper to the bright and cheerful image, this card is sure to bring a smile to someone special.


Stamps:

Monday, September 28

Jackie's Encore Projects


Today's fabulous Encore Week creations are from Jackie Trinder. She has created a beautiful card in shades of purple, blue and green featuring the frame and sentiment from the Country Floral digital set. Her second project is a tag decorated with the two ladybugs.


Stamps:

Sunday, September 27

Pre-Coloured Digis


Creating three-dimensional paper tole images is a lot simpler with pre-coloured digital stamps. I printed one image, three times, then fussy cut particular sections so I could layer them together to give the illusion of dimension.


Stamps:

Friday, September 25

Judy's Florals


This month's Encore set is Country Floral, a pretty set featuring cute little ladybugs and simple blossoms that are great for a variety of occasions. Judy has used the frame image, one of the sentiments and the little bugs to create a fabulous, colourful card. The flowers and lady bugs have been fussy cut and layered to give lots of great dimension to her project.


Stamps:

Tuesday, September 22

Hocus Pocus

I really enjoyed colouring the background of this image. Instead of carefully blending the shades of grey marker, I tried to keep them quite mottled, which to me, looks rather like an old oil painting. I can just imagine this little collection of bottles sitting on a dusty, long-forgotten shelf in a creepy apothecary somewhere.


Stamps:

Sunday, September 20

Stay Spooky

I've coloured my witch's hat in shades of purple and red, not all that spooky I guess, but certainly a lot of fun! I tore around the edges of my sentiment to add a little texture and to contrast with all the straight lines.


Stamps:

Saturday, September 19

Spooky Tag

It's only in the last few years that Halloween has really gained popularity here in Australia, which means I don't have a lot of decorations come October 31st. Each year I've been slowly adding to my collection with a combination of purchased items and a few homemade projects. This year, I made a spooky tag to hang off a fabulous big key I bought somewhere in my travels.


I used the long sentiment from the Witch Starter Kit set, printed on plain card stock and then distressed with paints, water and ink. I separated a length of twine so that it would be thin enough to pass through a needle, then sewed the printed card stock onto a piece of black card... Ã  la Frankenstein's monster.

Stamps:

Thursday, September 17

Karin's Cards


Today, Karin is sharing two beautiful cards that she created using the Bees and Blooms set of digital stamps. She coloured all the images with Derwent coloured pencils and then mixed and matched different patterned papers and pretty embellishments to complete the duo.


For more of Karin's work, visit her blog:

Tuesday, September 15

Everything Papercraft - Beading


Beads have made a huge comeback in recent years with manufacturers turning out some gorgeous designs in a variety of mediums including glass, clay and crystal. Papercrafters often use beads to embellish projects because they are readily available and simple to work with. They can be easily attached to paper creations with glue, thread, sticky mediums, wire or double sided tape. Beads are very popular with artists who create collage and altered art pieces because of the wide variety of different shapes, sizes and construction materials.

If you're sewing beads onto your cards, it's a good idea to use a piercing tool or needle to make holes in the card stock before you start sewing. This will make the placement a lot easier. Be sure you don't pull the stitches too tight or you may end up tearing through the card stock. Secure the loose threads on the reverse side of your finished piece with a spot of glue or tape to ensure the stitching doesn't unravel.


Here's an example of two beautiful, beaded cards.
IMAGES FROM THE INTERNET

Sunday, September 13

Witch Starter Kit


Have you already started on your Halloween projects?
This new pop-up product may just be the inspiration you're looking for!

Witch Starter Kit
digital stamps

Friday, September 11

Yellow Flowers

For this card, I combined all the images from the Bees and Blooms set to create a little garden montage. Everything was coloured with Copic markers, including the very light blue shading in the background.


Stamps:

Thursday, September 10

Tutorial - Book Fold Cards


Today's fabulous card fold was created by the very talented Hilary Wilson who kindly allowed me to recreate her fold and share a step-by-step tutorial with you. Some clever cutting gives the illusion of a thick, hard-cover book, but what you're actually looking at is a single fold card that will fit into a flat envelope!

Hilary has a video for creating this fold here: Craft Oasis Book Fold Video
as well as several other video tutorials you can view: The Craft Oasis on YouTube
Or you can visit the Craft Oasis page for more fun card folds.


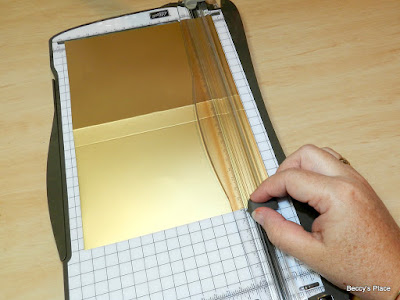
1. Start with a piece of card stock measuring 91/2" x 61/2". For the best results, use card stock that is coloured on one side and white or cream on the other. Both Hillary and myself have chosen to use single-sided gold card, but you can use a solid colour or pattern if you prefer.


2. Place the card stock horizontally on your score board and score at 43/4" and 51/2".
(IMPORTANT NOTE: the score line at 51/2" is decorative only. Do not fold.)


3. Fold along the 43/4" score line, which will give you an evenly folded card blank. Remember that the second score line is decorative only.


4. Open the card out flat. Cut a horizontal line from the right-hand side of the card to the 51/2" score line. The cut should start 3/4" down from the top right corner. Refer to the template above for correct placement.


5. Use a pair of small, sharp scissors to cut a scooped line from the end of the cut you made in step 4, to the top of the first score line. I've marked the line with pen so you can see the location of the cut. The section that we cut away will become the template for the remainder of our cuts.


6. Fold the card base in half. Place the template over the end of the visible white section, which is the inside of the card, lining up the score line on the template with the edge of the card stock. Use a pencil to mark the curve.


7. Use the template again at the bottom, left corner of the folded card, keeping the template flush with the bottom edge of the card. Mark the curve with a pencil.


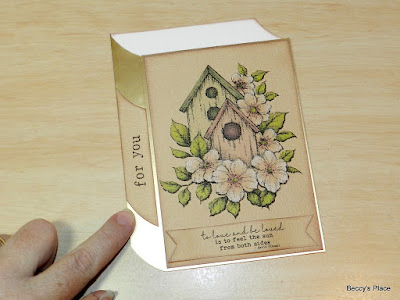
8. Use scissors or a craft knife to cut along the pencil lines you made in steps 6 and 7. As you can see, our card is now starting to look like a large book. By echoing the same curve shape, we're tricking the eye into seeing a three dimensional object.


9. Now to decorate. I added some brown chalk ink to the inside edges of my card to reduce the contrast between the white and gold surfaces.


10. Add a large picture and embellishments to the card front, keeping to the area between the right hand edge and the decorative score line.


11. If you wish to add something to the "spine of the book", simply use the template to shape the top and bottom to complete the illusion of three dimensions.


12. The last step is to add some "pages". I used a very light pencil (PC1069) to draw quick, rough lines from the spine toward the outer edge. Don't worry if the lines don't make it all the way to the other side of the card, and it doesn't matter if they are not entirely straight. They are supposed to represent the pages, which don't always sit flat and uniform if a book is slightly ajar.


Stamps:

Sincere thanks go to Hilary Wilson for allowing me to reproduce her beautiful card and share the instructions on my blog for everyone to use. If you enjoyed this tutorial, please visit Hilary's pages to let her know.