Original artwork by Beccy Muir, all rights reserved. Images are for personal use and must not be copied, swapped, shared, resold or mass produced without the express written permission of the artist.
Showing posts with label strawberries. Show all posts
Wednesday, March 1
Thursday, September 30
Monday, May 29
Circle Card
I recently purchased these fabulous scalloped circle dies that are large enough to cut the base of a card, with plenty of smaller dies for lots of layers. I coloured the image with copic markers and then added some sparkle to the champagne bottle with some clear Wink of Stella... I was going for a frosty look.
Stamps: Champagne digital stamps by Beccy's Place
Saturday, May 27
New Release: Champagne Set
A digital set for all those extra special celebrations in life, from engagement and anniversaries to big birthdays and graduations. Let's celebrate them all!
Celebrations
Digital Stamp set
My designers have put together some fabulous, celebratory cards and projects to help inspire you and spark your creativity. Stop by their blogs for more information about their projects and to see what else they've been working on.
AJ's Card
A gift bag from Anesha
Petra's Card
Karin's Card
Carla's Creation
Judy's Project
Tuesday, January 17
More Desserts!
Out of all the new stamp releases this month, Just Desserts is easily my favourite... and not just because I love desserts. I really like how easy the images are to colour and how vibrant the fruit looks. Plus there's the added bonus of being able to personalise the "flavour" of each dessert for the recipient... bring on the chocolate!
"Just Desserts" Clear Stamps
Labels:
blueberries,
cake,
cherry,
Just Desserts,
raspberries,
strawberries
Friday, February 13
Scrap Card #6
I am still enjoying the challenge of putting these scrap cards together - having the pre-constructed base is an interesting way to get started and can be surprisingly inspiring. Today's predominately green background made me think of gardens and things that grow, so it wasn't difficult choosing an image to work with.
Stamp: Strawberry Circle from Beccy's Place
Thursday, April 4
Tutorial - Teardrop Trifold Card
Teardrop cards are so named because part of the card is shaped like a drop of water or a tear. There are several ways to make these cards, but today I'm going to show you the trifold version, which is fairly quick and easy to do.
Template
1. Begin with a piece of cardstock measuring 12" x 6". Score and fold at 4" and 8" creating a trifold card. (tip: when I make trifold cards, I generally remove a thin slither from the right hand edge so the card sits better when folded.)
2. Using the template, cut a teardrop shape from the left hand panel of your card. You've now created the base of your teardrop card... I told you it was quick and easy!
3. To decorate the card, use the template to mark and cut some patterned paper for the front.
4. Add a rectangular piece of patterned paper measuring 4" x 6", and a handcoloured image. See the photos below to see how they all fit together. (tip: if you cut your patterned paper about 1/4" smaller than the specified size you will end up with a nice little border around the edges.)
If you're stamping directly on to the patterned paper, make sure you do it before you adhere everything together so that you end up with a nice crisp image... and if you make a mistake it's much easier just to cut another piece of paper!
Labels:
butterflies,
card folds,
strawberries,
teardrop card,
tutorial
Tuesday, February 12
Sweet Strawberries
A brand new set of rubber stamps has just hit the shelves over at Sparkle N Sprinkle and this time it's all about sweet, sweet strawberries! You can purchase these stamps as a sheet of rubber only, or for an extra $4.50 you can have them mounted on a cushion to use with your acrylic blocks.
Sunday, July 1
July Challenge
This month's challenge is to create an Easel Card using any of the Beccy's Place images. Easel cards are nice and simple to make and look fantastic standing on a shelf or cupboard. For those who haven't made one before I have some instructions here. Remember to use one of the Beccy's Place images, but colours, themes, sentiments, etc. are entirely up to you.
When you have made your card, take a photo and upload it to your blog then put a direct link below. You can enter as many times as you like and you can submit your card to any other challenge you wish. At the end of the month a random winner will be chosen to receive three images of their choice from my online store. I will personally select a Guest Designer for the month of August... try to get your entry in early as I need to choose the guest designer about a week before the end of the month so they can get started on their cards.
Good luck everyone!
Friday, February 3
Tutorial: Topper Cards
Topper or Over the Edge cards are basically cards that have a part of the design that extends beyond the usual straight edges of the card, generally at the top. There are many different ways to make these cards but the tutorial I would like to share with you today uses Spellbinders Nestabilities (you can substitute your favourite dies or shape cutters).
Labels 16 die by Spellbinders
Standard Circles (large) by Spellbinders
Border punch of choice
2 pieces of red cardstock measuring 4" x 4 1/2"
2 pieces of white cardstock measuring 4" x 2"
1 piece of white cardstock measuring 4" x 8"
1 piece of green cardstock measuring 3 1/2" x 3 1/2"
Small square or circular image
Adhesives
Green ribbon
Sentiment Stamp + Ink
1. We'll start by making the small frame for the image. Use the second largest Labels 16 die and the 4th largest Standard Circle die to cut a frame from the green cardstock. You can make both these cuts at the same time by lining the dies up on the cardstock as shown in the picture below. Make sure the circle die is centred nicely inside the labels die.
2. Once you've made the cuts, it's nice to finish the frame with an embossed edge, so run it all back through the Cuttlebug (including the dies) with the rubber shim. Reserve the circle cut from the centre of the frame for another project. (I have a draw full of reserved pieces!)
3. Adhere the frame around the image. I used a combination of repositionable glue and double-sided tape.
4. Fold the white 4" x 8" piece of cardstock in half so you end up with a card measuring 4" square.
5. Use the largest Labels 16 die to cut out a shaped card making sure you don't cut all the way through the folded edge. Look closely at the photos below, you will notice that the die hangs over the folded edge just a little bit. This will ensure I have a folded card after the cut is made and not two separate pieces of cardstock.
6. Use the largest of the Labels 16 dies to cut a shape from the white cardstock measuring 4" x 4". Emboss the edges by running it back through the Cuttlebug with the rubber mat.
7. Adhere the die cut shape to the front of the shaped card you cut earlier. This will hide the flat folding edge.
8. Use your border punch to add a decorative edge to both pieces of white cardstock measuring 4" x 2". Adhere them to the bottom of the red cardstock using double sided tape.
9. Align the two pieces of red cardstock and secure them with a piece of tape. (Remove some of the stickiness from the tape first so that you don't rip your cardstock when you attempt to remove it. You can do this by sticking it to your clothes a couple of times until it is less tacky - notice the blue fuzz from my pants!)
10. You want your entire card to measure 6" long. It's easiest to get this measurement by laying your card on a cutting mat and lining the edges up with the lines on the mat. Start by placing the centre top of the white shaped card at the very centre of your mat - 6" from the sides and 6" from the top and bottom. Use some more tape to hold it in place (put the tape on the inside of the card as you will need to slide the red pieces of cardstock inside).
11. Place the two pieces of red cardstock inside the shaped card, sliding them around until the white decorative edge at the bottom of the red cardstock sits flush along the 0" line on your mat. This will mean your completed card will be 6" long. Use some double-sided tape or glue to adhere the white shaped card to the red cardstock where they overlap.
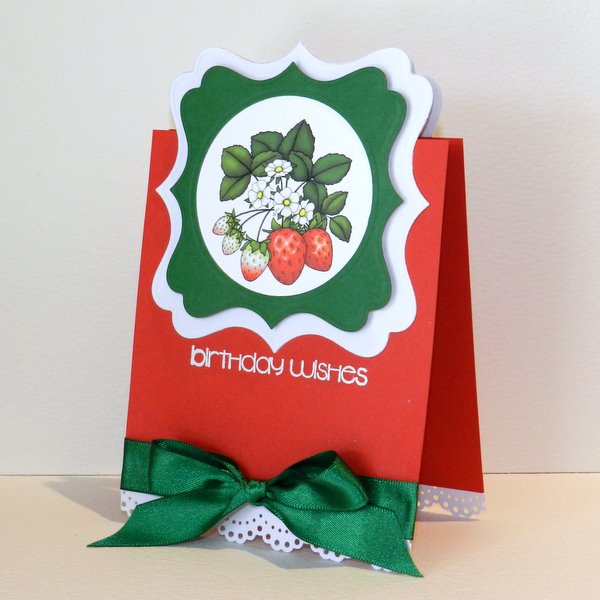
12. Now it's time to add the embellishments. I heat embossed a sentiment on to the red cardstock, just below the white shaped card, then tied a green ribbon around the bottom.
13. Add the framed image to the centre of the white card with foam tape and you are done!
copyright Beccy Muir 2012
Labels:
birthday card,
card folds,
strawberries,
topper card,
tutorial
Thursday, February 2
More Strawberries!
These are Tent Topper or Over the Edge cards, which basically means that a part of the design goes beyond the usual straight edges of the card. I have a tutorial here for a basic Tent Topper card, but I will also be posting instructions for one of these cards tomorrow.
Subscribe to:
Posts (Atom)