Showing posts with label Smooth Seas. Show all posts

Thursday, July 5

A Colouring Project

I've used the last four frames from my stash for a seaside grouping. The top two images are from the Smooth Seas clear stamp set and the bottom two are from the new By The Seaside set. These frames, along with the flowers I did earlier, will hang in my booth at the next craft fair.

Smooth Seas and By The Seaside

Lovely Lilies (August release)
Spring Tulips
Waratah
Geums

Monday, April 30

Digital Release: Smooth Seas

Smooth Seas is now available in digital format. The set contains four black and white line drawings as well as four full colour images and coordinating sentiments. Great for nautical themed cards, Father's day, birthdays and special occasions.

Smooth Seas
digital stamps


Tuesday, April 3

April New Releases

It's time for a fresh batch of delicious images from the Beccy's Place bakery!
Okay, maybe not a bakery, but definitely a warm place full of yummy treats and the occasional batch of fresh bickies... and a stamp set or two as well.

Geums
clear stamp set


Tea Time
digital stamp set


First Day Jitters
digital stamp set


Smooth Seas
digital stamp set

Thursday, March 8

Image Catalogue

Another addition to my hand-coloured stamp catalogue, this time using the "Smooth Seas" clear stamps coloured with Prismacolor pencils. My favourite image in this set is the little seahorse. I love to mask and stamp layers of the image to create a colourful shoal (or would it be a herd?) of seahorses.


Friday, June 23

For the Boys...

Today I want to share a couple of masculine themed cards I made using the Smooth Seas clear stamp set and some fabulous papers from Maja Designs.


Saturday, June 17

Seahorses

I really wanted to create a pretty card using just the die cut edging you see here, however, it was much too fragile to form the base of a card without some support. I did try, but found the edges would fold and crumple when I tried to stand the card open, so I settled for a black card base instead. Looking at it here, I think I might need to add a little more colour to the seahorses before I send it to the recipient, they're a bit too subtle against the background.


Wednesday, May 17

By The Sea

One of my brothers loves the sea. I think he should have been a commercial fisherman or a pilot on a large ship or any other job that puts him in the vicinity of the ocean. Even though he doesn't really enjoy recreational swimming, he loves everything else about the water, particularly fishing and boating. I had him firmly in mind when designing the Smooth Seas clear stamp set, which means, like it or not, he'll be receiving lots of cards with a beach theme!


Stamps: Smooth Seas by Beccy's Place

Wednesday, February 15

Smooth Seas Cards

I think I've decided on my favourite stamp from the new "Smooth Seas" set... can you guess what it is? I have a feeling I'll be inking this guy up on a regular basis, he's fun to colour and pretty easy to layer.

I used a masking technique to get two seahorses swimming side by side.

White pencil on "pool" coloured card stock. I even stamped in the same shade.

The "bubbles" are drops of glossy accents.

Monday, February 13

Tutorial - Waterfall Cards


Looking to add a bit of pizzazz to your next card-making project? Well, look no further! This card has the wow-factor, is interactive and you don't need to be a rocket scientist to put it together. Now that's my kind of card!


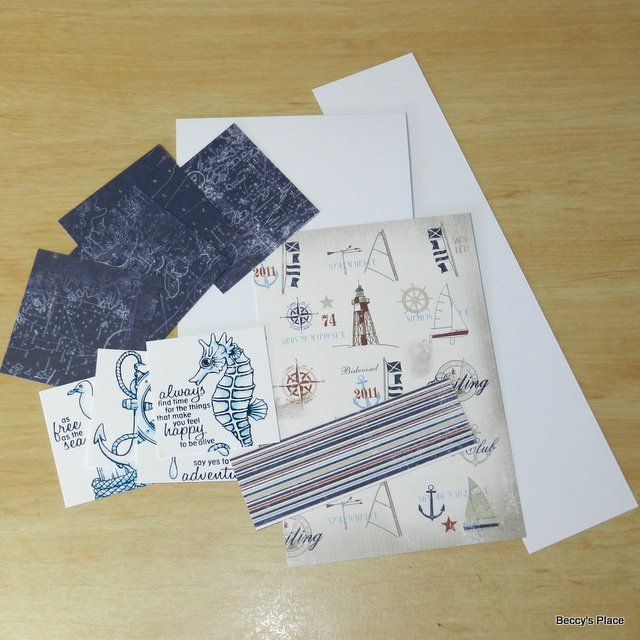
1. Gather together the supplies for your card. You'll need:
  • a card blank measuring 41/4" x 6"
  • one 2" x 9" piece of cardstock
  • four 2" squares, stamped and coloured
  • four 21/4" squares of coloured card or paper to mat the stamped images
  • two pieces of patterned paper - 4" x 53/4" and 4" x 11/4"
  • piece of ribbon or string for pull tag
  • an eyelet, staple or other way to secure the ribbon
  • adhesives and cutting tools 


2. Place the 2" x 9" strip of card stock horizontally on your score board and score at 2", 21/2", 3" and 31/2". Fold along each score line. 


3. If you're adding an eyelet to your pull tag, do it now. It is placed on the bottom of the strip of card stock you just scored, furthest away from the folds. 


4. Use glue or double sided tape to adhere the 4" x 53/4" piece of patterned paper to the front of your card blank. You should end up with a small border all around the card. 


5. Place a strip of double sided tape or a thin line of glue on either end of the 4" x 11/4" strip of patterned paper, making sure none of it is applied to the centre. Adhere it across the card front, 2" from the bottom of the card blank.


6. Slide the strip of card stock under the strip of patterned paper so that the folded score lines are at the top and the eyelet (if added) is at the bottom. 


7. Apply some glue or double sided tape to the centre of the strip of patterned paper. The adhesive should be no wider than the strip of card stock. 


8. Secure the strip of card stock to the strip of patterned paper. Be sure to line up the edges and make sure everything is centred before you secure it permanently. This strip is the basis for the interactive component of the card. (note: the strip of card stock should be able to slide up and down behind the patterned paper when pulled by the eyelet end)


9. If desired, stamp a sentiment on the bottom of the strip of card stock. 


10. Now it's time to add the images to your card. Begin with the bottom image, which is the one that will appear last when the card is activated. Apply glue to the first section of the strip of card stock, between the end and the first score line. The hash lines, in the photo below, indicate the area where adhesive should be applied. 


11. Secure the first image onto the adhesive, keeping the top of the mat just below the first score line and centring the image over the strip of card stock. 


12. Now apply adhesive in the next section, between the first and second score line, and add the second stamped image. 


13. Apply adhesive to the area between the second and third score line and attach the third image. 


14. Apply adhesive to the area between the third and fourth score lines and secure the fourth image, which will be the top image on your card. Be careful not to secure the last image too high on the card stock or the strip won't move. You should be able to see the last score line easily.


15. Attach the string through the eyelet (or the ribbon with a staple, etc.) and you're done!


Now you can gently pull on the string and watch the images flip by!


Products:

Sunday, February 12

New Release: Smooth Seas

This new clear stamp set is ideal for creating masculine themed cards, and perfect for anyone who loves the ocean. You can mix and match the images with the sentiment stamps to create cards and projects for lots of different occasions.

Smooth Seas
Clear Stamp Set


Carla, Anesha and Petra have come up with some amazing projects with these stamps. Check out their fabulous backgrounds, awesome colouring and wonderful scene construction right here... and don't forget to visit their blogs for more information and loads of inspiration!

Carla created these two stunning cards using all the images from the set.
She coloured, fussy cut and arranged the images to build these wonderful seascapes.


Petra was super inspired by this set and ended up designing four awesome cards, each using a different image from the set. 


Anesha has wowed us with this beautiful ceramic project featuring the seagull image from the set. What a great gift for someone who loves the sea or lives by the ocean.