Saturday, August 31

Pull-Along Puppy

We had lots of wooden toys when I was growing up, including something similar to this little dog. The ears were made from vinyl and the tail was mounted to a spring that would bend and wobble as the dog was pulled along. My own children had a plastic version that would also open it's mouth and bark. 


Digital Stamps:

Thursday, August 29


Selected, retired digital stamps at an incredibly low price for just 48 hours.
No rainchecks. No repeats.

Monkey Madness
digital stamps

Tuesday, August 27

Lovely Friend

I kept the colouring to a minimum with these pretty butterflies. Just a couple of shades of each colour for some contrast followed by a coat of shimmery medium. Simple.


Digital Stamps:

Sunday, August 25

Robot Classic

The robot toys of my early childhood had wheels hidden under their feet, a metal bell contained somewhere in the chassis that would ding every now and again, and a strange whirring voice that repeated robot-y phrases. Very cheesy, but my younger brothers sure loved them!


Digital Stamps:

Friday, August 23

Butterfly Collection


The idea for the Butterfly House digital stamp set came from Carla, who suggested I draw a range of large, realistic butterflies. As you can see from the cards below, she has taken them and created an absolutely beautiful collection of greeting cards.


Wednesday, August 21

Tutorial - Pinwheel Cards


Pinwheel cards are fun little creations that feature a distinctive pinwheel pattern both when open and when folded closed. Although it's not really needed, a belly band adds an extra cute element and a space for additional embellishments.


TEMPLATE:

1. Start with a thick piece of double-sided, 12" x 12" patterned paper. Around 180gsm is a good weight without being too heavy. I also chose paper that could be used as a lining for the inside of my card, so I ended up with very few offcuts.
Trim the paper to the following sizes:
- 8" x 8"
- 4" x 4"
- 12" x 11/2"
- 12" x 1"


2. Start with the 8" x 8" piece of paper. Measure and mark 3" and 5" from the left hand corner. Rotate the paper 90 degrees and repeat. Rotate and repeat two more times until you have marked all four sides.


3. If you have a score board with a right-angle wedge, place one side of your paper against the wedge and score across the paper from the first 3" line. It should line up with the 5" line on the next edge. (See the template for correct placement). Repeat for all four sides of the paper.


4. Fold along each score line.


5. You will notice small triangles where the score lines intersect. Use a pair of small, sharp scissors to remove each of the four triangles. (See the template for correct placement).


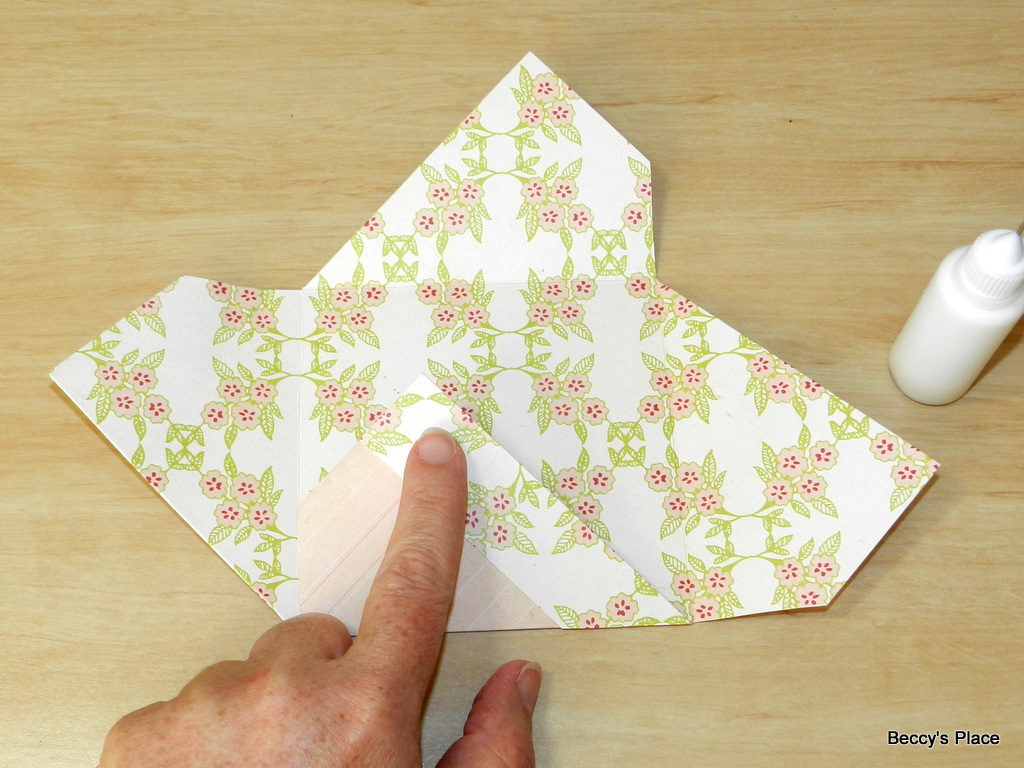
6. Remove the right-angle wedge from your score board. Place the paper on your score board and score at 1" until you reach the point of the small triangle you removed in the previous step. (Refer to template for correct placement). Rotate the paper 90 degrees and repeat. Repeat twice more for a total of four score lines.


7. Fold the first large corner into the centre of the card. Fold the 1" strip back over the large corner and secure with glue or double-sided tape. Repeat for all four corners.

REVERSE SIDE OF CARD:

8. To fold the card, bring one of the corners into the centre. To get the fold correct, you always want to cover the high point, so the second fold will be whichever corner covers the point - in my case, that's the corner on the left (clockwise). Then the top corner. The last corner is tucked under the very first one, which is a little tricky at first. You have to bend and curve the paper and slightly open the other folds to ease the last section into place.


9. To decorate, secure the 4" x 4" piece of patterned paper in the centre. If desired, stamp a sentiment or image before gluing in place.


10. Secure the two 12" strips together - the narrow one on top of the wider piece. Wrap around the card, secure the ends together with glue, and trim off any excess to form the belly band. Add an image or embellishment over the seam, and add other decorations as desired.


Products:

Tuesday, August 20

Condolence Card

To give a little more emphasis to the embossed pattern, I added the lightest green and lightest orange markers I had in my collection. The little berries and the wings of the butterfly also received a coat of shimmery medium for a subtle sparkle.


Digital Stamps:

Monday, August 19

Clanging Monkey Toy


Kathy has a great eye for detail and loves to add interesting little touches to her cards, such as the googly eyes and metal cymbals on the clockwork monkey from the Vintage Toys set. She's also very good at decorating the inside of her cards with sentiments, patterned paper and little embellishments.


Saturday, August 17

Clanging Monkey

I'm not quite old enough to have owned one of these cymbal-crashing-monkeys, but I certainly remember seeing and playing with them when I was growing up. I'm planning to give this card to a friend of my Mum's generation, who I know will get a nostalgic kick from the image!


Digital Stamps:

Thursday, August 15

Pretty Butterflies


Judy created these beautiful cards using the new Butterfly House set of digital stamps. Her first card features the Ulysses butterfly, beautifully coloured with a mix of blue and green, then coupled with a piece of marbled paper. To create the second card, she printed three of the Grass Yellow butterflies, coloured them with lovely bright shades and layered them onto a pretty purple background.