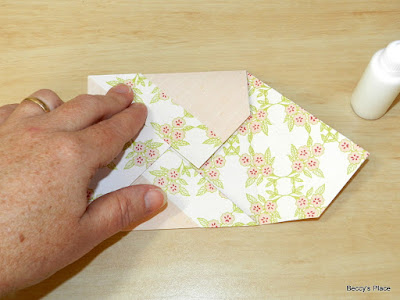
Pinwheel cards are fun little creations that feature a distinctive pinwheel pattern both when open and when folded closed. Although it's not really needed, a belly band adds an extra cute element and a space for additional embellishments.
TEMPLATE:
1. Start with a thick piece of double-sided, 12" x 12" patterned paper. Around 180gsm is a good weight without being too heavy. I also chose paper that could be used as a lining for the inside of my card, so I ended up with very few offcuts.
Trim the paper to the following sizes:
- 8" x 8"
- 4" x 4"
- 12" x 11/2"
- 12" x 1"
2. Start with the 8" x 8" piece of paper. Measure and mark 3" and 5" from the left hand corner. Rotate the paper 90 degrees and repeat. Rotate and repeat two more times until you have marked all four sides.
3. If you have a score board with a right-angle wedge, place one side of your paper against the wedge and score across the paper from the first 3" line. It should line up with the 5" line on the next edge. (See the template for correct placement). Repeat for all four sides of the paper.
4. Fold along each score line.
5. You will notice small triangles where the score lines intersect. Use a pair of small, sharp scissors to remove each of the four triangles. (See the template for correct placement).
6. Remove the right-angle wedge from your score board. Place the paper on your score board and score at 1" until you reach the point of the small triangle you removed in the previous step. (Refer to template for correct placement). Rotate the paper 90 degrees and repeat. Repeat twice more for a total of four score lines.
7. Fold the first large corner into the centre of the card. Fold the 1" strip back over the large corner and secure with glue or double-sided tape. Repeat for all four corners.
REVERSE SIDE OF CARD:
8. To fold the card, bring one of the corners into the centre. To get the fold correct, you always want to cover the high point, so the second fold will be whichever corner covers the point - in my case, that's the corner on the left (clockwise). Then the top corner. The last corner is tucked under the very first one, which is a little tricky at first. You have to bend and curve the paper and slightly open the other folds to ease the last section into place.
9. To decorate, secure the 4" x 4" piece of patterned paper in the centre. If desired, stamp a sentiment or image before gluing in place.
10. Secure the two 12" strips together - the narrow one on top of the wider piece. Wrap around the card, secure the ends together with glue, and trim off any excess to form the belly band. Add an image or embellishment over the seam, and add other decorations as desired.
Products:


No comments:
Post a Comment