


Although construction of this fabulous card is relatively easy, the wow factor lies in its decoration. Two additional pieces of cardstock allow you to build up a wonderful three dimensional scene with the added bonus that we all expect from great folds... the ability to slip into an envelope for posting.
This card fold was suggested to me by Hilary Wilson from Craft Oasis.
She has a wonderful video tutorial, including several beautiful examples, on her YouTube channel.
1. To make a basic card you'll need a piece of cardstock measuring 53/4" x 53/4", a piece measuring 63/4" x 11/2" and a third piece measuring 43/4" x 3". This will create a card with an overall measurement of 53/4" square.

2. Place the 53/4" square of cardstock on your score board and score at 27/8". Fold along the score line to form the card base.
3. Place the 63/4" x 11/2" piece of cardstock horizontally on your score board and score at 1/2", 33/8" and 61/4". Fold along each of the score lines.
4. Place the 43/4" x 3" piece of cardstock horizontally on your score board and score at 1/2", 23/8" and 41/4". Fold along each of the score lines.


5. To construct the card, place the 43/4" x 3" piece of cardstock over the card base, carefully lining up the centre fold and ensuring the bottom edges are flush. Apply glue or double sided tape to the 1/2" tabs on either end, then tuck them under and secure to the card base. (see photos below)


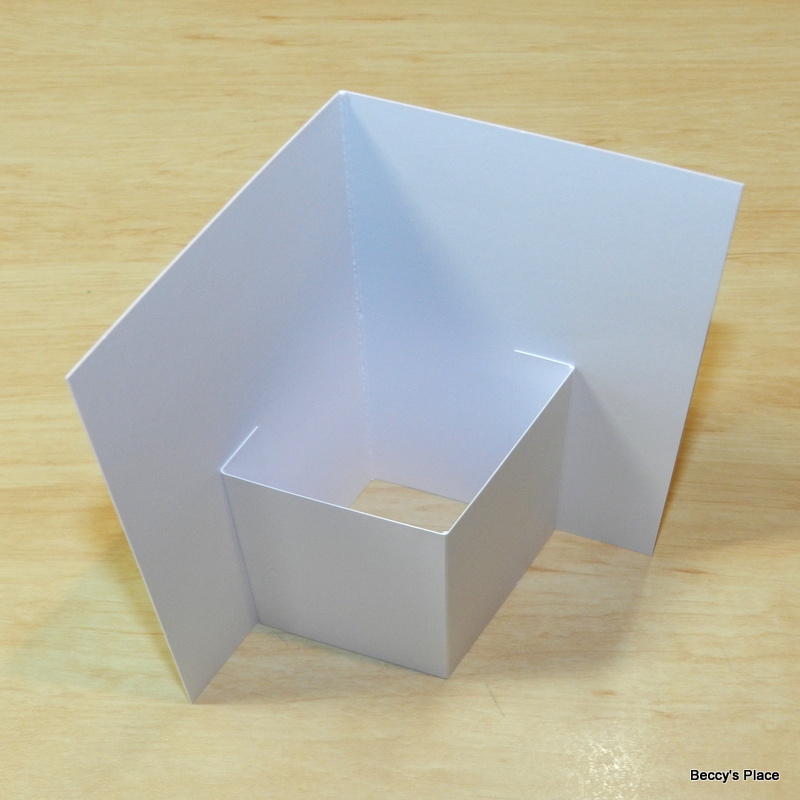
6. Repeat for the longer piece of card, ensuring the bottom edges are flush and the centre folds align. The tabs should tuck under so that the side edges are flush with the sides of your card base.


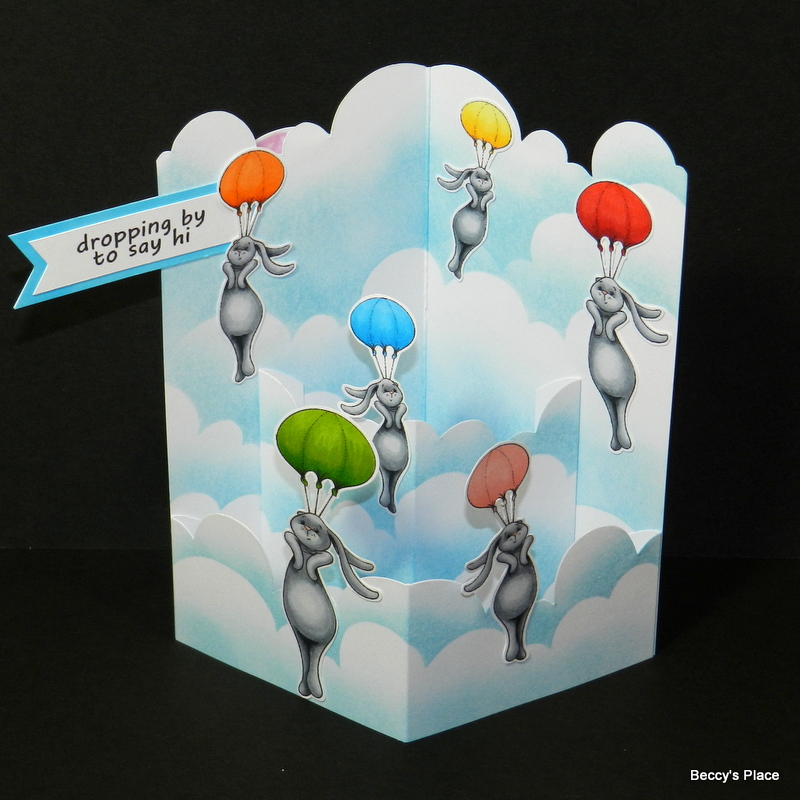
7. The card is designed to fold flat with the extra pieces on the outside, as shown below. These extra pieces, or balconies, are the areas that hold the decorations.


8. I had a specific idea in mind for my balcony card, which I'll show in the remainder of this tutorial. If you wish, you can decorate the card you've made up to this point with patterned papers, stamps and embellishments as desired. Keep the decorations to the 53/4" square formed by the side and bottom edge of the card base and longest balcony. This will ensure it fits into a square envelope.
9. I created a "cloud" template from a piece of cardstock, which I then used as a guide for cutting the shapes on the top of my card base and both balcony pieces.


10. I used the same template to ink a cloud design onto the front and inside of my card base as well as the two balcony pieces. I then constructed the card in the same way as described above.


11. To decorate, I printed, coloured and fussy cut a number of the bunnies from the Chute! set of digital stamps, altering the sizes and flipping some for a bit of variation.

12. The largest bunny was secured to the front of the card with foam tape. I also added a flag sentiment, which I printed twice so I'd be able to layer them back to back.

13. When decorating, keep in mind that some of the elements will be seen from the front and inside of the card, so take care to place them well.


Stamps:

12 comments:
Brilliant card, I love the design. xx
Wow, love your card and a wonderful idea. Thank you for sharing.
WOW, WOW, WOW. Such a fabulous card, Beccy...your interpretation of the clever construction card is WOW. I will definitely try this one. xx
What a super design. I love the fold but you have transformed it into a gorgeous card. Love the cloud idea.
Oh Beccy this is a wonderful card. Thank you for the tutorial. Take care. Hugs Jackie
Love it, thank you for the tutorial, what a fun card design and digi stamps, hugs, Lori m
Great cardshape Beccy. Thanks for the tutorial.
Karin
The bunnies are too cute and such a fun fold!
New fold to me Beccy, but your wonderful instructions, will certainly help. Thank you. LOVE your fun card too.
Faith x
Thank you for a brilliant tutorial. Emma
LOVE this card! I was looking for inspiration for my 2024 birthday cards, and this WINS!
Hermoso! Gracias!
Post a Comment