Now this is a cute project, and although it's a little fiddly in places, the end result is well worth the extra effort. Hat easel cards looks wonderful decorated with dainty flowers and pretty ribbons but would also look awesome decked out with camo paper and khaki card stock for anyone who loves the outdoors. A few tweaks with sizes and decorations and you have a card for just about any occasion and any recipient!
1. The first step is to decide on the size of your card, and that will depend on the dies or tools you have available to you. My finished card has a diameter of about 4", which are some of the larger circle dies I have in my collection. If you don't have any dies or tools, simply trace around a cup or plate and cut out by hand.
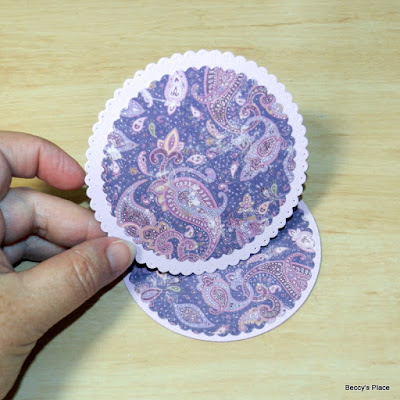
2. Cut a circular card base with your die and an additional circle of the same size or slightly larger. These pieces will form the easel card base. As you can see from the photo below, I decided to use a scalloped circle, which is slightly larger than my card base to add a little extra decoration.
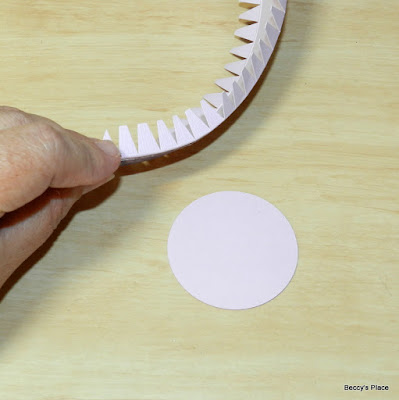
3. Decide how wide you'd like the crown of the hat to be by laying a die or circle tool in the centre of the card base. My die has a diameter of about 21/4". You'll also need a strip of card stock that is 2" high. The length will depend on the size of the crown, but I cut mine from a piece of 12" x 12" card stock so before trimming it measured 12" x 2". By the time I was finished, I had cut it down to about 7" long, but be wary of cutting too much off at first as you'll need to make sure it fits around the crown.
4. Place the 12" x 2" strip of card stock vertically on your score board and score at 1/2" and 11/2". Fold along each score line and press firmly with a bone folder.
5. Use a small pair of sharp scissors to cut little triangles from either side of the strip of card stock, which will help to bend the card stock neatly around the circle.
6. Fold the front of the card base in half to form the easel. Press the fold firmly with your bone folder or score tool to ensure a nice crisp line.
7. Time to decorate! I used patterned papers cut slightly smaller than each piece of card stock and secured them with a strong, flexible glue. I added a large scalloped circle to the centre of the card base and another to the scalloped card stock, I added a long strip to the sides of the crown, and a small, plain circle to the top of the crown.
8. Add liquid glue to one half of the card front - the half that is farthest away from the centre fold. Secure the large, scalloped circle over the top, taking care to centre it evenly on the base. This will form the easel base.
9. Now for the crown. Flip the small circle over so that the patterned paper is face down. Apply liquid glue to the little triangles on one side of the long strip. Work with just three or four triangles at a time to prevent the glue from going everywhere and to give yourself time to work without the risk of the glue drying before you're ready.
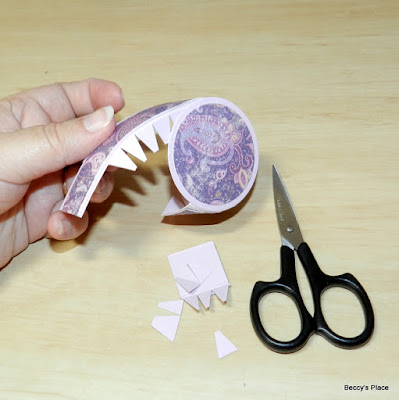
10. Glue the strip around the inside edge of the small circle as shown below. The patterned paper should be to the outside.
11. Once you've gone all the way around, you can trim off any excess paper and card stock. Have a close look at the photo below, you can see that I have left about 1" that will overlap so I can secure the crown in place. However, I have removed the triangles for a cleaner finish.
12. Apply more glue to the triangles on the other side of the strip and adhere the crown to the card base to form the little hat.
13. As with standard easel cards, you'll need an anchor in the centre of the card to hold the front in place. I've cut, stamped and punched a piece of matching card stock that will be secured with a combination of foam tape and glue.
14. The final step is to add your embellishments. I've gone with bows and blooms for a pretty spring-time look, which I know the recipient will love. I'll also make a simple, matching box to hold my card since it's much too tall for an envelope.


9 comments:
Oh wow Beccy this is just amazing. I love it. I have some dies that make a circular box I think they might work for this. Take care. Hugs Jackie
This is so cute, Beccy, and very clever! I have often made easel cards, but would never have thought of creating a little hat. Your tutorials are always so clear and easy to follow. I will have to try this one.
Hugs, Jennifer. x
Such a beautiful hat easel card and your directions were very easy to follow...thanks for sharing it.
Thank you Beccy, fantastic tutorial and a fabulous hat card, my wheels are spinning, love it, hugs, Lori m
SQUEAL! This is fabulous, what a wonderful idea, so beautifully put together Beccy.
Faith x
So pretty
Fabulous tutorial and lovely finish
I loved this tutorial, Beccy, and tried it right away. Very satisfied with my first attempt but intend to make more hat easel cards and I'm sure I'll get better with each one. :-D https://mygrammysattic.blogspot.com/2021/05/new-spring-hat.html
That's a neat card! Pretty!
Post a Comment