Cynthia has created three gorgeous and colourful cards using the new Hello Cupcake set of digital stamps. She coloured each of the images with markers that coordinate beautifully with her background papers.
Thursday, July 4
Tuesday, July 2
June Challenge Winners
Congratulations to the June Challenge Winners!
Helen (13), Vicki (34), and TracyM (27)
You are the randomly chosen winners of last month's challenge.
If you already have a Beccy's Place store account, I'll be adding a $20.00AU credit very soon.
If not, please email me at beccy@beccysplace.com to claim your prize.
Monday, July 1
New Digital Designs
New Digital Stamps
Hello Cupcake
digital stamps
Table Top Games
digital stamps
Labels:
cupcake,
dice,
digital stamps,
Hello Cupcake,
new release,
Table Top Games
Rose Fairy
Original artwork by Beccy Muir, all rights reserved.
Images are for personal use and must not be copied, swapped, shared, resold or mass produced without the express written permission of the artist.
July Challenge
Create a card or paper-craft project using any Beccy's Place image, upload a photo of it to your blog or other hosted site, and submit a direct link below. The challenge runs from now until midnight on the 31st of July 2024 (AEST).
To keep things interesting, I like to add an additional optional element to the monthly challenges, and this month I have a photo to inspire you. Perhaps there's a colour or two you'd like to use, or a shape or an element... interpret the bonus challenge however you wish.
PLEASE READ THE CONDITIONS CAREFULLY
BEFORE ENTERING THE CHALLENGE
- Entries that don't meet the conditions will be deleted from the challenge.
- Your project must be created during the month of July 2024 and entered into the challenge during the active challenge period. Due to an automated system, late entries cannot be accepted.
- Each month I will offer a free digital image and suggest a bonus challenge, such as a card sketch, bingo grid, etc. You DO NOT have to use the image or bonus challenge on your project, but you MUST use a Beccy's Place image, either free or purchased, to be eligible for entry.
- You can enter as many times as you like and you can submit your card to any other challenge you wish.
- At the end of the month three different random winners will be chosen to receive a $20.00AU store credit for any digital stamps at Beccy's Place. To redeem the store credit, winners must have a Beccy's Place customer account. (Please note, you do not need an account to enter the challenge. It is acceptable to create an account in the event that you win. Accounts can be closed at any time.)
- Store credit won during any Beccy's Place challenge is redeemable for digital stamps in the Beccy's Place online store.
- Entries can be uploaded to the challenge from any hosted site including blogs, online galleries, Google photos, etc. If you do not have access to a hosted site, please feel free to email your photos to me and I will add them from the Beccy's Place Guest blog.
- Beccy's Place designers may enter the monthly challenge but are not eligible to win prizes.
Saturday, June 29
Thursday, June 27
Wednesday, June 26
Tuesday, June 25
Chocolate Chip Cookies
If you wanted to, you could easily change these cookies to white or dark chocolate chip, or even fruit, by changing the colour of the chips. Or perhaps you'd prefer strawberry cookies with rainbow candies?
Digital Stamps:
Sunday, June 23
Tea Time at Anesha's Place
Anesha has created an absolutely fantastic collection of delicious cards using the new Tea Time favourites set of digital stamps. Although they are all fabulous, I do have to draw your attention to the very last card in the series, which might just hold the secret to a happy and peaceful life!
Friday, June 21
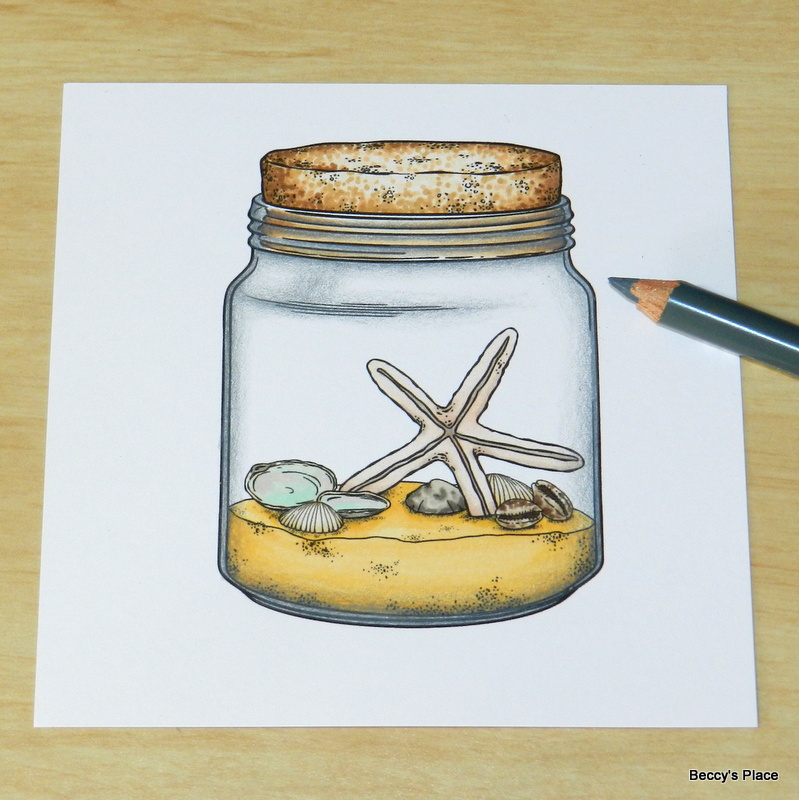
Tutorial - Colouring Glass
Even though glass is transparent, it still has highlights, shadows, and reflections that can be added when you're colouring. It will help to give the impression of shape and dimension for a more realistic look.
Print and colour your image. I used alcohol markers on smooth cardstock, but you can use whatever mediums you prefer.
The jar in this image has a screw top section that is made of glass of different thicknesses. It will bend the light at different angles, distorting whatever you can see through it. Because of that, I've coloured the portion of the cork lid visible through the glass without all the texture and detail. I've used the same colours, but applied in long strokes with gaps between. This will give the impression that the "glass" is distorting the view of the lid.
Now we're going to add shadows and highlights to our glass. The first thing to do is choose a different medium - one that won't interact with the colouring I've already done. I chose pencil, but you could also use water based markers.
Add a dark shadow under the screw top portion of the jar. Feather the colour as you move down the jar. Use a lighter grey to further soften and lighten the shadow as you move outward.
Add more shadows around the screw-top section of the jar, starting with the darker grey and blending it out with the lighter grey. Don't colour the entire area with shadow, only the recessed sections.
Now add shadows around the sides and base of the jar using the same technique.
Time to add shadows to the body of the jar, beginning with the section where the glass changes shape. You will need to feather the colour on both sides of this shadow, lightening it top and bottom.
Some vertical shadows will help "shape" the glass, tricking the eye into seeing dimension. You can see from the photos below, that my shadows follow the direction of the glass. There's an angle at the top, where the glass comes from the screw-top section to the side, and then the shadow continues vertically down to the bottom of the jar.
I've used a black pencil to darken the shadows here and there...
... and a white pencil to add some highlights. Glass is very reflective, so your highlights can be nice and intense in colour. Add them around the screw-top section of the jar in fine, broken lines.
Add another highlight down the side of the glass, opposite the shadow, and another smaller one right beside the shadow for some contrast.
A few lines and dots with a white gel pen will really make your glass shine. But try to resist the temptation of adding too much or you'll ruin the effect.
Here are the other jars from the set, before and after the glass has been coloured:
Digital Stamps:
Subscribe to:
Posts (Atom)