Friday, November 1

Our First Winner!

Congratulations Mel C.
You've won a $10.00 store credit for being the very
first person to enter a card in this year's challenge!

If you already have a Beccy's Place store account, I'll be adding a $10.00AU credit very soon.
If not, please email me at beccy@beccysplace.com to claim your prize.

Day 1 - "A"

Christmas in Australia, like other southern hemisphere countries, is celebrated during summer, which means sand, sun and surf rather than snow, ice and hot chocolate. I decided to give one of the little snowmen from the "Snow Angels" set a warm weather make-over, swapping snow for warm, tropical sand.


YOUR TURN: Create a card or paper craft project using the letter "A" as your prompt.
Click on the link below to add your creation to the challenge:

INSPIRATION WORDS:
Angel, accordion cards, a-frame cards, altered, aperture, A2, acetate, acrylic, alcohol ink, aqua, alabaster, almonds, apricots, apples, amethyst, antique, Arctic

A Month of Holiday Cards Challenge

Welcome to the Seventh Annual
Month of Holiday Cards Challenge

For the past six years, this challenge has heralded the start of the Christmas season for me. I love all the wonderful cards and projects that are entered into the challenge, they are all fabulously inspiring, but my favourite part is definitely the feeling of community that seems to rise with this challenge. I enjoy visiting all the blogs, reading the comments and seeing all the positive vibes you leave for each other. It really kindles my Christmas spirit!

For those new to the challenge, we have a few guidelines to keep things on track:

  • Each day throughout November, I'll post an A-Z letter prompt and card idea to get you inspired. You then use the prompt to create your own holiday themed project, take a photo of it and upload it to the challenge. Remember though, there are only 26 letters in the alphabet, which means you'll find a few random challenges thrown into the mix!
  • Follow the link at the bottom of any of this month's posts to upload your creations to the challenge. There's no limit on how many cards or projects you create but they must be holiday themed (any holiday) and created during the month of November 2019.
  • All the projects submitted will be eligible for prizes throughout the entire month, so get your cards in early!
  • Store credit won during any Beccy's Place challenge is only redeemable for digital stamps. All values are in Australian dollars.
  • Entries can be uploaded to the challenge from any hosted site including blogs, online galleries, Google photos, etc. If you do not have access to a hosted site, please feel free to email your photos to me and I will add them from the Beccy's Place Guest blog.
  • Beccy's Place designers may enter the monthly challenge but are not eligible to win prizes.
~ ~ ~ How To Win ~ ~ ~ 

Daily Comments
Every day a clever, funny or inspirational comment will be chosen,
winning its author $5 store credit at Beccy's Place.

Weekly Winners
Every Saturday during November I'll select three cards from amongst the submissions.
Each card artist will win $10 store credit at Beccy's Place.

Random Winners
I'll select cards from amongst the submissions at random times throughout the month.
Each card artist will win $10 store credit at Beccy's Place.

Monthly Winners
At the end of November, five random cards will be chosen from amongst the submissions.
The creators of those cards will each win $20 store credit at Beccy's Place.

Thursday, October 31


Selected, retired digital stamps at an incredibly low price for just 48 hours.
No rainchecks. No repeats.


Pumpkin Set
digital stamps
$2.00
48 hours only

Tuesday, October 29

Friday, October 25

Trim The Tree


Trimming the tree is one of those wonderful holiday traditions that many households enjoy together, and as such, it's also a popular image for holiday cards. Today I want to show you one way of colouring and decorating a Christmas tree image for your cards, scrapbook pages, art journals and paper craft projects.

I've printed a digital image in light grey by using the "washout" feature in Microsoft Word. The lighter lines will allow me to add more colour, rather than solid black lines, and results in a finished piece that looks more like a painting or drawing rather than a stamped image. Since I'm planning to use alcohol markers, I've printed on a piece of blending card.

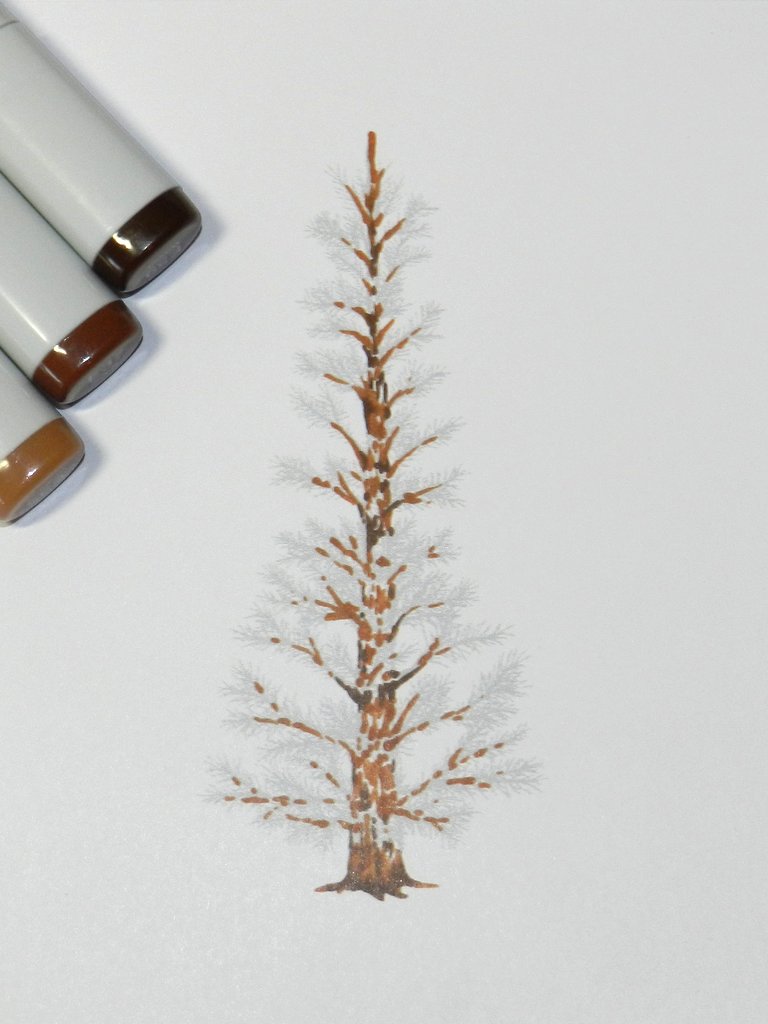
Start by colouring the trunk and branches of the tree. You want to use a few shades of brown to give a little bit of depth and interest, but there's no need to worry too much as the pine needles and decorations will cover most of it. As you can see, I've left a lot of white space in my colouring so I can layer the green over the brown. Alcohol markers are transparent and lower layers will show through whatever you apply over the top. To give the impression that some of the pine needles are actually in front of the trunk, you need to make sure the brown isn't showing through.

Add the pine needles with small strokes from the very tip of the marker.

Fill in as much or as little as you like.

Add a little bit of light green to the tips of the branches where new needles would grow.

Once the colouring is done, it's time to decorate!

I love using different mediums to add dimension, colour and texture over the top of the image. I've found some mediums are better than others at holding their shape, but it's good to mix it up with different brands. Don't forget you can also add rhinestones and self adhesive pearls. If your image is large enough, you can even think about die cuts and small stamped baubles. Have fun!

Stamps:

Wednesday, October 23

Christmas At Judy's Place


Judy has used a non-traditional colour scheme to create an amazingly beautiful Christmas card collection that is sure to delight whoever is lucky enough to receive one. Pinks, blues and purples coordinate perfectly with the cool green she has used for the tree. Some silver and purple glitter paper, sparkling rhinestones and fabulous layered snowflakes finish her collection perfectly.


The first card is a side step fold that allows for extra dimension to place embellishments, images and other little adornments. Judy's second card features lots of fussy cutting to help define the image against the background.


Judy has very kindly provided a colour chart of the pencils she used to colour both cards. Don't forget to stop by her blog to see what else she has been creating, you're sure to be inspired!


Monday, October 21

Don't forget our October Digital Stamp Sale
You have until the last day of the month to grab a bargain.

Goodness and Light

A quick card made with the tree I coloured a couple of days ago. 


Stamps:

Saturday, October 19

Black Backgrounds


Coloured images really pop on black backgrounds, but it's difficult to get the same vibrancy from your markers or pencils when colouring on black card stock. Usually we colour an image on light coloured card, cut around it with scissors or a die and mount it onto black. But what if you're after a more seamless finish?


The answer lies in your marker box... that's right, a black marker! Obviously you don't want to be colouring a huge image, not only will it consume a considerable of ink, but it will also take a long time to complete. However, a card sized image doesn't take too long and gives a great result.


I think the Christmas tree looks a lot more vibrant against the black background, especially the red ribbon and pops of silver.

Stamps:

Thursday, October 17

Divine Cards - with Carla


Carla has used the new "Oh Night Divine" set to create some truly divine Christmas cards full of festive colours and patterns. She has further enhanced her cards with pretty ribbons, a variety of die cuts and seasonal embellishments for a traditional take on Christmas.


I don't know about anyone else, but seeing these cards has definitely put me in a festive mood! You can check out even more of Carla's work by visiting her blog, and while you're over there, don't forget to sign up as a follower so you don't miss any of her posts.

Tuesday, October 15

Everything Papercraft - Ornare


Originally done using pieces of tin, ornare is a simple and effective technique that involves piercing surfaces to create pictures and patterns with a series of holes. Paper ornare generally uses metal templates that can be purchased in various sizes and designs, from full focal images to borders and corner adornments.  Simply lay a piece of heavy paper or card over a foam pad, place the ornare template on top then prick the paper with a piercing tool or needle following the guide. In the paper craft world, most of us know this technique as paper piercing, which is seen a lot in Pergamano or parchment craft.