Omitting is a stamping technique whereby some of
the stamp is left un-inked so as to exclude it from the stamped design. It is
similar in effect to masking, except that it occurs prior to any stamping being
done. One method is to ink only the desired parts of the stamp with a
water-based marker, which gives you a little more control over the colour
placement. Another method is to lay tape over the section of the stamp you
wish to omit, then add the ink, and remove the tape before stamping. This
technique helps to make your stamp collection much more versatile, giving you more options for your images.
Tuesday, December 27
Sunday, December 25
Friday, December 23
Sweetest Christmas
How about one more cute card before the big day arrives? Deanne has created this sweet gingerbread card using the Gingerbread Season set of digital stamps. She has added some fabulous sparkly glitter to the length of tinsel as well as different mediums for his gumdrop nose and buttons. Lots of glitz and glam on this one!

Wednesday, December 21
Colouring Candle Light
I enjoy colouring light, especially when it's warm, glowing candle light shining on a cute little face! Today I want to show you my technique for colouring candle glow using coloured pencils on smooth cardstock. You can apply the same technique to little bulbs, birthday candles, lanterns or most other light sources. If you'd like the light to be less "warm" opt for either a lighter shade of yellow or white.
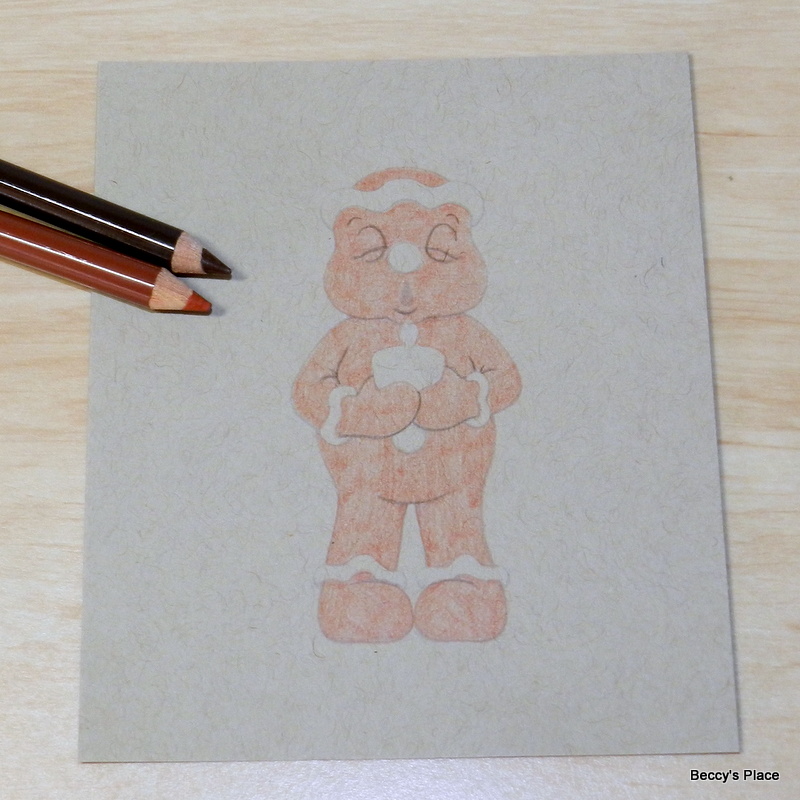
I started by printing one of the gingerbread characters onto a smooth piece of kraft cardstock. I like to use the kraft as it gives a nice base for the gingerbread cookie, both colour-wise and for texture.
I'm using a warm brown for the gingerbread base and a dark brown to shade. To make sure I don't lose the lines as I'm colouring, I generally trace over them with the darker shade so they are still visible through the first layer of colour.
I like to add additional colours between the layers, such as shading and "blush" for the cheeks. I have also coloured the candle flame, which is going to be the source of light for this project.
All the shadow areas will be above or below the light source - in this case, the candle flame. Shadows will occur wherever something obstructs the light from the candle, such as the gumdrop nose or the icing around the head. Don't forget to add shadows to the eye sockets so they recede into the head.
The light from the candle will hit the areas of the face that are not obstructed, such as the bottom of the nose, the chin and cheeks and the centre of each eyelid. Add yellow pencil to those areas making sure you fade out the colour as you move away from the light.
I coloured the icing with a cream pencil and shadowed with a warm grey tone. The icing will have shadows above as well as a very thin shadow below where the candle light can't quite reach. Don't forget to add some yellow along the bottom of the icing where the light touches.
Colour the rest of the design in the same way. Add your dark brown shadows in the areas where the candle light doesn't reach, particularly under the arms and tummy, the backs of the legs and bottoms of the feet.
I darkened some areas even further with black pencil. Adding very dark shadows helps to accentuate the light by adding contrast, but don't go overboard unless your character is in a lightless area.
Adding a final layer of the base colour will blend everything together nicely.
Now we add the glow to the body, remembering to hit the areas that aren't obstructed, such as the tops of the hands and arms. Very little light will reach all the way down to the belly and legs, but if you wish, you can add just a touch to the tops of the feet.
Stamps:
Labels:
christmas,
colouring,
gingerbread,
Gingerbread Season,
tutorial
Monday, December 19
Howling Good Holidays
Two of the images from the Holiday Hounds set of stamps have been put to good use on these cards created by Judy. She has mixed and matched reds, browns and deep greens for a traditional Christmas look with a quirky canine twist!
Labels:
christmas,
design team cards,
dog,
Holiday Hounds,
Judy VanZandt
Saturday, December 17
Holiday Set
The Holiday Hounds are perfect for creating simple Christmas cards that are sure to bring a smile to the faces of my dog-loving friends. I've kept to a brown, red and aqua colour scheme with lots of bright white in the background and a scattering of liquid pearl dots.
Stamps:
Friday, December 16
Thursday, December 15
Time for Gingerbread
This adorable gingerbread card was created by Kathy using the new Gingerbread Season set of digital stamps. She has used several different mediums for colour and texture, which helps to lift the character off the background and give him a decidedly 3D-look. I especially love the length of sparkly tinsel she has him holding! Fabulous!
Tuesday, December 13
Hot Tip Tuesday
There are countless cutting dies on the market featuring beautiful flourishes, tiny flowers and all manner of gorgeous lace-work that elevate our cards to the next level. The problem with intricate die cuts, aside from choosing amongst all the beautiful designs, is securing them to our projects.
Today's tip is to get your adhesive on your cardstock before you start cutting. Apply strips of double-sided tape or jac paper to the back of your cardstock, leaving the second backing strip in place while you run it through your machine. The dies should have no trouble cutting through the extra layer of adhesive. Once your shape is cut, simply remove the backing strip and secure the die cuts to your project.
Sunday, December 11
Who's A Good Boy?
With Christmas just around the corner, Deanne has created this sweet doggy treat tin for her furry little friend. She coloured one of the images from the Holiday Hounds set, fussy cut around the outside and fixed it to the side of an empty can. She used patterned paper, twine and die cuts to finish her fabulous project!
Labels:
christmas,
Deanne Saunders,
design team cards,
dog,
Holiday Hounds
Friday, December 9
Tutorial - Interlocking Gatefold Cards
A basic gatefold card with a clever interlocking feature
that can be sized and shaped to suit your needs!
1. Begin with a gatefold card of any size - mine measures 51/4" x 51/4". (To make a gatefold card, place a 101/2" x 51/4" piece of cardstock horizontally on your score board and score at 25/8" and 77/8". Fold along each score line so the side edges meet in the centre).
2. Decorate the front of your card with stamps, inks or patterned paper. I've used a layer of red cardstock with a second layer of Christmas themed paper over the top for each side of the gatefold. The red cardstock pieces measure 23/8" x 5" each and the patterned paper measures 21/4" x 47/8" each.
3. Secure the patterned paper to the cardstock with glue or double-sided tape first. Now secure those layers to the front of your card, taking care to line everything up correctly. (Note that the white borders that are closest to the centre opening of the card will be half the width of the other borders. This is because the two sides come together when the card is closed creating the same total amount.)
4. Select a cutting die that cuts a frame. In my case, my die cuts a narrow, scalloped edge frame decorated with faux stitching. You can see the two different cutting lines in the photo below - the outer one is scalloped and the inner is a smooth oval. (If you don't have a die like this, simply nest two different dies together. Cut a large shape and then cut a smaller shape from the centre.)
5. Print and colour the image you wish to use on your card. Use the same die to cut around the image, reserving the frame that will cut automatically, and also cut two frames from a coordinating piece of cardstock. Reserve one of the extra cardstock ovals from the centre of the frame.
6. Use glue or tape to secure the red cardstock oval to the back of the image, which will cover any bleed-through as well as add extra support. Use glue to sandwich the three frames together, keeping the white piece at the back or between the two red pieces. This will make your frame a lot stronger and less likely to bend or tear.
7. Centre the image panel over the front of your card. Hold it in place with some low-tack tape over the right hand side. Open the card and apply adhesive to the section that is showing. Close the card again and press down on the adhesive. This should secure the image panel to the left side of your gatefold.
8. Place the frame around the image panel, lining it up perfectly. Hold it in place with some low-tack tape positioned over the left hand side. Open the card to reveal the overhanging image panel and frame. Apply glue ONLY to the section of the frame you can see. DO NOT apply any adhesive to the image panel. Close the card and press the frame down on the right side.
9. The image panel should line up perfectly with the frame forming the "interlocking" part of your card.
10. If you wish, you can add a sentiment to the frame. Just remember to keep the adhesive ONLY on the section of the frame that the sentiment will cover. DO NOT allow any adhesive to overflow onto the image panel or the cardstock or you will glue your card closed.
Stamps:
Subscribe to:
Posts (Atom)


%2012-15-22%20BP%20Gingerbread%20Season-front-WM.jpg)
%2012-15-22%20BP%20Gingerbread%20Season-inside-WM.jpg)