Showing posts with label cardinal. Show all posts

Saturday, November 26

Day 26 - "X"

The day of the dreaded "X" has arrived! Those who have been playing along for a few years will know that means being as creative as you like when interpreting the prompt. Like always, I've kept it simple with my X-Press It blending card.


YOUR TURN: Create a card using the letter "X" as your prompt.
Click the link to add a photo of your creation to the challenge:

INSPIRATION WORDS:
X-Press It blending card, Xmas, xyron, XOXO, X-tra, X-Fold cards

Stamps:

Thursday, November 3

Day 3 - "C"

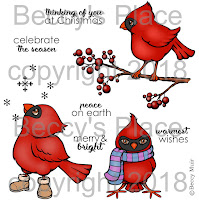
This little, red cardinal is celebrating the season by watching a flurry of snowflakes. Naturally, he has lovely warm boots to keep his tiny feet warm while he walks around in the snow.


YOUR TURN: Create a papercraft project using the letter "C" as your prompt.
Click on the link below to add a photo of your creation to the challenge:

INSPIRATION WORDS:
Christmas, Christ, Christmas tree, candy canes, chocolate, cardinal, candles, centre-step card, circle card, concertina fold card, canvas, chalk, chipboard, colouring, clear, Copic, crayon, crochet, celadon, cerise, charcoal, copper, cream, crimson, cyan.

Stamps:

Wednesday, December 23

Good Tidings

Sometimes I like to change things up a little, just to see what will happen. Instead of leaving a white border around my coloured image, I opted to add black marker instead. The result is an image that pops right off the white card blank!


Stamps:

Thursday, November 5

Day 5 - Birds and Animals

SURPRISE!!
It's the first non-letter prompt for this year's Month of Holiday Cards challenge and we're focusing on birds and animals. You can use any kind of bird or animal you like, just remember to make your card or project holiday themed - Christmas, Hanukkah, Easter, 4th of July... etc.


YOUR TURN: Create a card or papercraft project using a bird or animal in the design.
Click on the link below to add a photo of your creation to the challenge:

Stamps:


Saturday, November 30

Day 30 - Do What You Love

We've come to the end of another Month of Holiday Cards Challenge and, as always, today's prompt is to create something that you love. Use all your favourite embellishments, techniques, stamps, papers and colours to make a card or papercraft project that brings you joy.


YOUR TURN: Create a card or papercraft project that brings you joy.
Click the link below to add a photo of your project to the challenge:

Stamps:

Sunday, November 3

Day 3 - "C"

There are lots of great "C" words to choose from for today's card challenge. I was going to go for chocolate, but decided that it felt more like a cardinal day...


YOUR TURN: Create a card or papercraft project using the letter "C" as your prompt.
Click on the link below to add your creation to the challenge.

INSPIRATION WORDS:
Christmas, Christ, Christmas tree, candy canes, chocolate, cardinal, candles, centre-step card, circle card, concertina fold card, canvas, chalk, chipboard, colouring, clear, Copic, crayon, crochet, celadon, cerise, charcoal, copper, cream, crimson, cyan.

Friday, December 7

Tutorial - Pyramid Cards


Pyramid cards are fabulous, free standing display cards that are relatively easy to make. With three sides to decorate, they would make perfect table centrepieces for any celebration. The card is held in place with a simple closure that keeps it standing, but it can easily be folded flat for postage.


1. Start with three 5" x 5" pieces of card stock. Score them diagonally from corner to corner and fold along the score lines.


2. Place one square in front of you with the score line running vertically. Place a second square along the score line of the first square and use a pencil to mark the bottom edge. This will act as a guide for placing adhesive.


3. Add double sided tape or glue to the marked square, making sure the adhesive does not go below the pencil marks you made in step two.


4. Remove the backing paper and secure the second square in place, keeping it slightly to the left of the score line.


5. Repeat with the third square so that you have all three connected.


6. Now you can fold them up to form the pyramid shape, and that's basically the card base finished.


7. Time to decorate! I used Christmas themed patterned paper and some mirror card to decorate the sides of my pyramid. You'll need three large triangles and three small ones.
I formed each large triangle by cutting mirror board squares measuring 43/4" then cutting them in half from corner to corner. The patterned paper layer is cut from 41/2" squares cut in half from corner to corner.
The small triangles were cut from mirror board squares measuring 13/4" then cut in half from corner to corner, and patterned paper squares measuring 11/2" cut in half from corner to corner.


8. Take care to layer the pieces in the correct places, particularly the small square on the far left hand side. Double check by folding the card into it's pyramid shape before you secure any of the triangles.


9. Now it's time to place the closure. We'll be using a large brad to hold the card in it's pyramid shape. Alternatively, try a large button or even a sentiment tag... anything that you can slide the side of the card behind.


10. Fold the card into it's pyramid shape. You want to place the closure (brad, button or other) just below the large triangle flap. I've marked the position with a tiny cross in the photo below. The brad will extend up to hold the top triangle in place.


11. Use a sharp tool to pierce a hole for your brad. If you're using a button or tag, make sure you keep the adhesive in the very centre so that the edges can still lift.


12. Secure the brad through the hole. Now you can slide the flap behind the brad to hold it in place and to keep your pyramid card standing.


13. Add any additional elements you like to the sides of your pyramid card. 


14. To fold it flat for postage, simply slide the triangle out from behind the brad and collapse the card.


Stamps:

Saturday, November 10

New Release: Christmas Cardinals

In their bright red finery, these little cardinals are the perfect ambassadors for heralding in the Christmas season. Easy to colour and simple to fussy cut, they are the perfect subjects for quick and festive holiday card making. Mix and match with any of the five sentiments that are included in the set.

Christmas Cardinals
digital stamp set


My designers have some fabulous cards to share with you featuring the new Christmas Cardinals digital stamp set. You can find more great projects over on their blogs... the links are over on the left.


Day 10 - "I"

Although Christmas in Australia is hot, I'm still going with an icy cold theme for my card today... mostly because there aren't a lot of "I" words associated with the holidays and also because I enjoy the idea of a white Christmas.


YOUR TURN: Create a paper craft project using the letter "I" as your prompt.
Click on the link below to upload a photo of your creation:

INSPIRATION WORDS: 
Ice, ice skating, icicle, imagination, iridescent, inking, italic, iris folding, indigo, ivory.

Friday, November 2

Day 2 - "B"

"B" is for bird... and what better bird for a traditional Christmas card that a gorgeous red cardinal? Mix in some green foliage and a hint of gold and the job is done.


YOUR TURN: Create a card using the letter "B" as your prompt.
Click on the link to upload a photo of your creation:

INSPIRATION WORDS:
Blitzen, boots, bows, box cards, bendy cards, building block cards, bleaching, beads, brads, burnishing, blue, brown, black

Stamps: Cardinal freebie