Showing posts with label Sweet Thing. Show all posts

Saturday, March 30

Just One More...


It's hard to stop at just one... so Anesha created four! Check out these fabulous, colourful, and oh so sweet cards created with the new Sweet Thing set of digital stamps.


Wednesday, March 20

Sweet Thing


Deanne has added a touch of glitter and a little extra shine to one of the images from the new Sweet Thing set of digital stamps. There's nothing like a little sparkle and shine to make your birthday extra special!


Tuesday, March 19

Tutorial - Adding Sprinkles


Here's a quick tutorial for adding "sprinkles" to your donuts or cupcakes.


1. Print the donut image and colour with your choice of medium. I've used alcohol markers on a sheet of blending card. As you can see from the image below, I completely ignored the sprinkles as I coloured.


2. Next, select a variety of liquid accents, such as Nuvo drops or Liquid Pearls, which will give the sprinkles some dimension. You can also use gel or paint pens, but the colour will sit flush on your paper. (TIP: if you're also using patterned paper on your card, select colours from the paper for a nice coordinated look)


3. Apply the colours to the sprinkles. In areas where there is overlap, allow the first colour to dry completely before applying the second colour over the top.


Digital Stamps:

Monday, March 11

Sweet Treats


Karin created a cute little treat box using some of the images from the Sweet Thing set of digital stamps. One side of the box has a little window, protected by a piece of acetate, so you get a glimpse of the delicious treats inside, while the opposite side features a hand-coloured image. She even used some of the donut stamps to create digital paper for her project!


Saturday, March 9

Tutorial - Tricorn Fold Card


A free-standing, three dimensional, pop-up card that folds flat for postage...
all the things we love in a card!


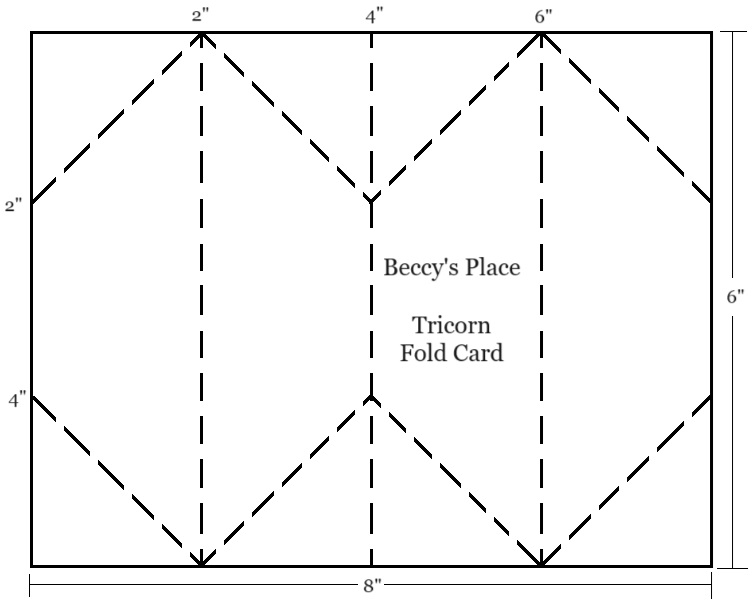
TEMPLATE:

1. Place an 8" x 6" piece of cardstock horizontally on your scoreboard and score at 2", 4" and 6".


2. If you have a scoreboard that includes a right angled guide, add it to the scoreboard. Score from the top of the first score line to the left side of the card, then from the top of the first score line to the second score line. With the extra guide in place, these score lines will be 45 degree angles. Repeat the process from the top of the third score line. Turn the cardstock around and repeat at the bottom of the cardstock. See the template above for correct placement.

If you don't have a right angled guide, measure and mark your cardstock 2" down from the top corners and 2" up from the bottom corners. Make the score lines as shown in the template above.


3. Fold along the vertical score lines starting with a mountain fold, then a valley fold, then another mountain fold. Burnish with your bone folder for crisp lines.


4. Fold along each of the angled score lines. I found it easiest to pinch the angled fold while also pushing back against the vertical score line. Repeat for all the diagonal score lines. Burnish each fold firmly with your bone folder.


5. Apply glue or strong double-sided tape to the centre section of the card as shown below. Fold in half to secure the centre section together.


the back:

6. Push the bulk of the card to each side a few times in order to loosen the folds. This is how the card will fold flat for postage.


7. Decorate the card with pieces of patterned paper and additional cardstock if desired. I found it easiest to use the card base as a template for my cardstock and patterned paper. Remember to cut them slightly smaller to leave a narrow border.


8. Secure the patterned paper and cardstock to the front of the card. Add two plain pieces of cardstock to the back of the card for personalised sentiments.


9. Add an image, a sentiment and any additional embellishments you wish.


Digital Stamps:

Monday, March 4

Box of Donuts


A box full of delicious donuts is a great way to say "Thanks" or "Happy Birthday" to someone you love, especially if that someone has a sweet tooth! Let me show you how I created this card using six of the pre-coloured images from the Sweet Thing set of digital stamps.


1. Start by finding either a circle punch or a circle cutting die and figuring out its diameter. You'll want to resize the donut images to fit the cutter you have. For example, I have a 11/2" circle punch, so I set the size of the images to be 11/2", which left a small border around the outside of the image.


2. Punch each donut with the circle punch, then use a hole punch to cut each centre.


3. To create the card, you'll need a base measuring 4" x 53/4" and an additional piece of cardstock measuring 5" x 63/4".


4. Place the 5" x 63/4" piece of cardstock on your score board and score at 1/4" and 1/2" on all four sides.


5. Use a large rectangle die, or a craft knife and ruler, to cut a window in the centre of the cardstock. 


6. Cut a piece of acetate to 37/8" x 55/8" and secure over the window with strong tape or glue.


7. Use a small pair of scissors to clip each corner, stopping at the second score line. Cut away the outer part of each corner so that you're left with the two small triangles between the two score lines. (See the photos below.)


8. If you'd like to add twine to your card, you'll want to punch a small hole on each of the four sides of your card, which will help to keep the frame flat against the card base. I always measure and mark the placement so that they are in the correct location. Since I want my twine to tie more towards one corner, I've made the holes asymmetrical. (NOTE: If you prefer to use ribbon, there's no need to punch the holes. Instead, secure the ribbon around the frame bringing the ends to the edge of the cardstock.)


9. Thread the twine through one hole and secure it on the inside of the frame with glue and tape. Bring it over the outside of the frame and through the hole opposite, again securing with glue and tape. Repeat with the second piece of twine and the other two holes.


10. Add a spot of glue between the two triangles and bring them together to form the corner. Fold over the outer section on each side to create the frame. I found it easiest to use clips to hold things in place as I was working. Set aside to dry fully.


11. Add foam tape or chipboard pieces to the back of each donut. I used a double layer to give them extra height.


12. Arrange them evenly on the front of your card base and secure with glue or double-sided tape.


13. Add glue to the edges of your frame and secure over the front of the card, carefully lining up the edges.


14. Add the finishing touches to your "box of donuts".


Digital Stamps: