


A free-standing, three dimensional, pop-up card that folds flat for postage...
all the things we love in a card!

TEMPLATE:
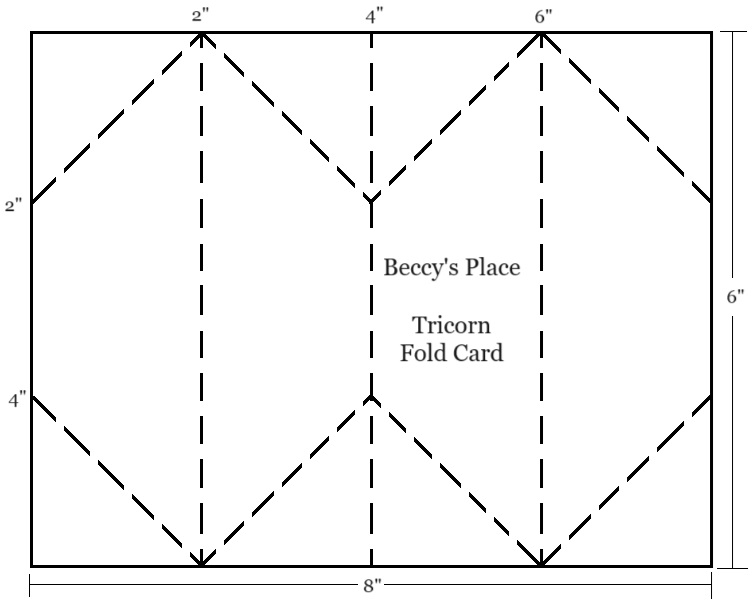
1. Place an 8" x 6" piece of cardstock horizontally on your scoreboard and score at 2", 4" and 6".

2. If you have a scoreboard that includes a right angled guide, add it to the scoreboard. Score from the top of the first score line to the left side of the card, then from the top of the first score line to the second score line. With the extra guide in place, these score lines will be 45 degree angles. Repeat the process from the top of the third score line. Turn the cardstock around and repeat at the bottom of the cardstock. See the template above for correct placement.
If you don't have a right angled guide, measure and mark your cardstock 2" down from the top corners and 2" up from the bottom corners. Make the score lines as shown in the template above.


3. Fold along the vertical score lines starting with a mountain fold, then a valley fold, then another mountain fold. Burnish with your bone folder for crisp lines.

4. Fold along each of the angled score lines. I found it easiest to pinch the angled fold while also pushing back against the vertical score line. Repeat for all the diagonal score lines. Burnish each fold firmly with your bone folder.


5. Apply glue or strong double-sided tape to the centre section of the card as shown below. Fold in half to secure the centre section together.


the back:

6. Push the bulk of the card to each side a few times in order to loosen the folds. This is how the card will fold flat for postage.

7. Decorate the card with pieces of patterned paper and additional cardstock if desired. I found it easiest to use the card base as a template for my cardstock and patterned paper. Remember to cut them slightly smaller to leave a narrow border.

8. Secure the patterned paper and cardstock to the front of the card. Add two plain pieces of cardstock to the back of the card for personalised sentiments.


9. Add an image, a sentiment and any additional embellishments you wish.

Digital Stamps:

6 comments:
Always love your step by step tutorials - the photos are always clear and so helpful! Going to have to get out of my comfort zone and try this one ~ it's so cute. Thank you Beccy!
Great card. Thanks for the phototutorial. Will give it a try.
xxx Margreet
What a great fold! Lovely card, thanks for the tutorial. xx
Such a unique card design! Thank you for sharing!
OMGoodness, I love this! I'm a fun fold fanatic and came here from Vicki's blog. Thanks so much for sharing your tutorial - will be trying this soon! :)
Fabulous fold must have a go at this -thank you.
Carol x
Post a Comment