I like to use lots of texture and dimension on white cards to help distinguish between the layers and elements of the design. A little touch of gold doesn't hurt either, and helps to elevate the card even more.
Showing posts with label Old Books. Show all posts
Showing posts with label Old Books. Show all posts
Friday, August 29
Thursday, August 14
Watercolour Background
A few months ago, my friend Pete told me about sprinkling rice on wet water-coloured images. I'd only ever heard of using salt, so I thought I'd give her suggestion a go. As you can see, the rice absorbs the colour leaving a very distinct pattern behind, which varies based on how much water is on the paper. Less water results in a clearer, more well-defined pattern, while more water creates a softer look.
Products:
Tuesday, August 5
Old Books Easel Card
If you're ever stuck choosing colours for an image, try starting with your patterned paper.
Select pencils, inks or markers that match for a lovely, coordinated result.
Products:
Friday, July 25
For the Love of Reading
The colours that come to mind when I think of love are a combination of pink, red and white... just like Valentine's Day. So it seemed to me that since I love reading so much, they would make the perfect palette for a book-themed card!
Products:
Thursday, July 17
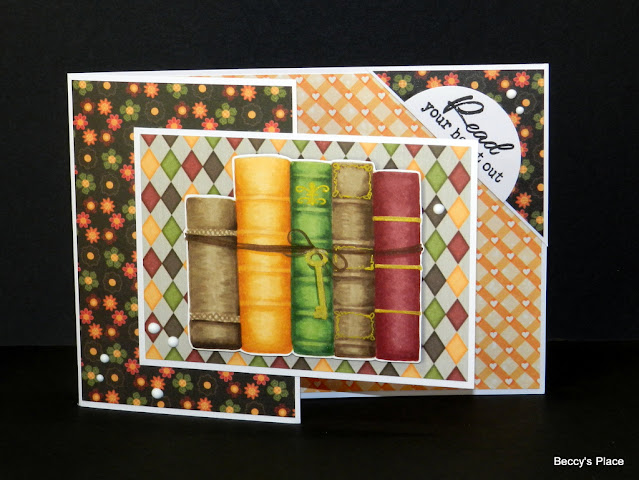
Tutorial - Corner Tuck Fold Cards
A basic card with a fun pocket closure that can be adapted to almost any size and shape. You can move the pocket to either corner and you can orient your card horizontally or vertically depending on your overall design.
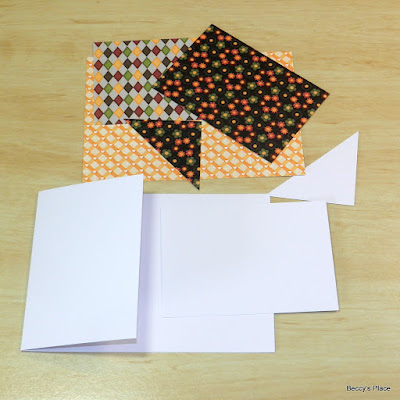
1. Start with an A5 tent-fold card blank (or 4" x 6" if you prefer).
2. Cut the front of the card in half. The part you cut off becomes the front panel of your card.
3. You'll also need a triangle of cardstock for the pocket. I started with a 21/4" square of cardstock, and cut it in half on the diagonal. (You don't have to make it quite as large as I did, but you must ensure the corner of your front panel can tuck inside the pocket.)
4. Cut several pieces of patterned paper for the different pieces of cardstock. I keep mine slightly smaller than my cardstock so I'll have a narrow border around all the edges. You can choose coordinating pieces or use the same design on all sections if you prefer.
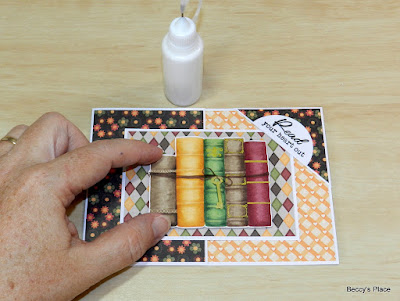
5. Place glue on the back of the panel, ensuring it only covers half the area. Secure it to the front of your card making sure none of the adhesive has drifted over to the right side - you don't want to glue your card closed!
6. Apply glue on the 90 degree angle of the triangle piece, leaving the long edge clear. I've added pencil marks so you can see the correct placement for the glue. The triangle will form the little pocket to hold your card closed.
7. Decide on the placement of your pocket. I've positioned mine at the top, right-hand side of the card, securing it to the inside edges of the card. Allow the pocket to dry fully before opening and closing.
8. Now decorate! I used an image from the Old Books set of stamps as well as one of the sentiments.
Products:
Thursday, July 10
You're A Classic
Paper piecing is a great way to get some colour onto your stamped images without worrying about pencils and markers. It also guarantees that you'll have perfectly coordinating papers for the background. Some gold details and a shadow at the base of the image, as well as a white embossed sentiment finished my card nicely.
Products:
Sunday, July 6
Remember When...
When I first started paper-crafting, embossing on plain cardstock was just gaining popularity (yes, it was that long ago!) In those days, I didn't have a heat gun and would anxiously wave my cardstock back and forth over the toaster. Needless to say, there was a lot of scorching and a great deal of unpleasant odours coming from the kitchen! Thankfully, times have changed and we have lots of great tools and products to help us get the results we want without the smell of burned paper.
Products:
Friday, June 20
Alcohol Inks
Long ago, during my painting days, there was a trend to create washy, acrylic backgrounds with navy blues, browns, pinks and purples and then layer pretty roses over the top. I decided to revisit some of those colours but with my alcohol markers and some blending card. I have to admit, it's nothing at all like the paintings, but I still love the effect!
Products:
Thursday, June 12
Blossoms and Old Books
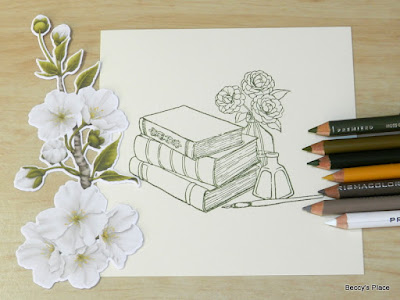
I decided to combine the flowers from the Cherry Blossoms cut sheets with one of the images from the Old Books stamp set by doing a little colour matching. Since my flowers are pre-coloured, I used them to select the pencils and ink for my image. I've included some photos below for those who are interested in the process.
Products:
Thursday, June 5
All The Books
I stamped the books multiple times across the bottom of my cardstock to get a nice long line of reading material... perfect for book lovers like myself. I then coloured one with beautiful deep shades from around the colour wheel, and the other with all the lovely brights!
Products:
Monday, May 26
One For The Books
To create the background for this card, I embossed a piece of glitter cardstock then lightly sanded the top to reveal the inner core. The distressed look coordinates nicely with the rich colours I chose for the image.
Products:
Tuesday, May 6
Old Books
Reading is one of the world's most popular pastimes, so our latest stamp set is sure to appeal to young and old alike. You can even personalise the images by adding the names of favourite books, family names or seasonal occasions!
Subscribe to:
Posts (Atom)


