


Today's tutorial was requested by a lovely card maker named Sandie. She wanted to learn how to put together a Double M Card, which is similar to a Pop-Up Book Card. Double M cards are wonderful, large display cards that would be perfect for parties where large groups of people want to leave a personalised message. They're also great for displaying lots of fun images and embellishments with the added bonus of folding flat for postage.


TEMPLATE
1. You'll need one piece of card stock measuring 8" x 6", two pieces of card stock both measuring 41/2" x 6", as well as some patterned paper, embellishments and stamped images for decorating.

2. Place the 8" x 6" piece of card stock horizontally on your desk. Measure and mark a horizontal cut line 11/2" from the top edge of the card stock, starting 2" from the left hand side and finishing 2" from the right hand side. Repeat for the bottom edge. Use a craft knife or trimmer to cut along both lines. (Refer to the template)

3. Now place the card stock horizontally onto your score board. Score at 4", which is half way along the card. This will form the centre fold.
4. The next four score lines will begin under the top cut and end above the bottom cut. Refer to the template for the correct placement. Score at 2", 21/2", 51/2" and 6", remembering to keep these four score lines between the two cut lines.

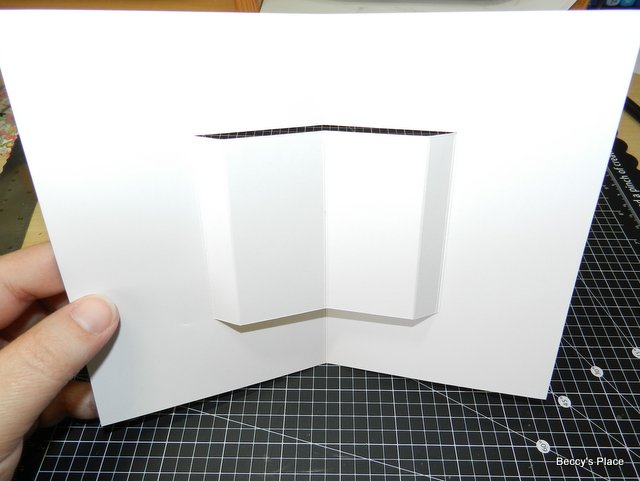
5. Fold the card in half along the centre score line. Now make a valley fold and a mountain fold on each side of the centre line along the shorter score lines. This will create a centre section that is raised up from the card as in the photos below. Set aside.

6. Working with the two 6" x 41/2" pieces of card stock, score 1/2" along one long edge of each and fold along the score line.

7. These two pieces are attached to either side of the 8" x 6" piece of card stock. Apply adhesive to the 1/2" strip along each 6" x 41/2" piece and secure to either side of the card blank. You want the join to be on the back of the finished card.


8. Your card should look like the one below. Note how the profile looks like two letter M's, one on top of the other, which is where the name of this card originates.

9. Fold the card and press firmly on all the creases.

10. Time to decorate! Lay the card completely flat on the desk in front of you. The first panel will be the front of the card, the next two panels will be the centre of the card, and the last panel will be the back. Decorate as desired.


Products:

8 comments:
Hi Beccy this is a stunning card. I love the images and the papers you have used. The card shape is fantastic thank you for the instructions. Take care. Hugs Jackie
amazing card!
This is really impressive.
Great card! Thank you for the tutorial.
Many thanks Beccy, one for the making today I think..x💖 [Aussie aNNie's Blog]
merci
Was trying to work this one out yesterday, youtube gave me the answer this morning with a link to you page. Wanting this for my daughters birthday next month, Thank you from the bottom of my heart
You're most welcome Leanne, I'm glad you were able to figure it out. Happy Birthday to your daughter for next month.
Cheers,
Beccy
Post a Comment