Monday, February 13

Tutorial - Waterfall Cards


Looking to add a bit of pizzazz to your next card-making project? Well, look no further! This card has the wow-factor, is interactive and you don't need to be a rocket scientist to put it together. Now that's my kind of card!


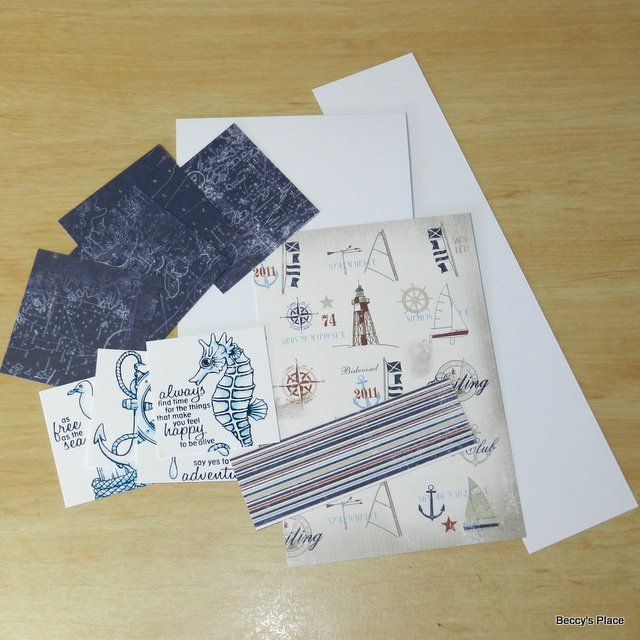
1. Gather together the supplies for your card. You'll need:
  • a card blank measuring 41/4" x 6"
  • one 2" x 9" piece of cardstock
  • four 2" squares, stamped and coloured
  • four 21/4" squares of coloured card or paper to mat the stamped images
  • two pieces of patterned paper - 4" x 53/4" and 4" x 11/4"
  • piece of ribbon or string for pull tag
  • an eyelet, staple or other way to secure the ribbon
  • adhesives and cutting tools 


2. Place the 2" x 9" strip of card stock horizontally on your score board and score at 2", 21/2", 3" and 31/2". Fold along each score line. 


3. If you're adding an eyelet to your pull tag, do it now. It is placed on the bottom of the strip of card stock you just scored, furthest away from the folds. 


4. Use glue or double sided tape to adhere the 4" x 53/4" piece of patterned paper to the front of your card blank. You should end up with a small border all around the card. 


5. Place a strip of double sided tape or a thin line of glue on either end of the 4" x 11/4" strip of patterned paper, making sure none of it is applied to the centre. Adhere it across the card front, 2" from the bottom of the card blank.


6. Slide the strip of card stock under the strip of patterned paper so that the folded score lines are at the top and the eyelet (if added) is at the bottom. 


7. Apply some glue or double sided tape to the centre of the strip of patterned paper. The adhesive should be no wider than the strip of card stock. 


8. Secure the strip of card stock to the strip of patterned paper. Be sure to line up the edges and make sure everything is centred before you secure it permanently. This strip is the basis for the interactive component of the card. (note: the strip of card stock should be able to slide up and down behind the patterned paper when pulled by the eyelet end)


9. If desired, stamp a sentiment on the bottom of the strip of card stock. 


10. Now it's time to add the images to your card. Begin with the bottom image, which is the one that will appear last when the card is activated. Apply glue to the first section of the strip of card stock, between the end and the first score line. The hash lines, in the photo below, indicate the area where adhesive should be applied. 


11. Secure the first image onto the adhesive, keeping the top of the mat just below the first score line and centring the image over the strip of card stock. 


12. Now apply adhesive in the next section, between the first and second score line, and add the second stamped image. 


13. Apply adhesive to the area between the second and third score line and attach the third image. 


14. Apply adhesive to the area between the third and fourth score lines and secure the fourth image, which will be the top image on your card. Be careful not to secure the last image too high on the card stock or the strip won't move. You should be able to see the last score line easily.


15. Attach the string through the eyelet (or the ribbon with a staple, etc.) and you're done!


Now you can gently pull on the string and watch the images flip by!


Products:

Sunday, February 12

New Release: Smooth Seas

This new clear stamp set is ideal for creating masculine themed cards, and perfect for anyone who loves the ocean. You can mix and match the images with the sentiment stamps to create cards and projects for lots of different occasions.

Smooth Seas
Clear Stamp Set


Carla, Anesha and Petra have come up with some amazing projects with these stamps. Check out their fabulous backgrounds, awesome colouring and wonderful scene construction right here... and don't forget to visit their blogs for more information and loads of inspiration!

Carla created these two stunning cards using all the images from the set.
She coloured, fussy cut and arranged the images to build these wonderful seascapes.


Petra was super inspired by this set and ended up designing four awesome cards, each using a different image from the set. 


Anesha has wowed us with this beautiful ceramic project featuring the seagull image from the set. What a great gift for someone who loves the sea or lives by the ocean.

Saturday, February 11

Traditional Colours

Today's peacock is in much more familiar colours than yesterday's version. Although it's a little hard to see, I added clear Wink of Stella to his body for some extra glitz and glamour.


Friday, February 10

Negative Colouring

I started out by printing the peacock image from the "True Beauty" digital stamp set onto a piece of dark blue card stock, and then colouring with white pencil. I really enjoyed working on all the layers of feathers in his tail, and it was surprisingly quick to do. The trickiest part was the bird's eye... the first one I coloured (and binned!) had a strange cock-eyed look to it because I got the highlight and shine in the wrong place. I could tell right away that it wasn't right, so at least I didn't waste time colouring all the feathers only to realise my mistake.


Wednesday, February 8

February Bargains

Love is in the air at Beccy's Place this month, with great deals on these five sets that celebrate all the special people in your life. Create fabulous cards for friends, partners, children and family, and don't forget all those other people who bring happiness to your life, like your gym instructor, dentist... or perhaps your favourite local barista! 
(clear stamp set)
$22.00
$18.00

(digital stamp set)
$6.00
$4.00

(digital stamp set)
$10.00
$8.00

(digital stamp set)
$8.00
$6.00

(digital stamp set)
$6.00
$4.00

Monday, February 6

True Beauty

I have some more fabulous projects to share with you today, all using the new "True Beauty" digital stamp set. These creations were put together by Petra, Anesha and Carla.

Petra went with shades of purple and green for her beautiful card.

Anesha created a beautiful wall calendar in gorgeous jewel colours.

Carla's peacock has been fussy cut and layered over a beautiful, soft background.

True Beauty
digital stamp set

Sunday, February 5

New Release: True Beauty

Looking to put a bit more glam into your card making? With his gorgeous blue body and full tail of jewel-coloured feathers, this peacock may just do the trick. Mix and match the image with one of the sentiments for glamorous projects suitable for any number of occasions, from birthdays and congratulations to notes of encouragement.

True Beauty
digital stamp set

Check out these glamorous projects created by some of my designers.
AJ created this fabulous wall decor to brighten up her living space. Don't you just love the background pattern of peacock feathers?!

Judy has used cool and calming shades of blue to create this stunning card. She's done a beautiful job adding colour to the peacock's tail.

Karen has coloured her card with a wonderful mix of pastels. She fussy cut the image and laid it over her matching background.

Friday, February 3

Yellow Roses

I absolutely love yellow roses, and of all the yellow roses in the world, my favourites are Peace roses, which have a pink edge on each petal. There really wasn't too much decision making needed when it came time to choose colours for this rose bouquet image... a few yellows, some pinks and some greens and I had the perfect palette. 


Wednesday, February 1

January Challenge Winners

Congratulations to the January Challenge Winners!

Teresa H, Dee's Cards & Borqna (Sofia)

You are the randomly chosen winners of last month's challenge.
Please email me at beccysplace@bigpond.com to claim your prize.

February Challenge

Create a card or paper-craft project using any Beccy's Place image, upload a photo of it to your blog and submit a direct link below. The challenge runs from now until midnight on the 28th of February 2017 (AEST)


PLEASE READ THE NEW CONDITIONS CAREFULLY
BEFORE ENTERING THE CHALLENGE
  • Your project must be created during the month of February 2017 and entered into the challenge during the active challenge period. Due to an automated system, late entries cannot be accepted.
  • Your project must include a Beccy's Place image, either free or purchased.
  • You can enter as many times as you like and you can submit your card to any other challenge you wish.
  • At the end of the month three winners will be randomly chosen to receive a $20.00 store credit for any digital stamps at Beccy's Place. To redeem the store credit, winners must have a Beccy's Place customer account. (Please note, you do not need an account to enter the challenge. It is acceptable to create an account in the event that you win. Accounts can be closed at any time.)
  • Each month I will include a re-mastered digital image from my library of freebies. You DO NOT have to use the design on your project, but you MUST use a Beccy's Place image, either free or purchased, to be eligible for entry.
  • Beccy's Place designers may enter the monthly challenge but are not eligible to win prizes.