Monday, July 4

Tutorial - Spinner Cards


Get ready for a bit of interactive fun with these great spinner cards that topple and slide as you tilt the card to the right or left. They are sure to be a hit with whoever receives them and can be easily personalised by choosing a spinner that appeals to your recipient.

Requirements: Coloured card blank folded in half Piece of white cardstock 5 3/4" x 4" Two small coins (eg: Australian 5c piece or U.S. penny) Small coloured and cut out image (I used a little bee) Pencil, ruler, eraser, black pen Craft knife, scissors Double sided tape Foam tape or large foam dots 1/2" circle punch or craft knife and scissors Narrow (less than 1/2" tall) sentiment stamp Stamp pad Assorted flowers and brads

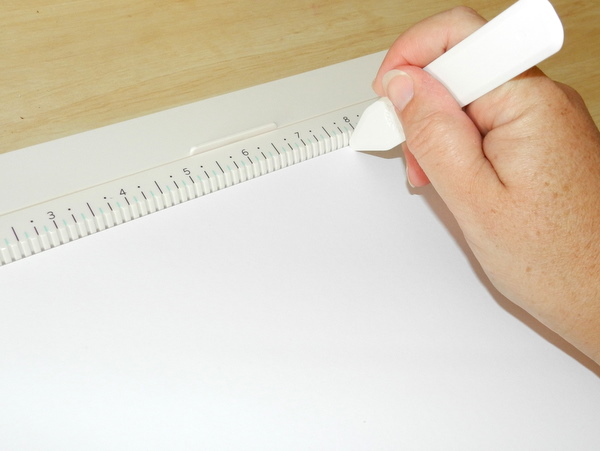
1. On the piece of white cardstock, measure down 3/4" from the top and draw a line across the cardstock. Draw another line 1/2" below the first. Measure 3/4" from each side edge and draw lines. You will end up with a 1/2" wide box across the top of the cardstock that is 3/4" from each edge as in the photo below.

2. If you have a 1/2" circle punch, punch out two circles on either end of the box. Don't worry if you can't reach all the way to the box, just put the punch as far over as it will go. For those of us who don't have a punch, simply round the ends of the box using a circle template, a large pen lid, a bottle top - anything circular.

3. Use a craft knife and/or scissors to cut out the box with the rounded ends.

4. Lay the white cardstock centred over your card blank and lightly trace around the edges of the box.

5. Use a narrow stamp to add a sentiment inside the window you created by tracing the shape of the box. I just used a pen to write the words I wanted.

6. You can add some more stamps or penwork to the white cardstock. I dotted a whimsical border with a black pen.

7. Choose an assortment of flowers or embellishments for the front of your card. Alternatively you could stamp and colour images of your choice or use some appropriate patterned papers.

8. To make the spinner, add a large circular piece of foam tape to one of the coins. The foam tape needs to be big enough to hold the two coins together, but not so big that it takes up the entire surface of the coin. If you don't have circular foam tape, simple cut off the corners of a square piece and roughly round it out like I did.

9. Add the other coin on top to make a "sandwich".

10. Use nice strong double sided tape to adhere the coins to the back of your small coloured image.

11. Place the bottom of the back coin over the bottom of the slot you cut into the white cardstock.

12. Bend the top of the white cardstock slightly until you can get the top of the coin to pop through as well. You should now have a coin on either side of the window with the foam tape forming a channel for the spinner to slide along.

Front view:

13. Use foam tape to attach the white cardstock to the card blank. You will need quite a lot of foam tape around the window to ensure there is enough support for the coins, which are actually quite heavy. Make sure you place your foam tape far enough away from the window for the spinner to move freely.

14. Centre the white card over the card blank and press together firmly.

15. Tilt the card from side to side and watch the bee spin back and forth!

Friday, July 1

Circle Cards

Circle cards are fairly easy to make and would probably fall into the "shaped cards" category, since, obviously, they are shaped like a circle! You just need to remember when cutting your circle card that you must not cut all the way through the folded edge or you will end up with two separate circles instead of a card. And yes... I am speaking from experience, albeit quite a few years ago.


Requirements:
A5 card blank
Folding / creasing tool
Circle cutting tool (I used Spellbinders dies)
Various paper and embellishments for decorating


1. Fold your card blank in half and crease the fold firmly.


2. Place your cutting tool onto the folded card ensuring that some of the cutting edge actually misses part of the fold. If you don't leave in this little bit of fold you will end up with two separate pieces of cardstock and not a joined card.


3. Cut the card using your tool of choice. If you don't have a cutting tool, simply use a compass or a saucer or other round object, trace a circle on your folded card, making sure you leave some of the fold in place, then cut the circle with scissors or a craft knife.


You can see the part of the card where the circle cutter missed actually forms the card fold.


4. To give your card a completely circular front you can cut out another circle the same size and adhere it to the front of your card.


5. Decorate as desired.


copyright Beccy Muir 2011

Wednesday, June 29

Triple Scoop Icecream Cone


Originally Designed: 2011
Remastered: December 2017
Original artwork by Beccy Muir, all rights reserved. Images are for personal use and must not be copied, swapped, shared, resold or mass produced without the express written permission of the artist.

Monday, June 27

Icecream Card

The challenge this week at Card Camp was to create a card using neopolitan colours - pink, brown and white. Well, I was instantly transported back to my childhood when Mum used to bring home a 4 litre bucket of neopolitan icecream from the shops. What joy! The only problem was all that darned pink icecream that was left after we'd scoffed the rest. You know, it's only now that I'm a mother myself that I wonder why she didn't just buy one tub of chocolate and one of vanilla... I really must ask her.

Friday, June 24

Berry Branch


Originally Designed: June 2011
Remastered: December 2018
Original artwork by Beccy Muir, all rights reserved. Images are for personal use and must not be copied,
swapped, shared, resold or mass produced without the express written permission of the artist.

Wednesday, June 22

June Christmas Cards

The June challenge over at Christmas Cards All Year Round was to create five cards with a design of your own choice - anything goes! I drew this little berry branch a couple of weeks ago and thought it would look lovely for Christmas. Teamed with the black and red colours the overall design has a very oriental air I think.

Tutorial - Double Gatefold Card


At my card club recently we did a shoe box swap where we brought along card kits we had put together for the other members at our table. The idea was to pass the kits around so that everyone made a card from each person at the table, resulting in a nice little stash by the end of the day. I decided to make this double gatefold card using punches, butterflies and patterned papers.

Requirements: A4 cardstock base (8 1/4" x 11 3/4") Patterned paper 8" x 3 3/4" Two strips of green patterned paper 8" x 2" Small offcut of white cardstock Vine punch (I used a Martha Stewart punch) Lattice border punch (I used a Martha Stewart border punch) Small flower punch (I used an EK success punch) Self adhesive pearls (I used Kaisercraft pearls) Paper butterflies (I used Collections Elements Creative Butterflies) Sentiment stamp (I used Stamping Up Sincere Salutations) Score board and score tool Foam mat Ink pad Double sided tape Small foam dots Wet glue (I used Glossy Accents) Glue pen (I used Zig Squeeze and Roll)

1. Use the score board and scoring tool to score the cardstock at 1 7/8", 3 7/8", 7 7/8" and 9 7/8". Fold the card in the following way, from left to right: mountain fold, valley fold, valley fold, mountain fold. Open the card back out.

2. Use the border punch to punch a decorative edge down both short sides of the cardstock.

3. Use the vine punch to punch two vine strips from the green paper.

4. Put glue on the back of the stems of the vine (don't worry about adding any glue to the leaves), and adhere the vines as close as possible to the punched edges of the card.

5. Ink the edges of the 8" x 3 3/4" piece of patterned paper and adhere it to the centre panel of the card - you will have a little border around all four edges.

6. Stamp a little sentiment on the bottom of the panel to the right of the centre panel.

7. Punch 10 - 12 little flowers from the scrap of white cardstock.

8. Place the flowers on the foam mat and shape each by pushing a stylus down firmly in the centre of the flower until the petals fold upward.

9. Use wet glue to adhere the flowers to the vine. It is best to group them randomly and offset the two sides so that when the card is closed the flowers aren't all in one place. Add a pearl to the centre of each flower.

10. Cut out two or three butterflies. If you don't have printed butterflies you could stamp and colour some in or download some of the free digis or clip art from the internet.

11. Apply a couple of foam dots on the back of each butterfly wing. Add some wet glue down the centre of each body.

12. Press the butterflies on to the vine in various places. The body should be flush with the card while the wings will be raised by the foam dots.

Fold the whole thing back together and you're done! The card should fit nicely into a standard DL sized envelope or you could get super creative and make your own.