


Slimline cards have become very popular recently and with good reason. They're super easy to make, appropriate for any occasion and can be altered for most card-making styles. There are no hard and fast rules for making slimline cards, just a few things to consider regarding envelopes, decorations and size ratios.

I find it easiest to think about my envelope before deciding on the overall size of my slimline card. Most countries will have a business size envelope that corresponds with the standard paper size for letter-writing. In Australia, our standard paper size is A4 and our business envelopes are DL.
If you don't like making your own envelopes, it's a great idea to size your slimline card to fit one of the standard sizes. For A4, you'll need to remove about 1/3 of the length, which is approximately 10cm.

I find business envelopes, and therefore business-sized cards, a little large for my liking and prefer to have a smaller card and make my own envelope. A good ratio for slimline cards is 1:2, which means the height is half the measurement of the length. To make that super simple, just cut a square of cardstock and fold it in half! Mine is 6" square, which creates a folded card measuring 3" x 6".

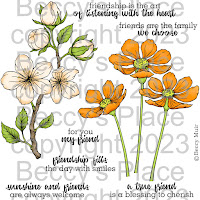
To decorate, I have used one image layered multiple times across a sheet of cardstock. You could also use a very tall or long image, or a series of die cuts, multiple frames, a big ribbon bow... just about anything really.

Trim the image panel to fit the front of your slimline card and add any extra embellishments to finish. I secured some scrap pieces of chipboard to the back of the panel for a little more dimension and weight, then added a sheer ribbon and some glittery stickles.


Stamps:
8 comments:
Fabulous card, Beccy. xx
Beccy, you make the most beautiful cards and designs, thank you for sharing, hugs, Lori m
l do like a slim card and yours is gorgeous x
How Beautiful.
Faith x
Can you please let me know what program you use to layer the stamps. I absolutely love this look but no idea how to make it happen. Thank you for all the inspiration and love you share!
April
Hi April. I use MSWord to layer and print my digital stamps. Most of my new designs are png files, which means they have no white background and can be layered together without part of the bottom image disappearing behind whatever you place on top.
Here's a quick how-to:
1. Open a blank page in MSWord.
2. Insert the image you want to use, click on it, then drag the corners in or out to change the size.
3. Add several more images to your page. You can insert them or just copy and paste if you prefer. Again, change the sizes to whatever you require.
4. Right click on one image and select "Wrap Text", then select "Behind Text". This will shift it to the back, behind the other images. Do this to each image.
5. Click on the images to move them around with your mouse. Once you're happy with their positions, hit print.
I hope that helps April, please let me know if you need further info.
Cheers,
Beccy
Beautiful card and wonderful tutorial, Beccy! The color orange makes me feel all warm and cozy on this cold morning! hugs, de
Wow, this is a beautiful slimline card ! Love the orange colour you have chosen, and love the scalloped borders! Creative regards, Gina
Post a Comment