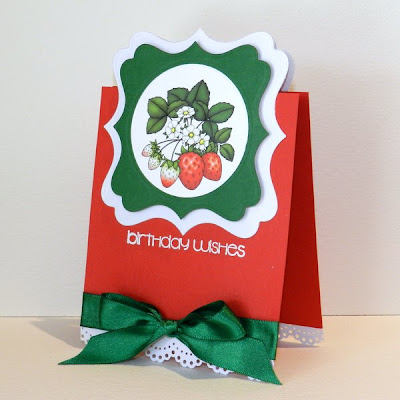
Topper or Over the Edge cards are basically cards that have a part of the design that extends beyond the usual straight edges of the card, generally at the top. There are many different ways to make these cards but the tutorial I would like to share with you today uses Spellbinders Nestabilities (you can substitute your favourite dies or shape cutters).
Labels 16 die by Spellbinders
Standard Circles (large) by Spellbinders
Border punch of choice
2 pieces of red cardstock measuring 4" x 4 1/2"
2 pieces of white cardstock measuring 4" x 2"
1 piece of white cardstock measuring 4" x 8"
1 piece of green cardstock measuring 3 1/2" x 3 1/2"
Small square or circular image
Adhesives
Green ribbon
Sentiment Stamp + Ink
1. We'll start by making the small frame for the image. Use the second largest Labels 16 die and the 4th largest Standard Circle die to cut a frame from the green cardstock. You can make both these cuts at the same time by lining the dies up on the cardstock as shown in the picture below. Make sure the circle die is centred nicely inside the labels die.
2. Once you've made the cuts, it's nice to finish the frame with an embossed edge, so run it all back through the Cuttlebug (including the dies) with the rubber shim. Reserve the circle cut from the centre of the frame for another project. (I have a draw full of reserved pieces!)
3. Adhere the frame around the image. I used a combination of repositionable glue and double-sided tape.
4. Fold the white 4" x 8" piece of cardstock in half so you end up with a card measuring 4" square.
5. Use the largest Labels 16 die to cut out a shaped card making sure you don't cut all the way through the folded edge. Look closely at the photos below, you will notice that the die hangs over the folded edge just a little bit. This will ensure I have a folded card after the cut is made and not two separate pieces of cardstock.
6. Use the largest of the Labels 16 dies to cut a shape from the white cardstock measuring 4" x 4". Emboss the edges by running it back through the Cuttlebug with the rubber mat.
7. Adhere the die cut shape to the front of the shaped card you cut earlier. This will hide the flat folding edge.
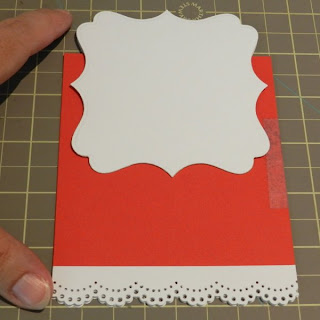
8. Use your border punch to add a decorative edge to both pieces of white cardstock measuring 4" x 2". Adhere them to the bottom of the red cardstock using double sided tape.
9. Align the two pieces of red cardstock and secure them with a piece of tape. (Remove some of the stickiness from the tape first so that you don't rip your cardstock when you attempt to remove it. You can do this by sticking it to your clothes a couple of times until it is less tacky - notice the blue fuzz from my pants!)
10. You want your entire card to measure 6" long. It's easiest to get this measurement by laying your card on a cutting mat and lining the edges up with the lines on the mat. Start by placing the centre top of the white shaped card at the very centre of your mat - 6" from the sides and 6" from the top and bottom. Use some more tape to hold it in place (put the tape on the inside of the card as you will need to slide the red pieces of cardstock inside).
11. Place the two pieces of red cardstock inside the shaped card, sliding them around until the white decorative edge at the bottom of the red cardstock sits flush along the 0" line on your mat. This will mean your completed card will be 6" long. Use some double-sided tape or glue to adhere the white shaped card to the red cardstock where they overlap.
12. Now it's time to add the embellishments. I heat embossed a sentiment on to the red cardstock, just below the white shaped card, then tied a green ribbon around the bottom.
13. Add the framed image to the centre of the white card with foam tape and you are done!
copyright Beccy Muir 2012


14 comments:
beautiful! thank you for sharing
Great! Love your work!
What a fabulous tutorial I also have lots of pieces I've kept but never seem to anything with them, maybe I need to make a point of using them before cutting more.
Fab technique, thanks for sharing
Margaret :o)
Thank you so much for the step-by-step directions! Increases confidence that I can actually do this. These are beautiful!
FAB tut Beccy, many thanks for this as its not at all what I had initially expected!
Super card!
Keryn x
Great tut Beccy, another how-to to add to my list of things to try :)
thank you for the tutorial beccy.
greetings karin
Thank you for this wonderful Tutorial Beccy!!! I love your work.
Hugs,
Tryny
Great step by step tutorial, thank you so much for sharing.
Thank you for this fantastic tutorial.
Hugs
Natali
Lovely card...will have to try this one.
An amazing tutorial--thanks! Pinning it! :)
This is awesome! I think im stealing this idea.
Post a Comment