


I enjoy making dimensional cards full of handmade flowers, loads of embossing, ribbons and pearls, but their bulk makes them very difficult to package, and you can forget about using a standard envelope! What you need is a custom made, matching box that not only houses your beautiful card, but also becomes a work of art in itself.

1. Measure your card. Your box will need to be slightly bigger than the card - just enough that you will be able to put the card in easily, but not so big that the card then slides around inside. I generally add 1/4" to the height of the card and 1/4" to the width of the card to get my box dimensions. I like my boxes to be about 3/4" deep, which has so far been enough to accomodate any of the embellishments I've used on my cards.

2. Okay, now for the maths... My finished card measures 8 1/4" x 4". I want my box to be slightly bigger than my card so I will add 1/4" to both the height and the width bringing the total to 8 1/2" x 4 1/4".
3. We now need to add in the measurements for the depth of the box. These will be the sides that fold up. As I said in step one, I like to make my boxes about 3/4" deep, which means we need to add that measurement to each of the four sides. That will bring the total measurement to 10" x 5 3/4".
4. Using the final measurements you figured out in step three (in my case 10" x 5 3/4"), cut two pieces of cardstock - one for the base and one for the lid.
5. Place one of the cardstock pieces on your scoreboard and score each of the four sides at 3/4". This will be the base of your box.

6. The lid of the box needs to be slightly wider than the base or it won't slip on properly. On my scoreboard I have an extra little line on the left hand side that is a fraction of an inch away from the O. I line my cardstock up with this mark and then score at 3/4". Turn the cardstock 90 degrees, line it up with the same mark and score at 3/4". Repeat for the other two sides. You will now have marked the lid of your box that will be slightly wider and slightly longer than the base. Set it aside while we complete the bottom of the box.

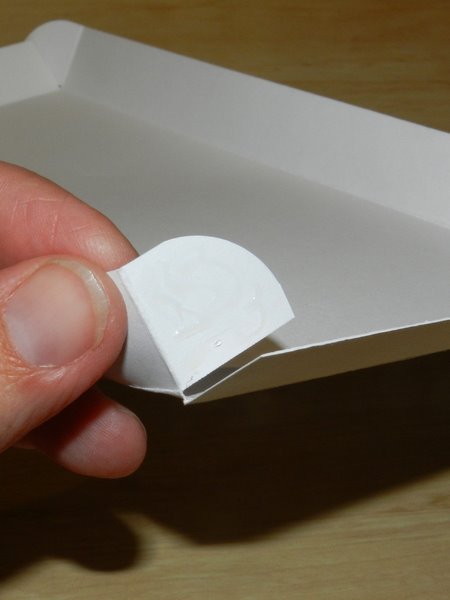
7. Have a look at the corners of your cardstock where the score lines intersect. To help with the folding and construction of the box we're going to cut away one of the score lines on each corner with a small pair of scissors. Remove the score line up to where it intersects the second score line as in the pictures below.


 8. Fold along the score lines.
9. Add some glue or double sided tape to the small tabs you formed on each corner of the box. Adhere them to the inside of the box forming nice, straight, square corners.
10. The base of your box is now complete.

11. To make the lid, remove the score lines in each of the four corners as we did in step seven. Now we are going to cut out a section of the lid so that we can see through to the card inside. I often cut out the aperture with a craft knife and ruler to give me a simple rectangular window, but now and again I get fancy and pull out a nestability to do the job. It really doesn't matter what shape you choose to make the window, but try to leave at least 1/2" between the edge of the window and the score lines.

 12. Now fold up and adhere the tabs of the lid in the same manner as you did the base.
13. Adhere a piece of plastic to the inside of the lid with double sided tape. (If I may briefly get upon my soapbox... consider going green and harvesting some plastic from packaging around your home - ironically, I found my plastic on an old package of Christmas cards I purchased years ago! There's really no need to go out and buy transparencies or acrylic sheets when so many of our everyday items come prepackaged in plastic. Not only does it save money, but also our world.)


22 comments:
Love it!!!!!
So nice this was:)
bente
Great tutorial Beccy, thank you. Gorgeous card love the dimension. :-) xx
That is so neat and another wonderful tutorial.
This is another fantastic tutorial Beccy, you are so generous with your knowledge. Im very much the same, its not doing any good if its just stuck in our own heads alone. I love doing tutorials. This is a really lovely way to send a card and a pretty display box too. Lee xx
Thank you Beccy for the tutorial.
just beautiful, thank you beccy for the tutorial.
greetings karin
what a clever piece of work Brilliant!
Greetings Baukje
Hi Beccy and oh so many thanks to you for this fantastic tutorial which i have been 'hanging out' for lol....my first craft attempt after the chores tomorrow morning....cheers, Annie. NSW..XX
A great tutorial Beccy and a wonderful project. It really has the WOW factor. Thanks for sharing your ideas and knowledge with us.
Love Joan xx
This is awesome! Thank you so much for sharing.:)
Thank you so much. This is a great, easy to understand, tutorial :) I can hardly wait to try it! Your box card is just gorgeous, as usual :)
Great, easy to follow tutorial. Your projects are so beautiful. Thank you for sharing. Hugs.
Wow what a wonderful card!
Thanks for the tutorial.
xAndrea
Thanks for the instruction Beccy. I referenced this with a direct link on http://mindovermattercreations.blogspot.com/2011/09/almost-weekend.html
Thanks. Lisa
This is beyond gorgeous Beccy. Thanks so much for telling us how to figure the measurements in case we want a different size. "Hugs" Carol
Great idea!!!!
I love this it is excellent!
Fabulous Idea I am going to give it a go tomorrow - hope I can do it.
So nice I like these cards a lot thanks for this super amazing content
Thank you very much Beccy
Thank you very much Beccy
Post a Comment