

Last month I shared a Christmas album I created that had a wrap around cover. Following that post, I received a few lovely emails asking for a tutorial for how to put one together, which is what I've been doing for the past few days. This is a tutorial ONLY for the outside of the album, there are no pages, but you can see where they would be attached.


1. Start by creating the spine for your album. This is the section that you will attach all the individual pages to and it's what will determine the width of your finished album. I want my album to measure 6" square so I'm using a piece of card stock that is 6" wide x 111/4" long, which will allow me to add eight pages.
2. Place the card stock horizontally on your score board and make the first score line at the 1/2" mark. After that first score line, there is a pattern to follow. Measuring from the last score line, go ahead 1/4", then 1/2", another 1/2", 1/4", 1/2", 1/2",1/4", 1/2", 1/2",1/4", 1/2", 1/2",1/4", 1/2", 1/2", 1/4".... continue until you have reached the end of the card stock. You should finish on a single 1/2".

3. Now it's time to fold along the score lines. The line between each 1/2" score line is a mountain fold and all the others are valleys.

4. Apply double sided tape on the back of the card stock, between each 1/2" score line and press them together. You should end up with eight little tabs with 1/4" gaps between them. These tabs will hold the individual pages of your album.

5. Your spine should look like the photo below. The back is flat, which is where you apply the glue to hold it inside your album cover.

6. Now measure the width of the spine you created. As you can see, mine is 23/8" which is the measurement I will use for my album.

7. I'm making the album cover out of heavy chipboard, which I've cut to the sizes I want. For an album measuring 6" x 6" and 23/8" wide you will need the following chipboard:
- two pieces that are 6" x 61/2" for the front and back cover
- one piece that is 6" x 23/8" for the album spine
- one piece that is 6" x 21/2" for the end
- one piece that is 6" x 2" for the closure

8. Here I have them laid out, in order, on two pieces of card stock that I'm using for the outer cover. I have attached the two piece together with some tape.

9. Use some liquid glue to attach the chipboard to the card stock. I'm using a ruler to make sure my chipboard stays straight as I secure it across the card stock.

10. This step is very important for creating an album that doesn't tear when you put it all together. Create a shim from three pieces of the chipboard you're using. Glue them all together so that you have a piece that is three times as thick as your regular chipboard. You'll use this little shim as the spacer between the pieces you're gluing. DO NOT PLACE THE CHIPBOARD ANY CLOSER OR YOUR CARD STOCK WILL TEAR AND YOUR ALBUM WILL FALL APART.


11. Use the shim to space each piece of chipboard. Don't throw it away... save it for the next album you make!

12. Okay, we have all our pieces attached firmly to the card stock and the glue has dried. I like to apply some matt varnish to each of the folds to help strengthen them. I highly recommend this step, particularly for albums that are going to be handled a lot. An alternative to varnish is to place a piece of washi or masking tape on the inside of the card stock where the folds will be. It gives extra strength to the card.


13. Fold the edges of the card stock up around the chipboard on all four sides. Use a bone folder to press the seams, then unfold again.

14. Using liquid glue or strong double sided tape, start gluing the card stock to the chipboard, beginning with the four corners. Keep the folds nice and crisp and press them firmly for a nice flat finish.


15. Once the four corners are secure, glue and fold up the four sides. Allow the glue to dry completely.

16. Use a bone folder or ball tool to score along all the fold lines, taking care not to pierce the card stock. Fold along each of the score lines. Now you have created the basic album cover!


17. Time to secure the folded spine inside the album. Use some strong glue or double sided tape to secure the folded spine to the chipboard.


18. Apply some more glue to the two end pieces and secure them on either side of the gaps. Use your bone folder or ball tool to score either side before folding your album cover up.


Now you can decorate your album cover in any way you like. I would normally use papers and embellishments to decorate my album, but today I decided to go with a mixed media compilation. I've included some photos of the process I used to decorate my album. I won't go into too much detail, but feel free to ask me any questions in the comment section below.


Masking tape and plaster tape for texture.
The tape gives the folds a little more strength too.
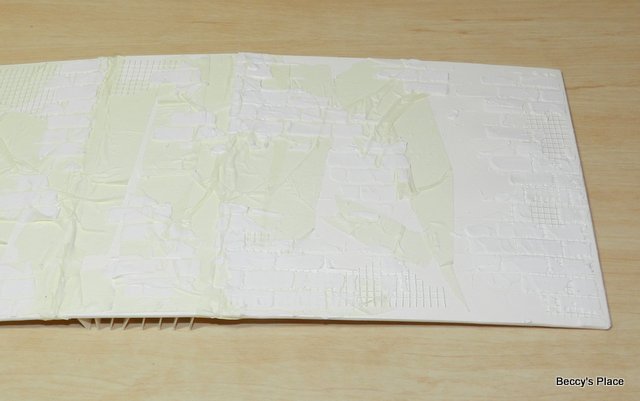
Some texture paste applied through a stencil.

Figuring out where I want the metal closure.
(I haven't realised that I'm putting it on upside down!)

I've added flowers, chipboard and wood pieces.

A coat of gesso preps my album for colour.


Spritzes and sprays until I'm happy

Applying a top coat of gesso to tone down the colour and bring everything together. I like to use my finger for this step, it keeps the paint on the highest parts of the surface so I don't lose too much colour or texture.

Gesso has dried and I've applied a coat of spray varnish.


Applying the hardware with glue and brads.
... yep, still upside down, but I'm about to realise...

... and turn it around.

I decorate the inside last so that I can cover up the stems of the brads.


Here I'm applying some washi tape on the back of the patterned paper, directly over the chipboard joins. This will give the paper lots of extra strength for all that bending and folding.


Covering the far right hand side first...

Then finishing off the centre, ready for some pages.
Happy Crafting Everyone!
Cheers,
Beccy
Beccy
Photos and written instructions are copyright Beccy Muir.
All rights reserved.


